Managing data ingress and egress#
Data ingress#
It is the Dataset Provider Representative’s responsibility to upload the data required by the safe haven.
The following steps show how to generate a temporary, write-only upload token that can be securely sent to the Dataset Provider Representative, enabling them to upload the data:
In the Azure portal select Subscriptions then navigate to the subscription containing the relevant SHM
Search for the resource group:
shm-<YOUR_SHM_NAME>-sre-<YOUR_SRE_NAME>-rg, then click through to the storage account ending withsensitivedataBrowse to and ensure that the data provider’s IP address is one of those allowed under the Firewall header
If it’s not listed there are two possible approaches to take:
Either: directly add the IP address on the Networking page in Azure.
Or: use
dshto modify and redeploy the configuration with the IP address added to thedata_provider_ip_addresseslist. See the Update IP address and redeploy section below for details.
Browse to from the menu on the left hand side
Click ingress
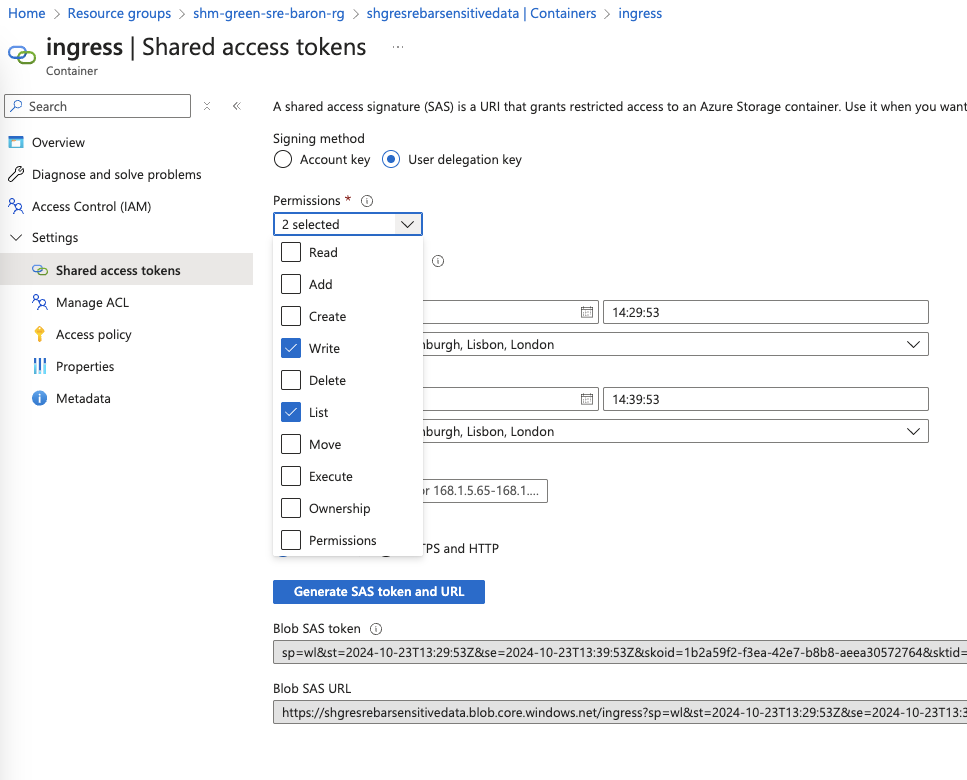
Browse to and do the following:
Under Signing method, select User delegation key
Under Permissions, check these boxes:
Write
List
Set a 24 hour time window in the Start and expiry date/time (or an appropriate length of time)
Leave everything else as default and click Generate SAS token and URL
Copy the Blob SAS URL
Send the Blob SAS URL to the data provider through a secure channel
The data provider should now be able to upload data
Validate successful data ingress
Browse to (in the middle of the page)
Select the ingress container and ensure that the uploaded files are present
Once the user has uploaded the data, or the ingress time window has expired, the IP address must be removed from the firewall rules. See the Follow-up tasks section below for details.
Data egress#
Important
Assessment of output must be completed before an egress link is created. Outputs are potentially sensitive, and so an appropriate process must be applied to ensure that they are suitable for egress.
The System Manager creates a time-limited and IP restricted link to remove data from the environment.
In the Azure portal select Subscriptions then navigate to the subscription containing the relevant SHM
Search for the resource group:
shm-<YOUR_SHM_NAME>-sre-<YOUR_SRE_NAME>-rg, then click through to the storage account ending withsensitivedataBrowse to and check the list of pre-approved IP addresses allowed under the Firewall header
Ensure that the IP address of the person to receive the outputs is listed. If it’s not listed there are two possible approaches to take:
Either: directly add the IP address on the Networking page in Azure.
Or: use
dshto modify and redeploy the configuration with the IP address added to thedata_provider_ip_addresseslist. See the Update IP address and redeploy section below for details.
Browse to
Select the egress container
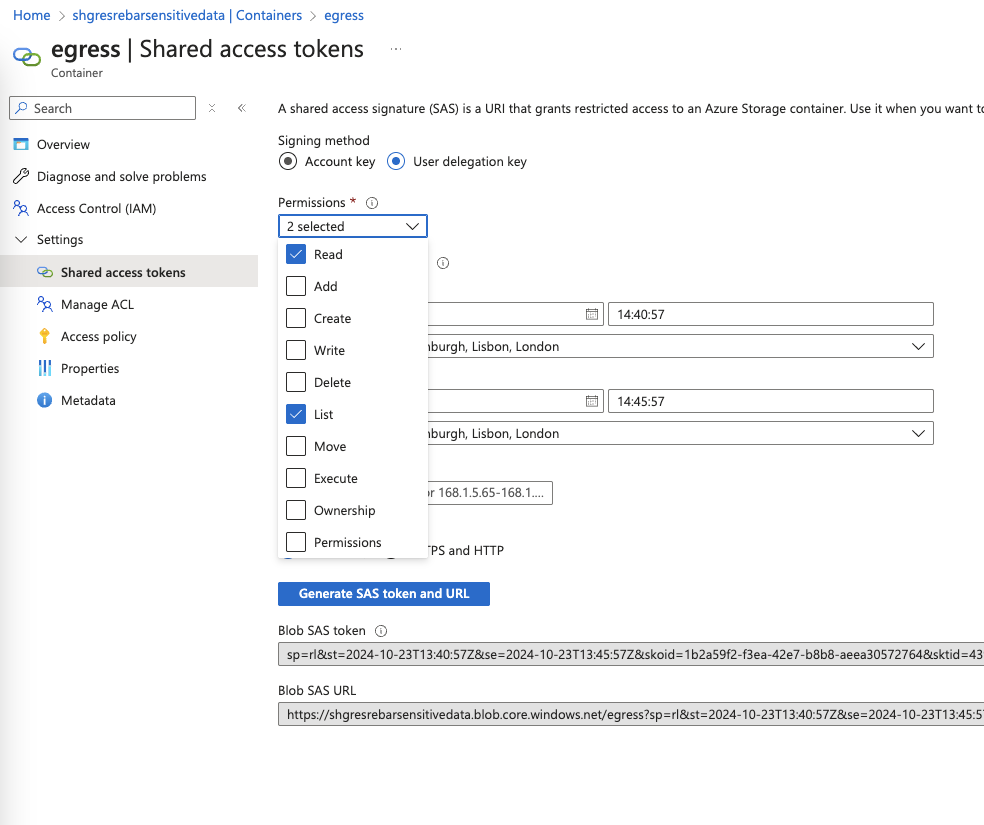
Browse to and do the following:
Under Signing method, select User delegation key
Under Permissions, check these boxes:
Read
List
Set a time window in the Start and expiry date/time that gives enough time for the person who will perform the secure egress download to do so
Leave everything else as default and press Generate SAS token and URL
Copy the Blob SAS URL
Send the Blob SAS URL to the relevant person through a secure channel
The appropriate person should now be able to download data
Once the user has downloaded the data, or the egress time window has expired, the IP address must be removed from the firewall rules. See the Follow-up tasks section below for details.
Update IP address and redeploy#
For both data ingress and egress the firewall IP addresses must be updated to allow access to the data.
This can be done either through the Azure Portal or by redeploying using the dsh command line tool.
The high-level steps for redeploy using dsh are as follows for reference.
Use
dsh config showto download the existing configuration for the SRE in YAML format.Modify the
data_provider_ip_addresseslist in the downloaded file using your favourite text editor to either add or remove the IP address as appropriate.Upload the configuration YAML file using
dsh.Redeploy the SRE.
This translates into the following commands (where the <sre-name> should be adjusted as appropriate).
dsh config available
dsh config show <sre-name> --file sre-config.yaml
# Edit the sre-config.yaml file to add or remove the IP address
dsh config upload sre-config.yaml
dsh sre deploy <sre-name>
See the Deploy a Secure Research Environment page for full redeployment details.
Follow-up tasks#
Following data egress or ingress the IP address should be removed from the firewall rules to ensure the system remains secure. This task should therefore be performed either after the user has completed the data upload or download, or once the SAS token has expired. The approach taken should reflect the approach you used to add the IP address in the above instructions.
If you added the IP address to the Networking page on the Azure Portal, you should remove it from the same list.
If you used the
dshcommand line tool to redeploy the SRE, you should remove the IP address from the configuration and redeploy. See the section Update IP address and redeploy above for details.
The output volume#
Once you have set up the egress connection in Azure Storage Explorer, you should be able to view data from the output volume, a read-write area intended for the extraction of results, such as figures for publication.
On the workspaces, this volume is /mnt/output and is shared between all workspaces in an SRE.
For more information on shared SRE storage volumes, consult the Safe Haven User Guide.