Deploy a Safe Haven Management Environment (SHM)#
These instructions will deploy a new Safe Haven Management Environment (SHM). This is required to manage your Secure Research Environments (SREs) and must be deployed before you create any SREs. A single SHM can manage all your SREs. Alternatively, you may run multiple SHMs concurrently, for example you may have a group of projects with the same lifecycle which share a different SHM to your other projects.
Explanation of symbols used in this guide#
Powershell command

This indicates a
Powershellcommand which you will need to run locally on your machineEnsure you have checked out (or downloaded) the appropriate tag of the Safe Haven repository from alan-turing-institute/data-safe-haven.
Open a
Powershellterminal and navigate to the indicated directory of your locally checked-out version of the Safe Haven repositoryEnsure that you are logged into Azure by running the
Connect-AzAccountcommandTip
If your account is a guest in additional Azure tenants, you may need to add the
-Tenant <Tenant ID>flag, where<Tenant ID>is the ID of the Azure tenant you want to deploy into.This command will give you a URL and a short alphanumeric code.
Go to URL in a web browser, enter the code and log in to your account on Azure.
Tip
If you have several Azure accounts, make sure you use one that has permissions to make changes to the subscription you are using
Remote command

This indicates a command which you will need to run remotely on an Azure virtual machine (VM) using
Microsoft Remote DesktopOpen
Microsoft Remote Desktopand clickAdd Desktop/Add PCEnter the private IP address of the VM that you need to connect to in the
PC namefield (this can be found by looking in the Azure portal)Enter the name of the VM (for example
DC1-SHM-PROJECT) in theFriendly namefieldClick
AddEnsure you are connected to the SHM VPN that you have set up
Double click on the desktop that appears under
Saved DesktopsorPCs.Use the
usernameandpasswordspecified by the appropriate section of the guide
Tip
If you see a warning dialog that the certificate cannot be verified as root, accept this and continue.
Azure Portal operation

This indicates an operation which needs to be carried out in the
Azure Portalusing a web browser on your local machine.You will need to login to the portal using an account with privileges to make the necessary changes to the resources you are altering
Microsoft Entra ID operation

This indicates an operation which needs to be carried out in the
Azure Portalusing a web browser on your local machine.You will need to login to the portal using an account with administrative privileges on the
Microsoft Entra IDthat you are altering.Note that this might be different from the account which is able to create/alter resources in the Azure subscription where you are building the Safe Haven.
OS-dependent steps
The following icons indicate steps that depend on the OS you are using to deploy the SHM
MacOS
Windows
Linux
1. 🌱 Prerequisites#
An Azure subscription with sufficient credits to build the environment in: we recommend around $3,000 as a reasonable starting point.
Tip
Ensure that the Owner of the subscription is an
Azure Security groupthat contains all administrators and no-one else.We recommend using separate
Microsoft Entra IDsfor users and administrators
PowerShellWe recommend installing the latest stable release of Powershell. We have most recently tested deployment using version
7.4.1.
Powershellcross-platform modulesTip
Check whether you are missing any required modules by running
PS> ./deployment/CheckRequirements.ps1
Either manually install each missing module or install them all with
PS> ./deployment/CheckRequirements.ps1 -InstallMissing
Microsoft Remote Desktop
OpenSSLbrew install opensslError
If
Powershellcannot detectOpenSSLyou may need to explicitly add yourOpenSSLinstallation to yourPowershellpath by running$env:path = $env:path + ";<path to OpenSSL bin directory>
Docker HubaccountThe DSH makes use of several public Docker images. Due to Docker Hub download rate limits, we now require Docker credentials to ensure that all images are successfully downloaded at the time of deployment.
We recommend using a personal access token (PAT) with Public Repo Read-Only permissions rather than your Docker account password. See instructions on Docker for details of how to create a PAT.
Hint
If you run:
PS> Start-Transcript -Path <a log file>
before you start your deployment and
PS> Stop-Transcript
afterwards, you will automatically get a full log of the Powershell commands you have run.
2. 📋 Safe Haven Management configuration#
Management environment ID#
Important
Choose a short ID <SHM ID> to identify the management environment (e.g. project).
This can have a maximum of seven alphanumeric characters.
Create configuration file#
The core properties for the Safe Haven Management (SHM) environment must be defined in a JSON file named shm_<SHM ID>_core_config.json in the environment_configs folder.
The following core SHM properties are required - look in the environment_configs folder to see some examples.
{
  "name": "Name of this Safe Haven (e.g. 'Turing Production Safe Haven').",
  "shmId": "The <SHM ID> that you decided on above (e.g. 'project').",
  "domain": "The fully qualified domain name for the management environment (e.g. 'project.turingsafehaven.ac.uk')",
  "timezone": "[Optional] Timezone in IANA format (e.g. 'Europe/London').",
  "azure": {
    "adminGroupName": "Azure Security Group that admins of this Safe Haven will belong to (see below for details).",
    "activeDirectoryTenantId": "Tenant ID for the Microsoft Entra ID containing users (see below for details on how to obtain this). Note that we preserve the Active Directory name here for compatability with earlier DSH versions.",
    "location": "Azure location to deploy the management environment into (e.g. 'uksouth').",
    "subscriptionName": "Azure subscription to deploy the management environment into."
  },
  "organisation": {
    "name": "Name of your organisation, used when generating SSL certificates (e.g. 'The Alan Turing Institute')",
    "townCity": "Town where your organisation is located, used when generating SSL certificates (e.g. 'London')",
    "stateCountyRegion": "Region where your organisation is located, used when generating SSL certificates (e.g. 'London')",
    "countryCode": "Country where your organisation is located, used when generating SSL certificates (e.g. 'GB')",
    "contactEmail": "Email address at your organisation that will receive notifications when SSL certificates are about to expire."
  },
  "dnsRecords": {
    "subscriptionName": "[Optional] Azure subscription which holds DNS records (if not specified then the value from the 'azure' block will be used).",
    "resourceGroupName": "[Optional] Resource group which holds DNS records (e.g. RG_SHM_DNS_TEST)."
  },
  "repositoryType": {
    "tier2": "[Optional] Whether to use 'mirror' or 'proxy' for tier-2 repositories (default is 'proxy').",
    "tier3": "[Optional] Whether to use 'mirror' or 'proxy' for tier-3 repositories (default is 'proxy')."
  },
  "vmImages": {
    "subscriptionName": "[Optional] Azure subscription where VM images will be built (if not specified then the value from the 'azure' block will be used). Multiple Safe Haven deployments can share a single set of VM images in a common subscription if desired - this is what is done in the Turing deployment. If you are hoping to use images that have already been built for another Safe Haven deployment, make sure you specify this parameter accordingly.",
    "location": "[Optional] Azure location where VM images should be built (if not specified then the value from the 'azure' block will be used). Multiple Safe Haven deployments can share a single set of VM images in a common subscription if desired - this is what is done in the Turing deployment. If you are hoping to use images that have already been built for another Safe Haven deployment, make sure you specify this parameter accordingly.",
    "buildIpAddresses": "[Optional] One or more IP addresses which admins will be running the VM build scripts from (if not specified then Turing IP addresses will be used)."
  },
  "docker": {
    "account": "A Docker Hub account name.",
    "password": "The password or personal access token for the above account. We strongly recommend using a Personal Access Token with permissions set to Public Repo Read-only"
  },
  "overrides": "[Optional, Advanced] Do not use this unless you know what you're doing! If you want to override any of the default settings, you can do so by creating the same JSON structure that would be found in the final config file and nesting it under this entry. For example, to change the size of the data disk on the domain controller, you could use something like: 'shm: { dc: { disks: { data: { sizeGb: 50 } } } }'"
}
Note
This configuration file is also used when deploying an SRE environment.
We recommend that you set the fully qualified domain name to
<SHM ID>.<some domain that you control>.This may require purchasing a dedicated domain so follow your organisation’s guidance.
You must ensure that the group specifed in
azure.adminGroupNameexists in the Microsoft Entra ID for the tenant that you will be deploying into. Depending on your setup, this may be different from the Microsoft Entra ID where your users are created.
Alan Turing Institute default
production uses
<SHM ID>.turingsafehaven.ac.ukdevelopment uses
<SHM ID>.dsgroupdev.co.uk
(Optional) Verify code version#
If you have cloned/forked the code from our GitHub repository, you can confirm which version of the Data Safe Haven you are currently using by running the following commands:
PS> git tag --list | Select-String $(git describe --tags)
This will check the tag you are using against the list of known tags and print it out. You can include this confirmation in any record you keep of your deployment.
(Optional) View full SHM configuration#
A full configuration, which will be used in subsequent steps, will be automatically generated from your core configuration. Should you wish to, you can print the full SHM config by running the following Powershell command:

./deployment
PS> ./ShowConfigFile.ps1 -shmId <SHM ID>
where
<SHM ID>is the management environment ID for this SHM
3. 📁 Setup Microsoft Entra ID#
Warning
If you wish to reuse an existing Microsoft Entra ID please make sure you remove any existing Conditional Access Policies by going to Security > Conditional Access > Policies and manually removing the Restrict Microsoft Entra ID access and Require MFA policies.
You can then continue to the next step: getting the Microsoft Entra tenant ID.
Create a new Microsoft Entra ID#

From the Azure portal, click
Create a Resourceand search forMicrosoft Entra IDScreenshots
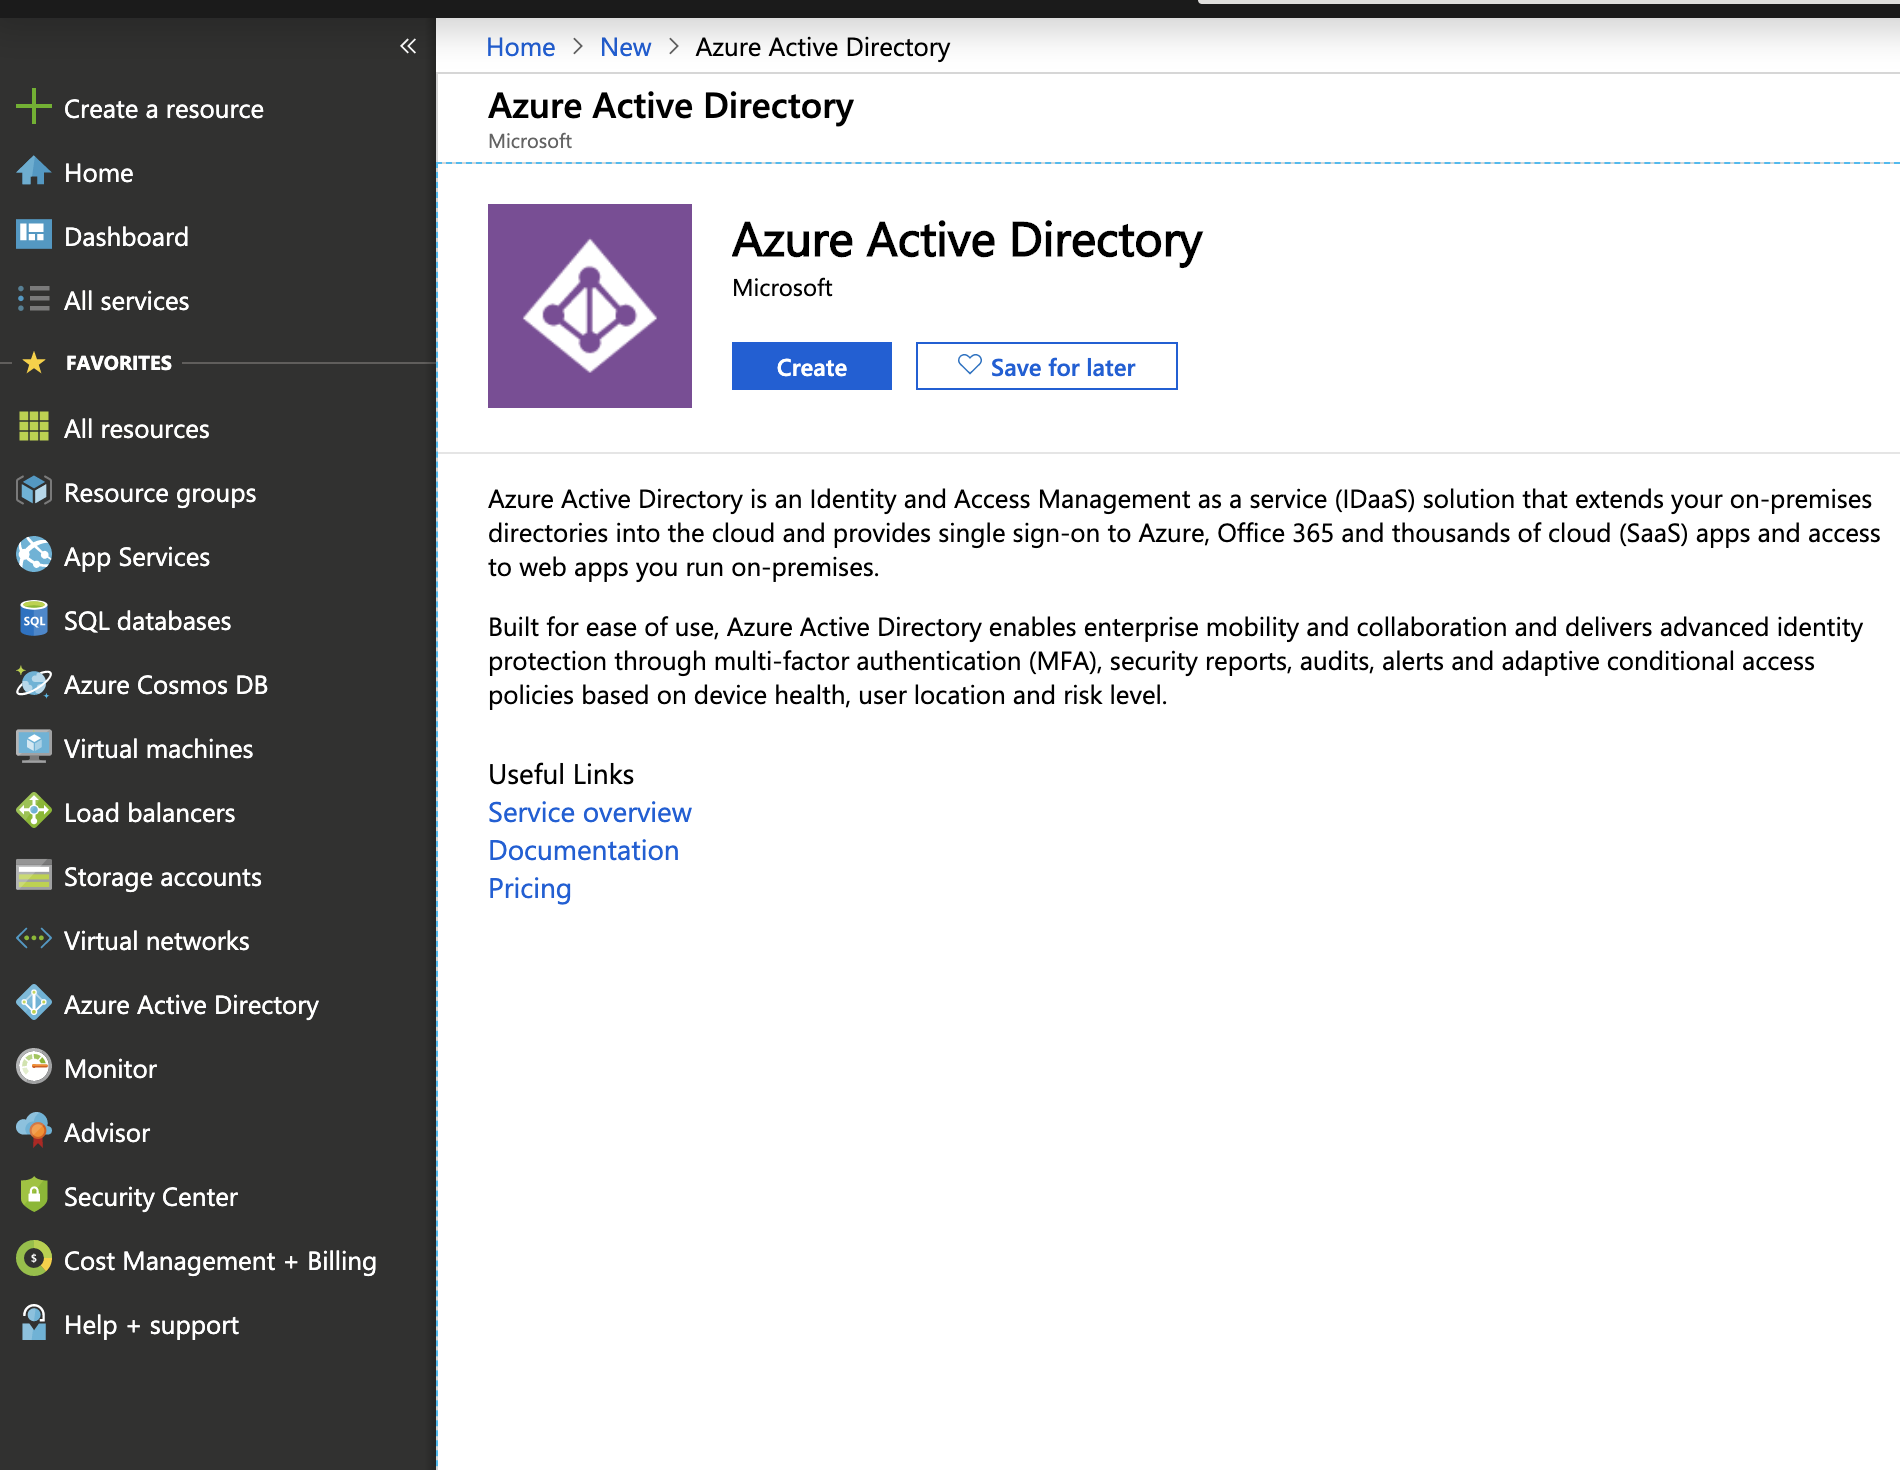
Click
CreateSet the
Organisation Nameto the value of<name>in your core configuration file (e.g.Turing Production Safe Haven)Note: be careful not to confuse this with the
<name>under<organisation>used in the config file
Set the
Initial Domain Nameto theOrganisation Nameall lower case with spaces removed (e.g.turingproductionsafehaven)Set the
Country or Regionto whatever region is appropriate for your deployment (e.g.United Kingdom)Screenshots
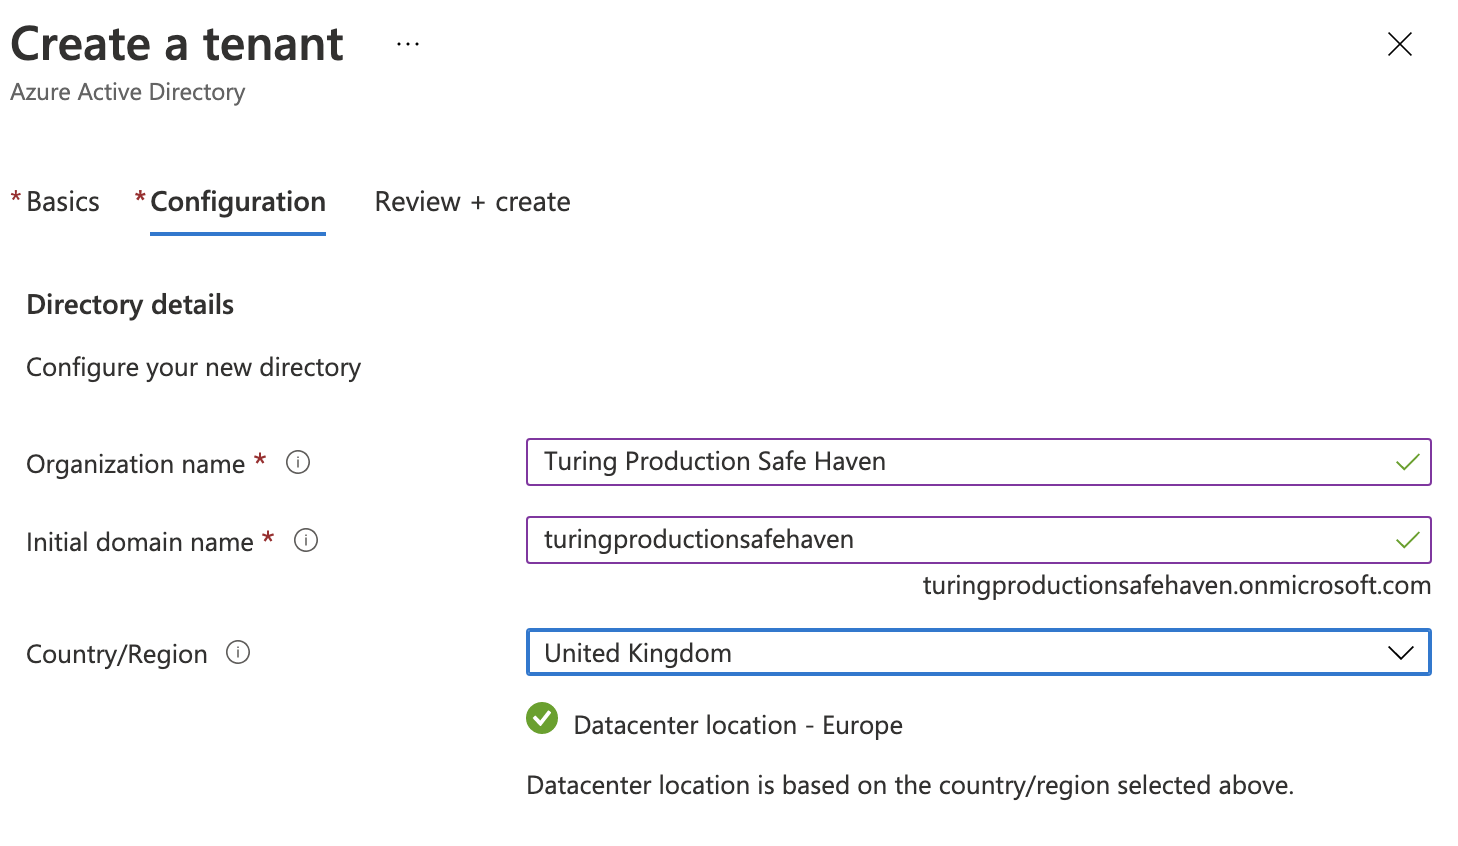
Click
CreateWait for Microsoft Entra ID to be created
Get the Microsoft Entra Tenant ID#
From the Azure portal, navigate to the Microsoft Entra ID you have created. You can do this by:
Clicking the link displayed at the end of the initial Microsoft Entra ID deployment.
Clicking on your username and profile icon at the top left of the Azure portal, clicking
Switch directoryand selecting the Microsoft Entra ID you have just created from theAll Directoriessection of theDirectory + Subscriptionpanel that then displays.
If required, click the “hamburger” menu in the top left corner (three horizontal lines) and select
Microsoft Entra IDClick
Overviewin the left panel and copy theTenant IDdisplayed under the Microsoft Entra ID name and initialsomething.onmicrosoft.comdomain.Screenshots
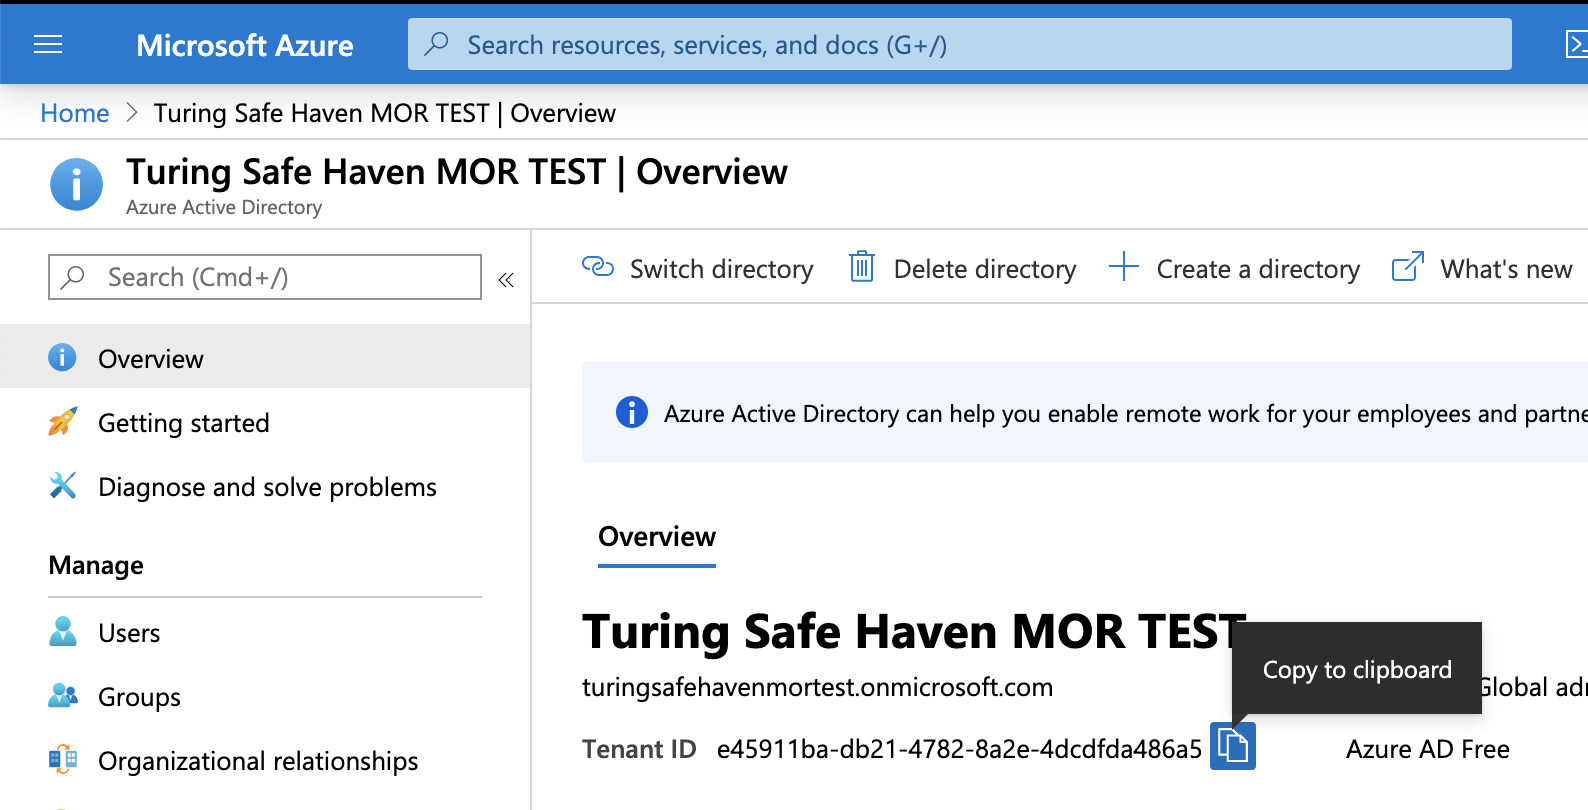
Ensure that you add this to the configuration file for this SHM under
azure > activeDirectoryTenantId.
4. 🚪 Register custom domain with Microsoft Entra ID#
Configure DNS for the custom domain#

./deployment/safe_haven_management_environment/setup
PS> ./Setup_SHM_DNS_Zone.ps1 -shmId <SHM ID>
where
<SHM ID>is the management environment ID for this SHM
Error
If you see a message You need to add the following NS records to the parent DNS system for... you will need to add the NS records manually to the parent’s DNS system, as follows:
Manual DNS configuration instructions
To find the required values for the NS records on the portal, click
All resourcesin the far left panel, search forDNS Zoneand locate the DNS Zone with the SHM’s domain.The NS record will list four Azure name servers which must be duplicated to the parent DNS system.
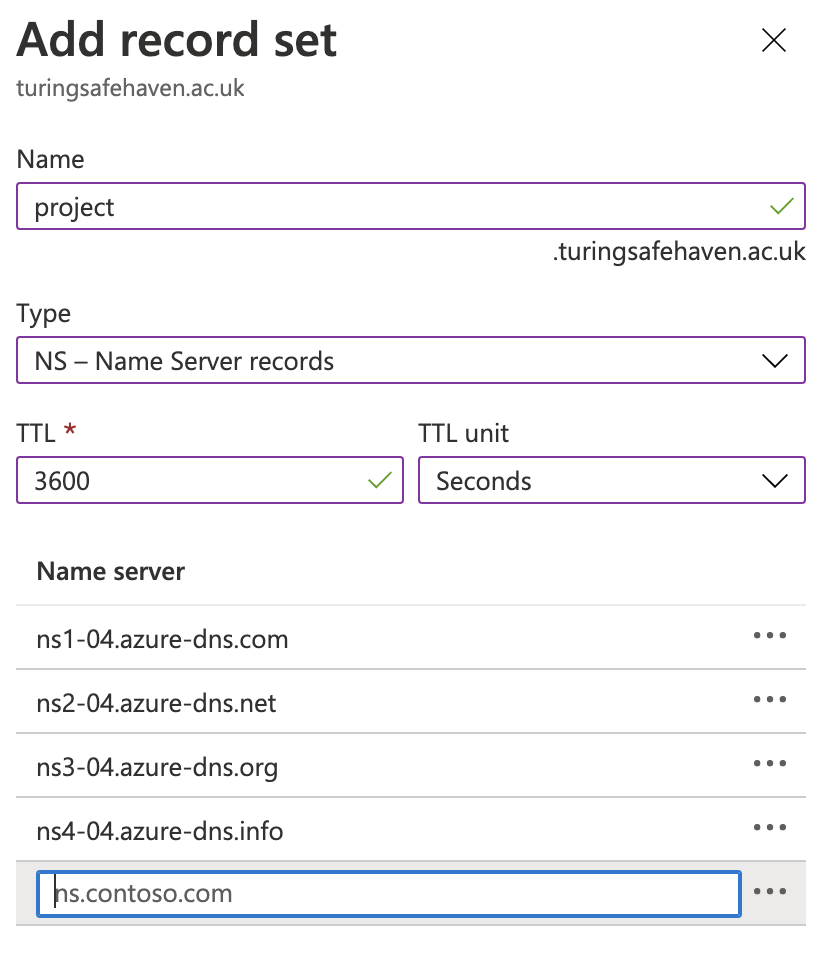
If the parent domain has an Azure DNS Zone, create an NS record set in this zone.
The name should be set to the subdomain (e.g.
project) or@if using a custom domain, and the values duplicated from aboveFor example, for a new subdomain
project.turingsafehaven.ac.uk, duplicate the NS records from the Azure DNS Zoneproject.turingsafehaven.ac.ukto the Azure DNS Zone forturingsafehaven.ac.uk, by creating a record set with nameproject
If the parent domain is outside of Azure, create NS records in the registrar for the new domain with the same value as the NS records in the new Azure DNS Zone for the domain.
Add the SHM domain to the Microsoft Entra ID#
./deployment/safe_haven_management_environment/setup
PS> ./Setup_SHM_AAD_Domain.ps1 -shmId <SHM ID>
where
<SHM ID>is the management environment ID for this SHM
Error
If you get an error like Could not load file or assembly 'Microsoft.IdentityModel.Clients.ActiveDirectory, Version=3.19.8.16603, Culture=neutral PublicKeyToken=31bf3856ad364e35'. Could not find or load a specific file. (0x80131621) then you may need to try again in a fresh Powershell terminal.
Error
Due to delays with DNS propagation, the script may occasionally exhaust the maximum number of retries without managing to verify the domain. If this occurs, run the script again. If it exhausts the number of retries a second time, wait an hour and try again.
5. 🔨 Create Microsoft Entra administrator accounts#
A default external administrator account was automatically created for the user you were logged in as when you initially created the Microsoft Entra ID. This user should also not be used for administering the Microsoft Entra ID.
Several later steps will require the use of a native administrator account with a valid mobile phone and email address. You must therefore create and activate a native administrator account for each person who will be acting as a system administrator. After doing so, you can delete the default external user - we strongly recommend that you do so.
Tip
In order to avoid being a single point of failure, we strongly recommend that you add other administrators in addition to yourself.
Caution
An emergency access admin account is created later in the deployment process. This should not be used except when absolute necessary. In particular, it should not be used as a shared admin account for routine administration of the Safe Haven.
Create a new account for each administrator (including yourself)#

From the Azure portal, navigate to the Microsoft Entra ID you have created.
Click
Usersin the left hand sidebar and click on the+New usericon in the top menu above the list of users.
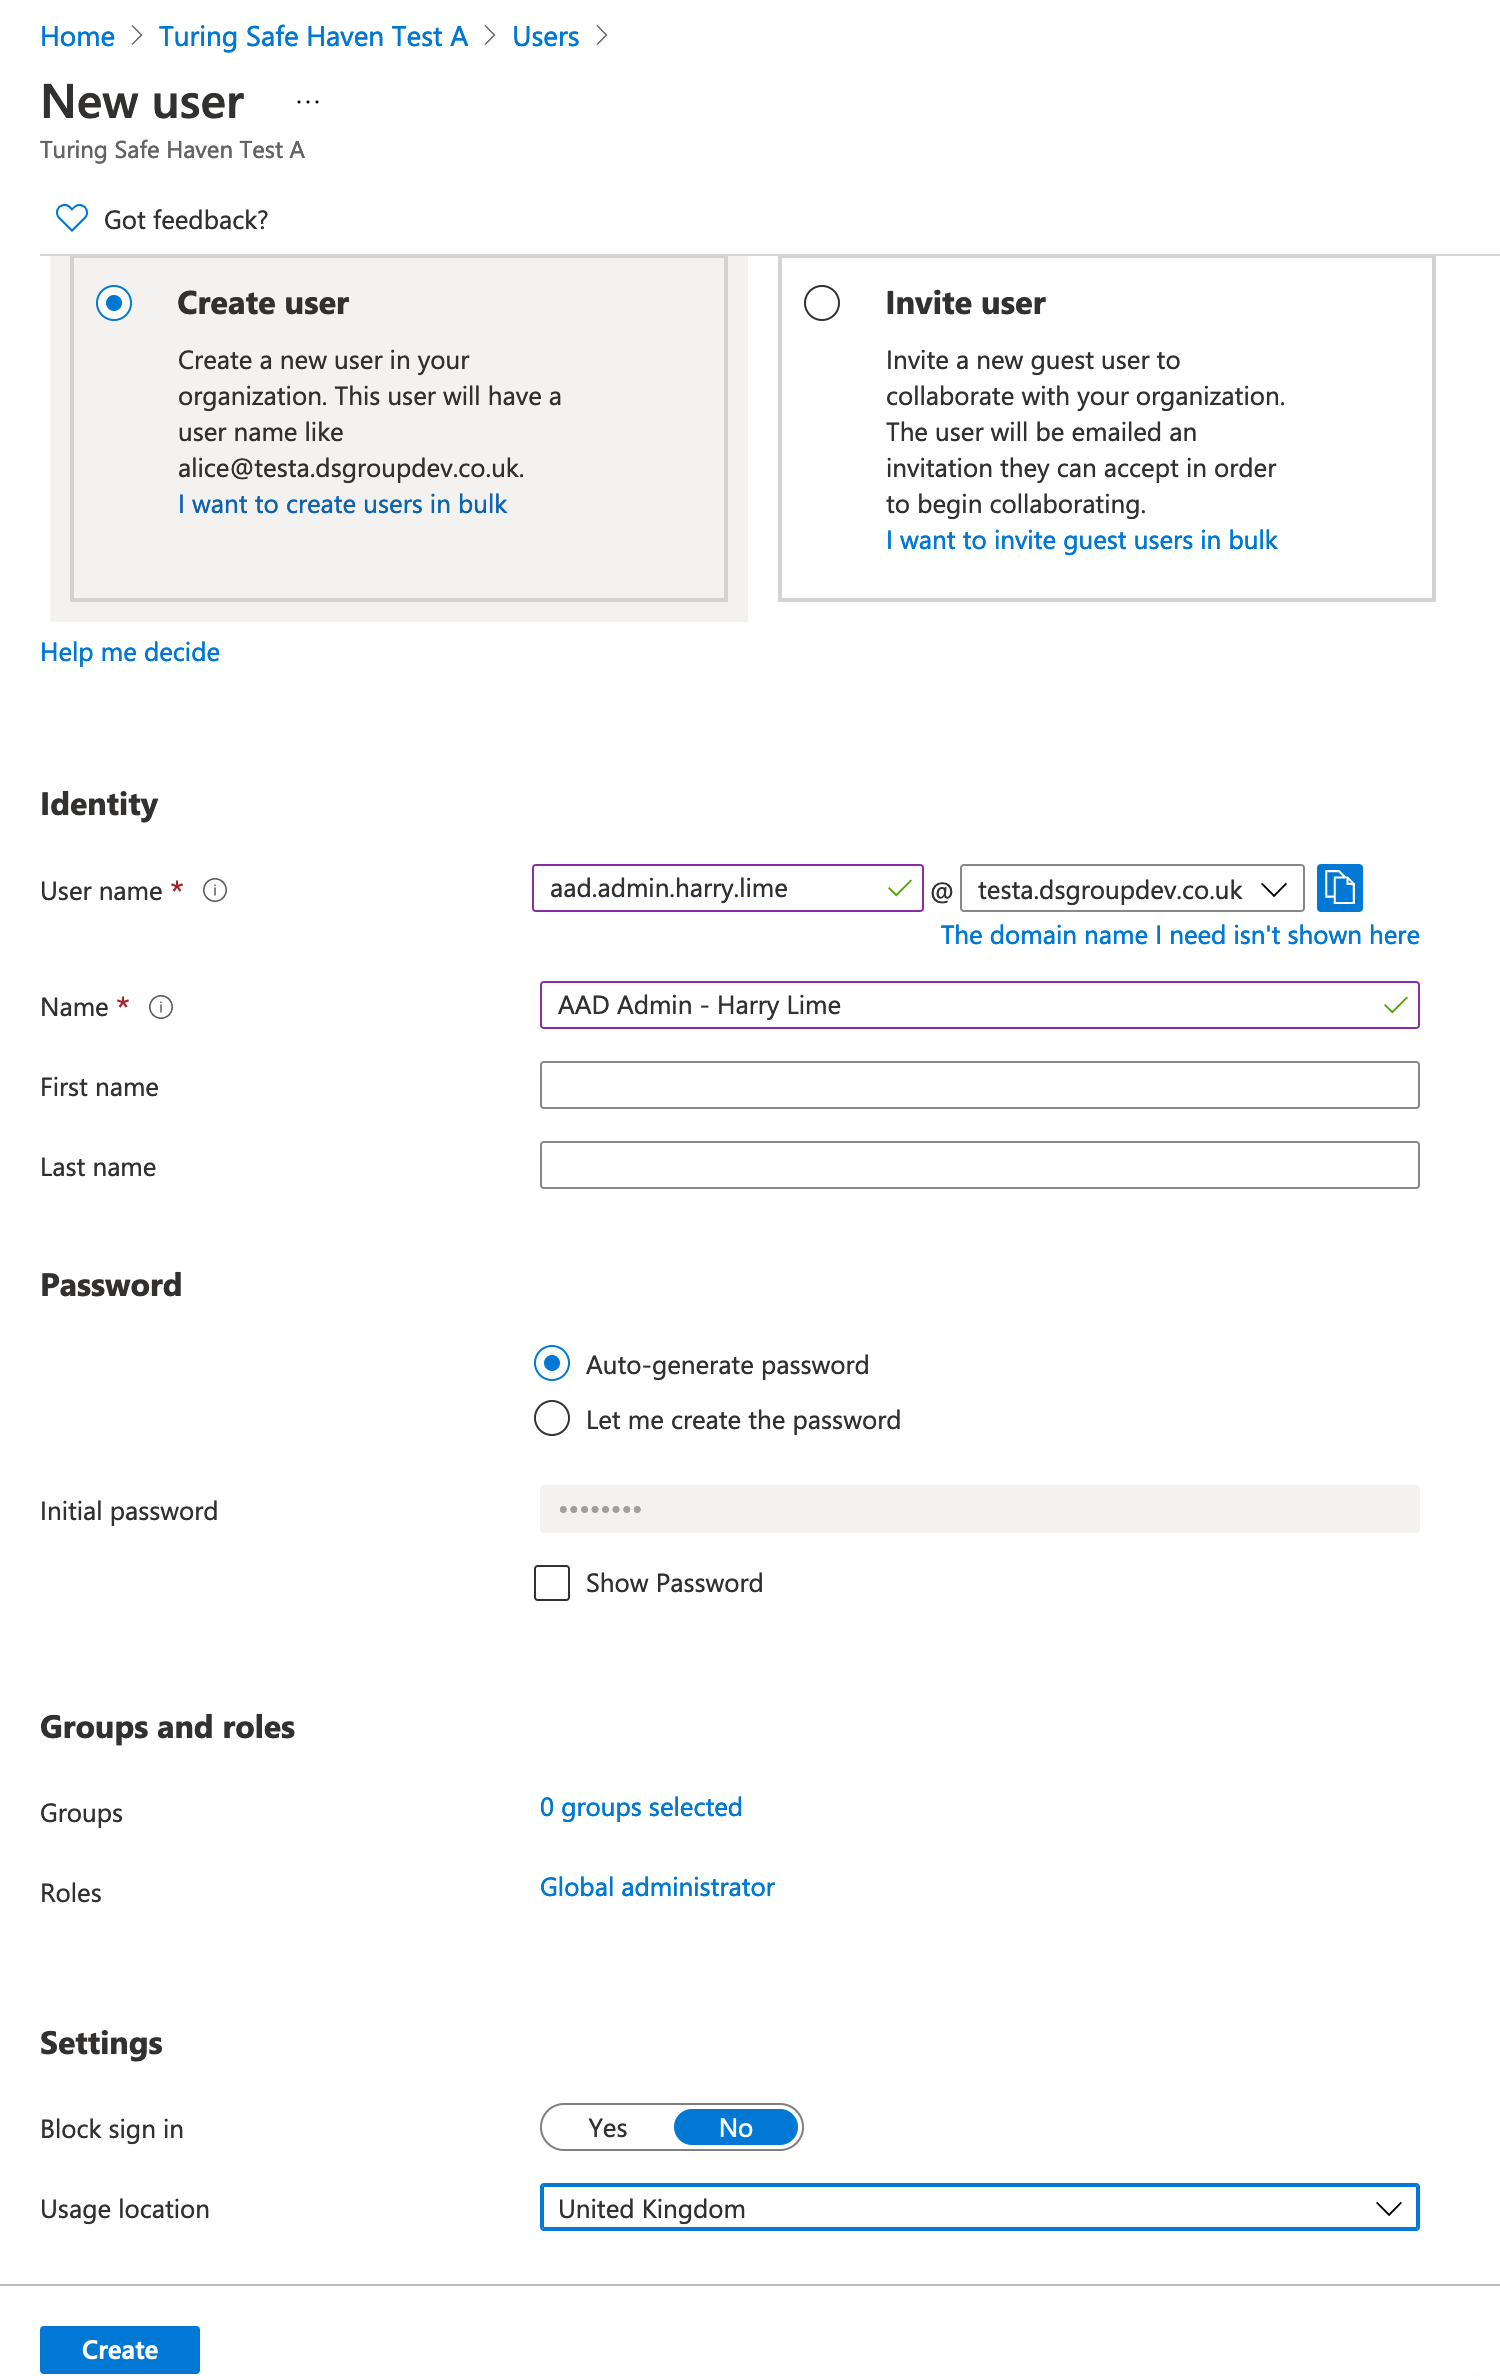
Create an internal admin user:#
User name:
aad.admin.firstname.lastname@<SHM domain>Name:
AAD Admin - Firstname LastnameLeave
Auto-generate passwordset. Users will be able to reset their passwords on first login and it is good security practice for admins not to know user passwords.Click the
Userlink in theRolesfield and make the user an administrator:Search for
Global AdministratorCheck
Global AdministratorClick the
Selectbutton
Set their usage location to the country you used when creating the Safe Haven Microsoft Entra ID
Leave all other fields empty, including First name and Last name
Click
Create
Add authentication methods for self-service password reset#
Navigate to
Usersand click on the account you have just created.Click on
Propertiesand then edit theContact infosection.Add the the user’s mobile phone number to the
Mobile phonefield. Make sure to prefix it with the country code and do not include the leading zero (e.g.+44 7700900000).They will need to enter their number in exactly this format when performing a self-service password reset.
Do not add anything in the
Emailfield here as this will prevent you from using the same email address for a user account.Click the
Saveicon in top panel.
In the left-hand sidebar click
Authentication methods.Enter the user’s mobile phone number in the
Phonefield, using the same format as above.Note that you do not need to fill out the
Alternate Phonefield.
Enter the user’s institutional email address in the
Emailfield.Ensure that you have registered both a phone number and an email address.
Click the
Saveicon in top panel.
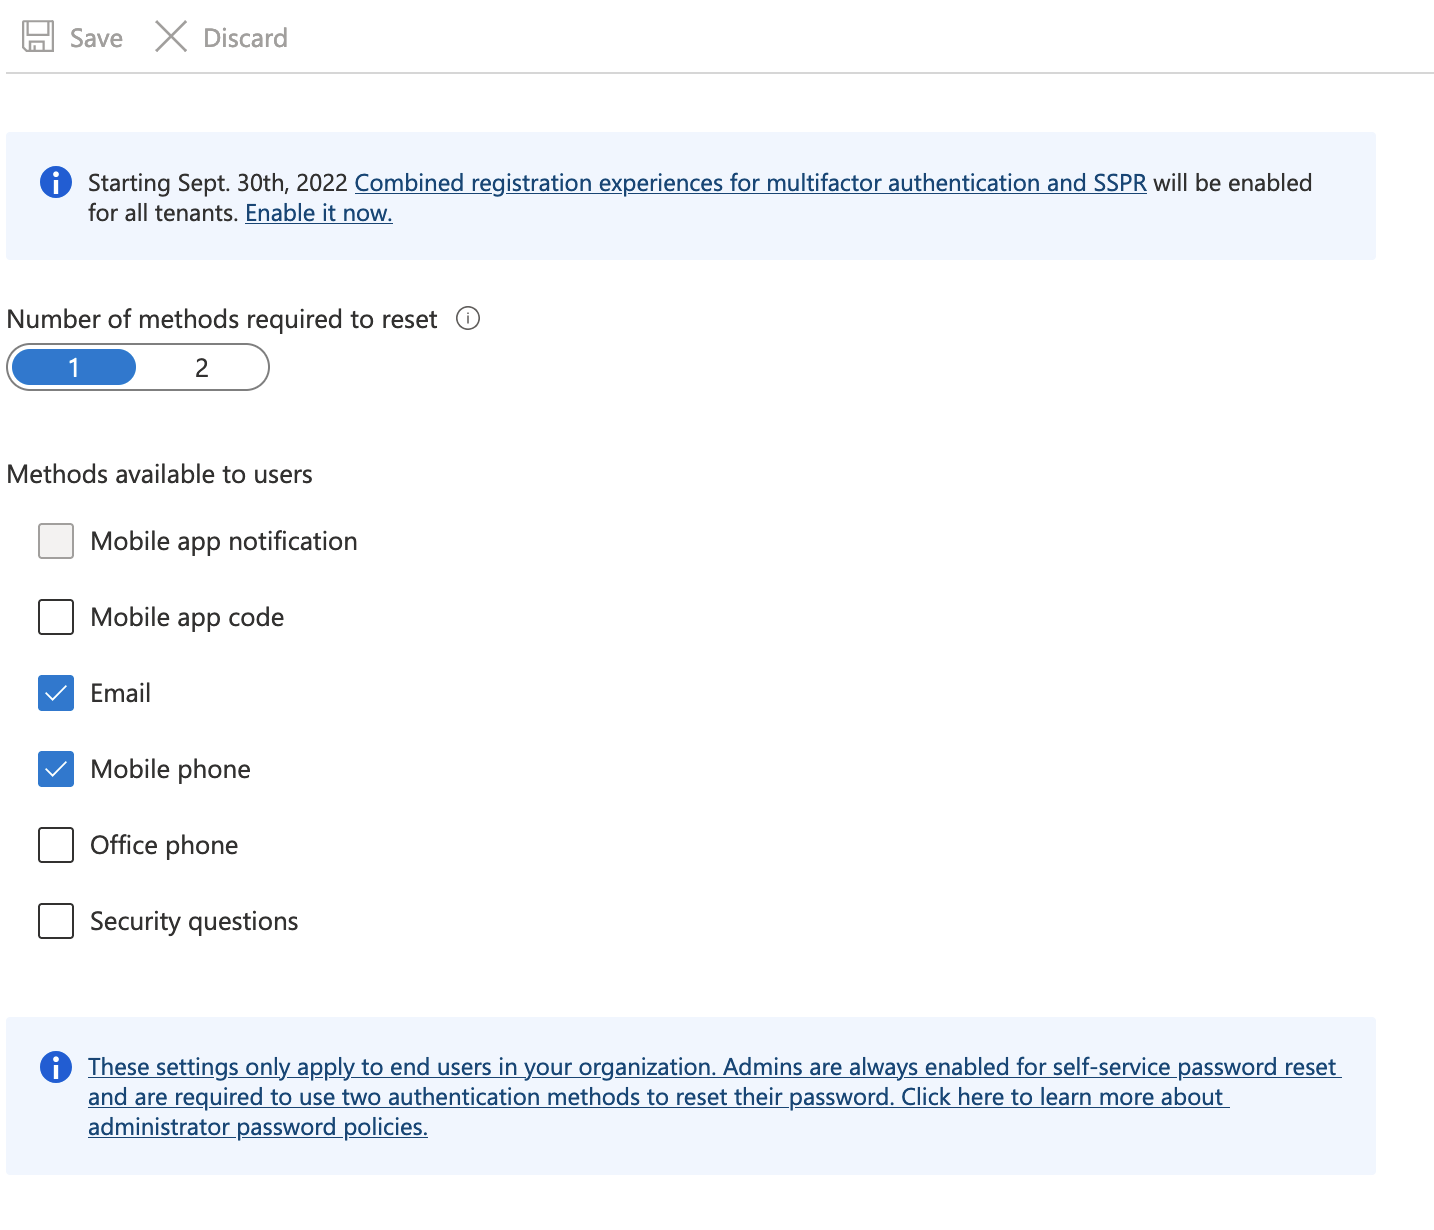
Register allowed authentication methods#
When you have finished creating administrator accounts, you will need to ensure that they are able to set their own passwords
From the Azure portal, navigate to the Microsoft Entra ID you have created.
Click
Manage > Password Reseton the left-hand sidebarClick
Manage > Authentication methodson the left-hand sidebarEnsure that both
EmailandMobile phoneare enabled
Activate and configure your new internal admin account#
Warning
In the next step we will delete the external admin account created for the user account you used to create the Microsoft Entra ID. Before you do this, you must configure and log into the native admin account you have just created for yourself.
The
<username>for this account isaad.admin.firstname.lastnameThe
<username domain>for this account is the same as the<SHM domain>
The administrators you have just set up can activate their accounts by following the password and MFA steps in the user guide.
Remove the default external user that was used to create the Microsoft Entra ID#
Warning
Make sure you have activated your account and successfully logged in with the new native administrator account you have just created for yourself (aad.admin.firstname.lastname@<SHM domain>) before deleting the default external administrator account.
Ensure you are logged in with the new native administrator account you have just created.
Click on your username at the top right corner of the screen, then
Sign in with a different user.Log in with the password you set for yourself when activating your admin account in the previous step
From the Azure portal, navigate to the Microsoft Entra ID you have created.
Click
Usersin the left hand sidebarSelect the default external user that was created when you created the Microsoft Entra ID.
The
User principal namefield for this user will contain the external domain and will have#EXT#before the@sign (for examplealovelace_turing.ac.uk#EXT#@turingsafehaven.onmicrosoft.com)
Click the
Delete usericon in the menu bar at the top of the user list panel
6. 💻 Deploy SHM#

./deployment/safe_haven_management_environment/setup
PS> ./Deploy_SHM.ps1 -shmId <SHM ID>
where
<SHM ID>is the management environment ID for this SHMwhere
<SRE ID>is the secure research environment ID for this SRE
You will be prompted for credentials for:
a user with admin rights over the Azure subscriptions you plan to deploy into
a user with Global Administrator privileges over the Microsoft Entra ID you set up earlier
This will perform the following actions, which can be run individually if desired:
Deploy Key Vault for SHM secrets and create an emergency admin account

./deployment/safe_haven_management_environment/setup
PS> ./Setup_SHM_Key_Vault_And_Emergency_Admin.ps1 -shmId <SHM ID>
where
<SHM ID>is the management environment ID for this SHM
Error
If you get an error like Could not load file or assembly 'Microsoft.IdentityModel.Clients.ActiveDirectory, Version=3.19.8.16603, Culture=neutral PublicKeyToken=31bf3856ad364e35'. Could not find or load a specific file. (0x80131621) then you may need to try again in a fresh Powershell terminal.
Some (rare) operations require you to be logged in as a native Global Administrator. To support these rare cases, and to allow access to the Safe Haven Microsoft Entra ID in the case of loss of access to personal administrator accounts (e.g. lost access to MFA), an emergency access administrator account has been created by the above script.
Warning
Do not use this account unless absolutely required!
Deploy network and VPN gateway

./deployment/safe_haven_management_environment/setup
PS> ./Setup_SHM_Networking.ps1 -shmId <SHM ID>
where
<SHM ID>is the management environment ID for this SHM
Sanity check
Once the script exits successfully you should see the following resource groups in the Azure Portal under the SHM subscription, with the appropriate <SHM ID> for your deployment e.g. RG_SHM_<SHM ID>_NETWORKING:

Error
If you cannot see these resource groups:
Ensure you are logged into the portal using the account that you are building the environment with.
Click on your username in the top right corner of the Azure portal screen and ensure that your SHM subscription (see
shm_<SHM ID>_core_config.json) is one of the selections.Click the “hamburger” menu in the top left corner (three horizontal lines) and select
Resource groups.
Deploy monitoring

./deployment/safe_haven_management_environment/setup
PS> ./Setup_SHM_Monitoring.ps1 -shmId <SHM ID>
where
<SHM ID>is the management environment ID for this SHM
Deploy firewall
./deployment/safe_haven_management_environment/setup
PS> ./Setup_SHM_Firewall.ps1 -shmId <SHM ID>
where
<SHM ID>is the management environment ID for this SHM
Deploy domain controllers

./deployment/safe_haven_management_environment/setup
PS> ./Setup_SHM_DC.ps1 -shmId <SHM ID>
where
<SHM ID>is the management environment ID for this SHM
Sanity check
Once the script exits successfully you should see the following resource groups in the Azure Portal under the SHM subscription, with the appropriate <SHM ID> for your deployment e.g. RG_SHM_<SHM ID>_NETWORKING:

Error
If you cannot see these resource groups:
Ensure you are logged into the portal using the account that you are building the environment with.
Click on your username in the top right corner of the Azure portal screen and ensure that your SHM subscription (see
shm_<SHM ID>_core_config.json) is one of the selections.Click the “hamburger” menu in the top left corner (three horizontal lines) and select
Resource groups.
Deploy update servers
./deployment/safe_haven_management_environment/setup
PS> ./Setup_SHM_Update_Servers.ps1 -shmId <SHM ID>
where
<SHM ID>is the management environment ID for this SHM
Deploy local package repositories
Two different types of local package repositories are available for Tier 2 and Tier 3 SREs:
Proxy (the repository makes on-demand connections to the external repository)
Mirror (the repository full replicates all requested packages from the external repository)
Hint
We recommend using Nexus proxies at both Tier 2 and Tier 3 to avoid the time taken to sync local mirrors.
We currently support the PyPI (Python) and CRAN (R) repositories.
./deployment/safe_haven_management_environment/setup
PS> ./Setup_SHM_Package_Repositories.ps1 -shmId <SHM ID>
where
<SHM ID>is the management environment ID for this SHM
Danger
You should never attempt to manage the Nexus proxy through the web interface. Doing so from outside the Nexus subnet could expose the admin credentials.
Warning
Note that a full set of Tier 2 local mirrors currently take around two weeks to fully synchronise with the external package repositories as PyPI contains >10TB of packages.
7. 🚉 Configure VPN connection#
Download a client VPN certificate for the Safe Haven Management network#
Navigate to the SHM Key Vault via
Resource Groups > RG_SHM_<SHM ID>_SECRETS > kv-shm-<SHM ID>Once there open the
Certificatespage under theSettingssection in the left hand sidebar.Click on the certificate named
shm-<SHM ID>-vpn-client-certand select theCURRENT VERSIONClick the
Download in PFX/PEM formatlink at the top of the page and save the*.pfxcertificate file locallyTo install, double click on the downloaded certificate (or on macOS you can manually drag it into the
loginkeychain), leaving the password field blank.
Make sure to securely delete the local “*.pfx” certificate file that you downloaded after you have installed it.
Setup VPN connection to the Safe Haven Management network#
Navigate to the Safe Haven Management (SHM) virtual network gateway in the SHM subscription via
Resource Groups > RG_SHM_<SHM ID>_NETWORKING > VNET_SHM_<SHM ID>_GWOnce there open the
Point-to-site configurationpage under theSettingssection in the left hand sidebarClick the
Download VPN clientlink at the top of the page to download a zip fileScreenshots
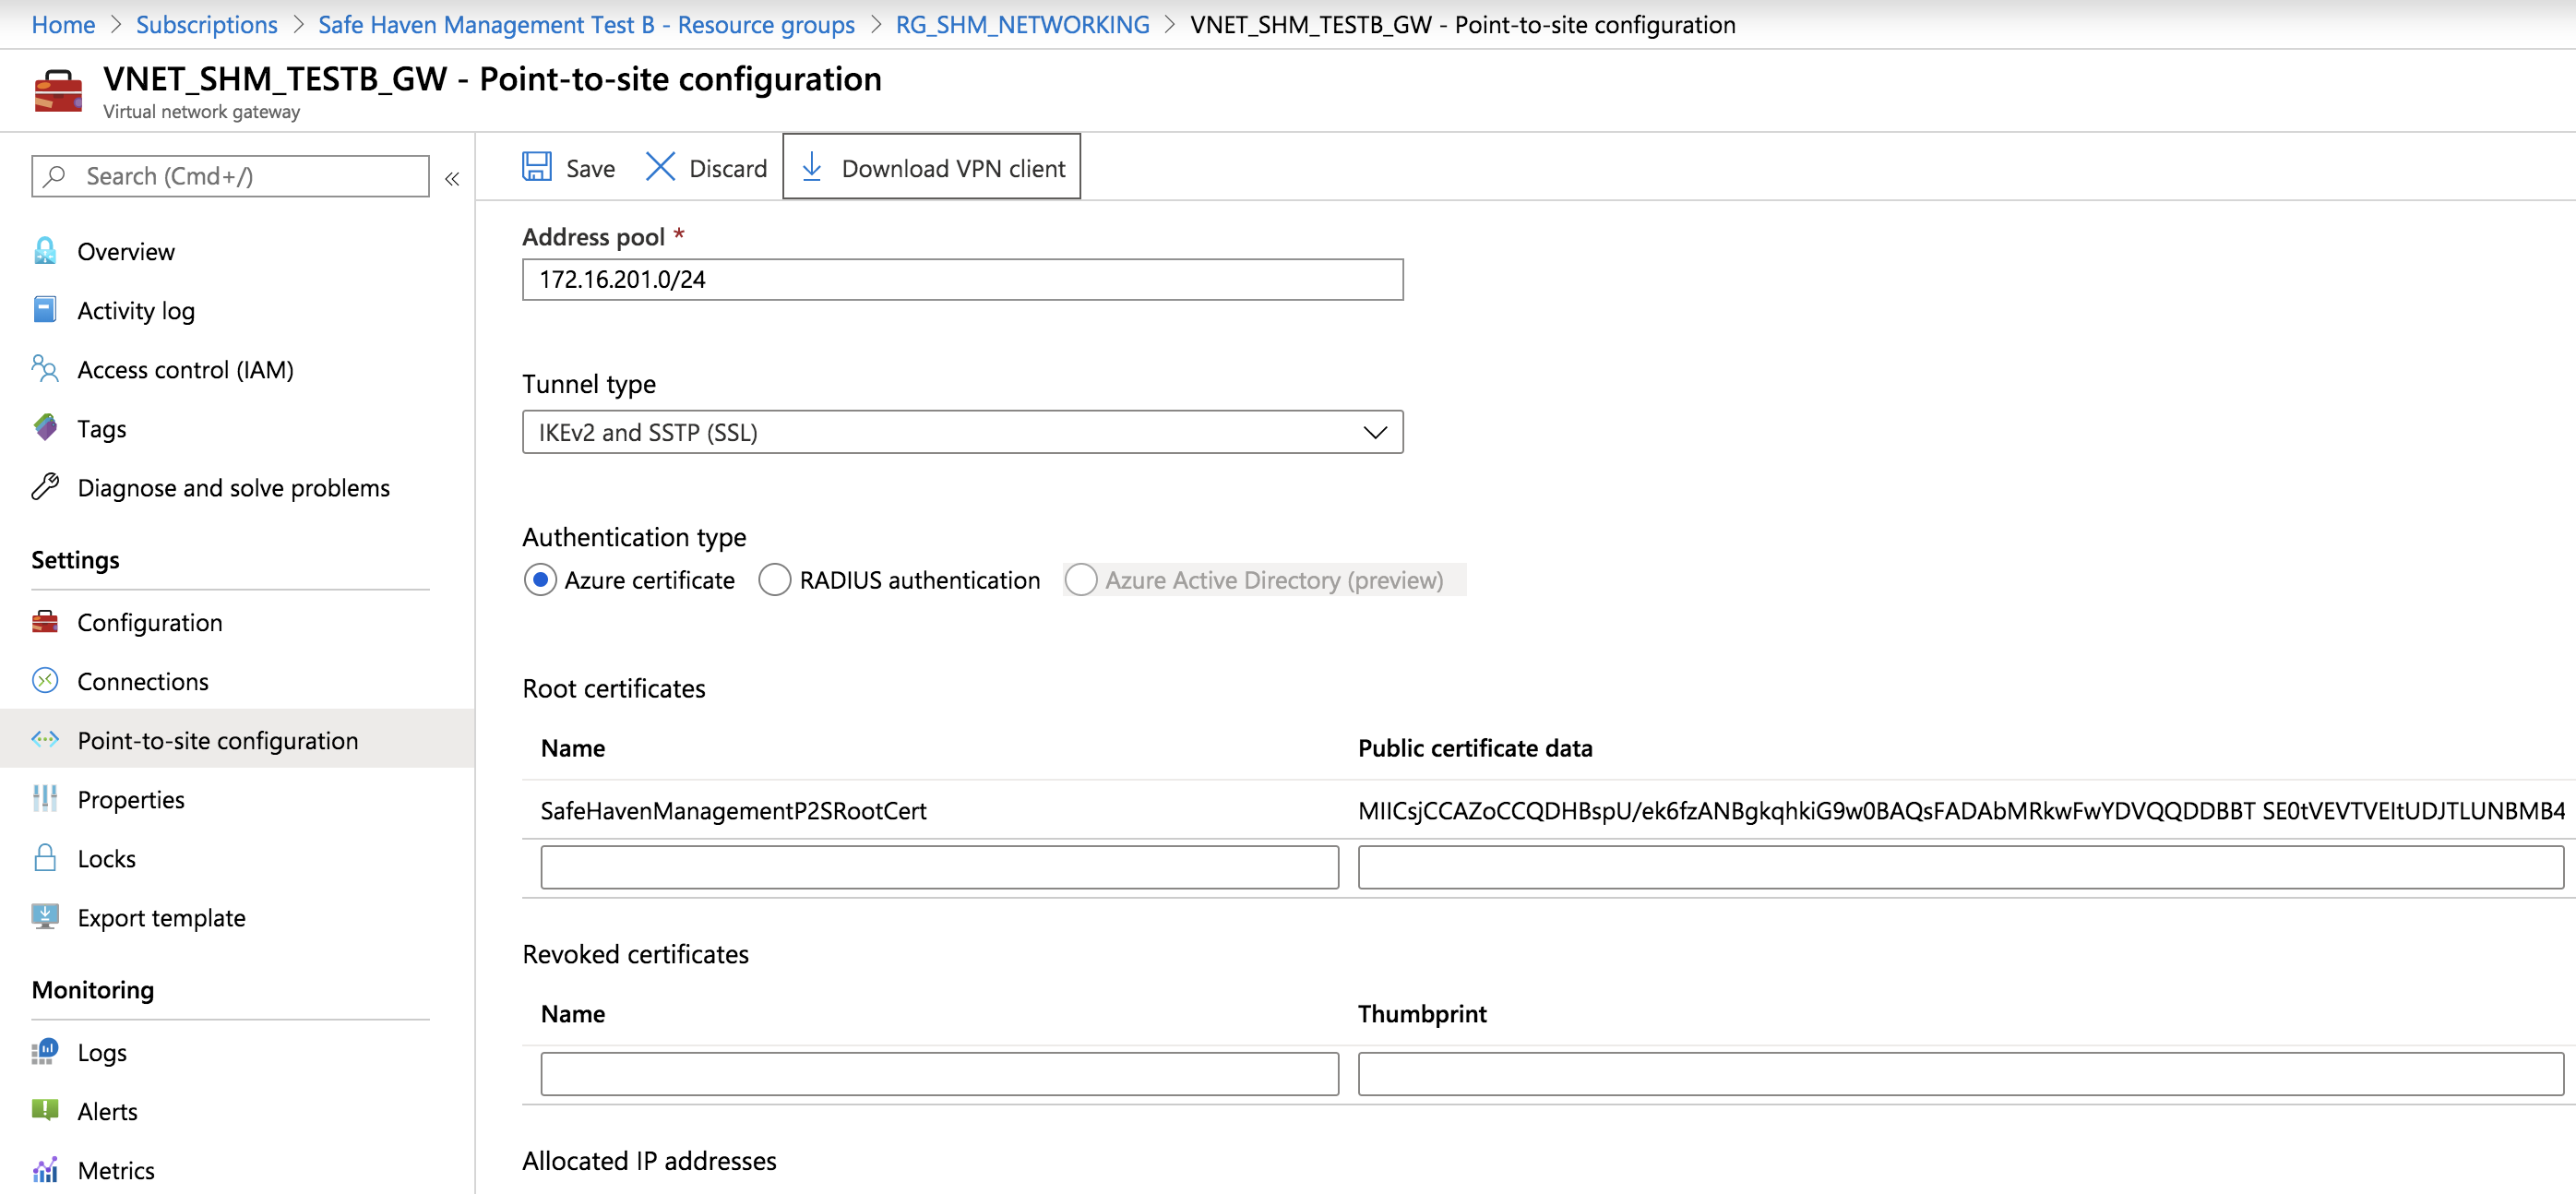
Unzip the zip file and identify the root certificate (
Generic\VpnServerRoot.cer) and VPN configuration file (Generic\VpnSettings.xml)Follow the VPN set up instructions using the section appropriate to your operating system (you do not need to install the
Generic\VpnServerRoot.cercertificate, as we’re using our own self-signed root certificate):
instructions
Use SSTP for the VPN type
Name the VPN connection
Safe Haven Management Gateway (<SHM ID>)Do not rename the VPN client as this will break it
instructions
Start from “Configure VPN client profile” step of the
macOSinstructions.Use IKEv2 for the VPN type
For users of macOS Catalina or later
You must select
Nonefrom the drop-down (notCertificate) and then select theCertificateradio button underneath as shown in the image below.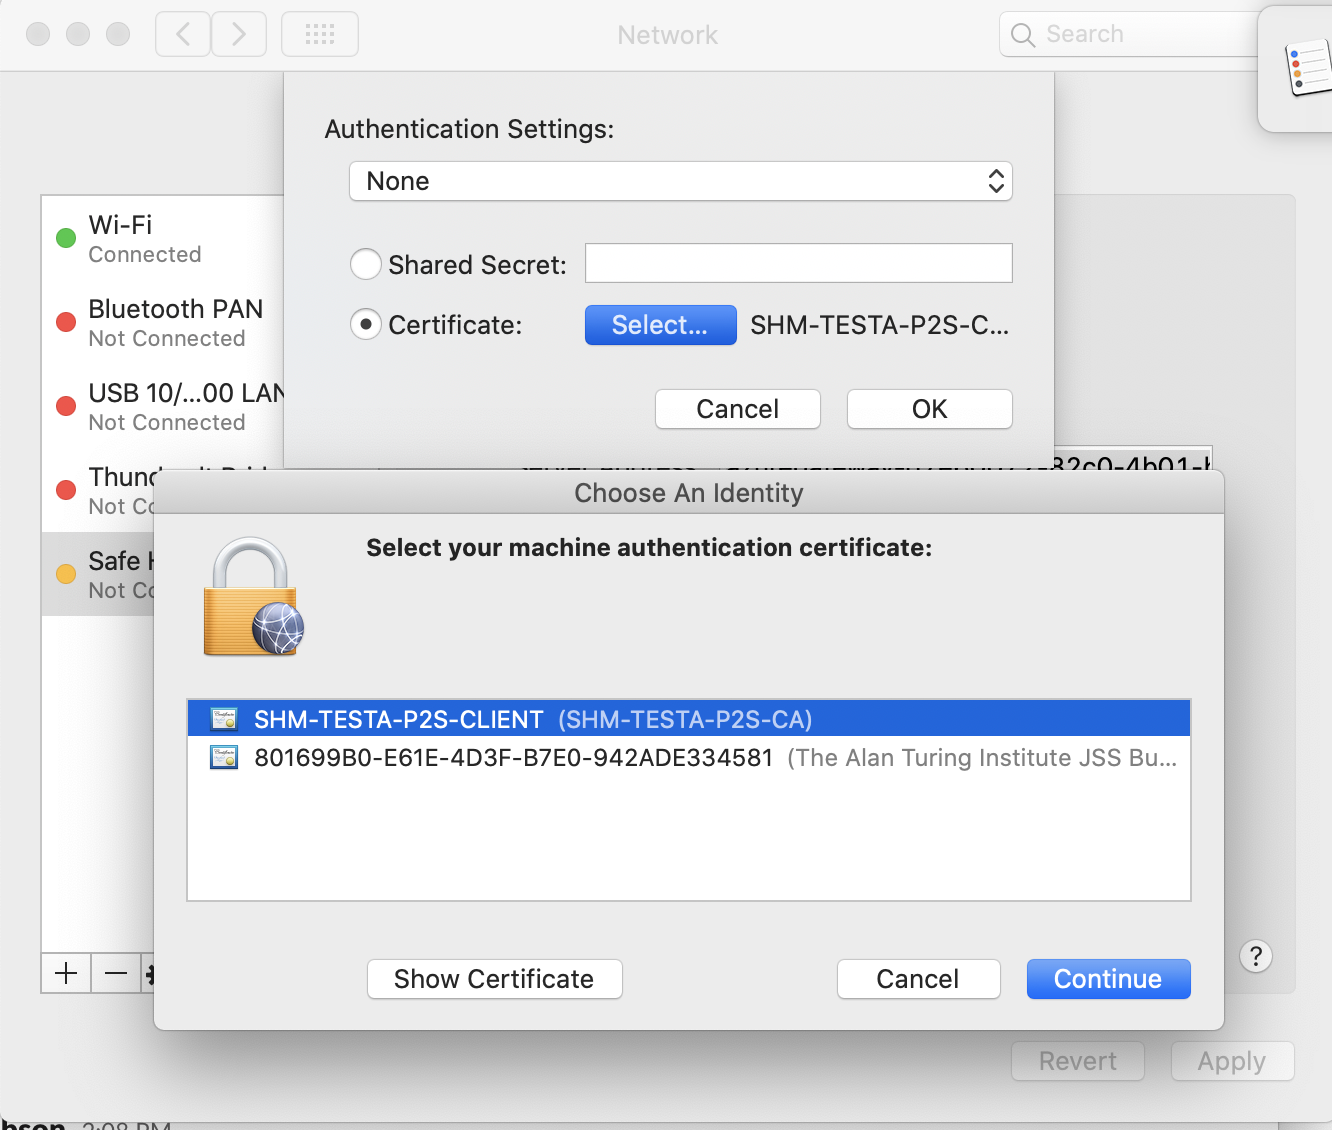
Name the VPN connection
Safe Haven Management Gateway (<SHM ID>)You can view the details of the downloaded certificate by highlighting the certificate file in Finder and pressing the spacebar.
You can then look for the certificate of the same name in the login KeyChain and view its details by double clicking the list entry.
If the details match the certificate has been successfully installed.
You should now be able to connect to the SHM virtual network via the VPN.
Important
Each time you need to access the virtual network ensure you are connected via the VPN.
Error
You may get a
Windows protected your PC pop up.
If so, click More info -> Run anyway.
Error
You may encounter a further warning along the lines of
Windows cannot access the specified device, path, or file.
This may mean that your antivirus is blocking the VPN client.
You will need to configure your antivirus software to make an exception.
8. 🏡 Configure domain controllers#
Configure the first domain controller via Remote Desktop#
Navigate to the SHM primary domain controller VM in the portal at
Resource Groups > RG_SHM_<SHM ID>_DC > DC1-SHM-<SHM ID>and note thePrivate IP addressfor this VMNext, navigate to the
RG_SHM_<SHM ID>_SECRETSresource group and then thekv-shm-<SHM ID>Key Vault and then selectsecretson the left hand panel and retrieve the following:<admin username>is in theshm-<SHM ID>-domain-admin-usernamesecret.<admin login>is the<admin username>followed by the SHM AD domain:<admin username>@<SHM domain>.<admin password>is in theshm-<SHM ID>-domain-admin-passwordsecret.
Danger
These domain administrator credentials have complete control over creating and deleting users as well as assigning them to groups.
Do not use them except where specified and never write them down!
Be particularly careful never to use them to log in to any user-accessible VMs (such as the secure research desktops).
Install Microsoft Entra Connect#

Note
Microsoft Entra Connect is the new name for Azure AD Connect. However, although all Microsoft documentation and entries in the Azure portal now refer to Microsoft Entra Connect, as of this release of the Data Safe Haven, the software itself is still named Azure AD Connect. It will appear as such on your Domain Controller.
Log into the SHM primary domain controller (
DC1-SHM-<SHM ID>) VM using theprivate IP address,<admin login>and<admin password>that you obtained from the portal above.Navigate to
C:\InstallationRun the
AzureADConnectWindows Installer PackageOn the
Welcome to Azure AD Connectscreen:Tick the
I agree to the license termsboxClick
Continue
On the
Express Settingsscreen:Click
Customize
On the
Install required componentsscreen:Click
Install
On the
User sign-inscreen:Ensure that
Password Hash Synchronizationis selectedClick
Next
On the
Connect to Azure ADscreen:Provide credentials for the Azure Active Directory global administrator account you set up earlier (
aad.admin.<first name>.<last name>@<SHM domain>) when promptedIf you receive a pop-up prompt, provide the same credentials when prompted
Back on the
Connect to Azure ADscreen, clickNextApprove the login with MFA if required
On the
Connect your directoriesscreen:Ensure that correct forest (your custom domain name; e.g
turingsafehaven.ac.uk) is selected and clickAdd DirectoryOn the
AD forest accountpop-up:Select
Use existing AD accountEnter the details for the
localadsyncuser.Username: use the value of the
shm-<SHM ID>-aad-localsync-usernamesecret in the SHM key vault:EITHER prepended with
<Domain ID>\, where theDomain IDis the capitalised form of the<SHM ID>, so if the SHM ID isprojectand the username isprojectlocaladsyncthen you would usePROJECT\projectlocaladsynchere.OR suffixed with
<SHM domain>, so if the SHM domain isproject.turingsafehaven.ac.ukand the username isprojectlocaladsyncthen you would useprojectlocaladsync@project.turingsafehaven.ac.ukhere.
Password: use the
shm-<SHM ID>-aad-localsync-passwordsecret in the SHM key vault.
Click
OK
Click
Next
On the
Azure AD sign-in configurationscreen:Verify that the
User Principal Nameis set touserPrincipalNameClick
Next
On the
Domain and OU filteringscreen:Select
Sync Selected domains and OUsExpand the domain and deselect all objects
Select
Safe Haven Research UsersandSafe Haven Security GroupsClick
Next
On the
Uniquely identifying your usersscreen:Click
Next
On the
Filter users and devicesscreen:Select
Synchronize all users and devicesClick
Next
On the
Optional featuresscreen:Select
Password WritebackClick
Next
On the
Ready to configurescreen:Ensure that the
Start the synchronisation process when configuration completesoption is ticked.Click
InstallThis may take a few minutes to complete
On the
Configuration completescreen:Click
Exit
Note
Take care to consider any differences in the keyboard of your machine and the Windows remote desktop when entering any usernames or passwords.
Error
If you receive an Internet Explorer pop-up dialog Content within this application coming from the website below is being blocked by Internet Explorer Advanced Security Configuration for Microsoft domains such as https://login.microsoft.com or https://aadcdn.msftauth.net then you can safely add these as exceptions:
Click
AddClick
Close
Error
If you receive an error message on the login webpage pop-ups saying We can't sign you in. Javascript is required to sign you in.... followed by the Script Error: Do you want to continue running scripts on this page you can safely allow Javascript:
Click
YesClose the dialog by clicking
X
Error
If you see a Windows Security Warning, related to the MFA login:
Check
Don't show this message againClick
Yesto close the dialog.
Error
If you get an error that the username/password is incorrect or that the domain/directory could not be found when entering the details for the localadsync user, try resetting the password for this user in the Domain Controller Active Directory so that it matches the value stored in the Key Vault
In Server Manager click
Tools > Active Directory Users and ComputersExpand the domain in the left hand panel
Expand the
Safe Haven Service AccountsOURight click on the
<SHM ID> Local AD Sync Administratoruser and selectreset passwordSet the password to the value from the appropriate Key Vault secret.
Leave the other settings alone and click
OK
Error
If you have recently torn down another SHM linked to the same Microsoft Entra ID you might see the error Directory synchronization is currently in a pending disabled state for this directory. Please wait until directory synchronization has been fully disabled before trying again.
You need to wait for the Microsoft Entra ID to fully disconnect - this can take up to 72 hours but is typically sooner.
You do not need to close the installer window while waiting.
If you need to, you can disconnect from the DC and VPN and reconnect later before clicking Retry.
Error
If you get an error that the connection to Azure Active Directory could not be made, please check that you do not have any Conditional Access policies enabled on the Azure Active Directory that require MFA for the synchronisation account.
Update Azure Active Directory Connect rules#
This step allows the locale (country code) to be pushed from the local AD to Microsoft Entra ID.

Log into the SHM primary domain controller (
DC1-SHM-<SHM ID>) VM using theprivate IP address,<admin login>and<admin password>that you obtained from the portal above.Run the following command on the remote domain controller VM to update the Microsoft Entra rules
PS> C:\Installation\UpdateAADSyncRule.ps1
Validate Active Directory synchronisation#
This step validates that your local Active Directory users are correctly synchronised to Microsoft Entra ID. Note that you can use the same script after deploying an SRE to add users in bulk.
Log into the SHM primary domain controller (
DC1-SHM-<SHM ID>) VM using theprivate IP address,<admin login>and<admin password>that you obtained from the portal above.Add your details to create researcher accounts for yourself and any other deployers.
Make a new copy of the user details template file from
C:\Installation\user_details_template.csvTip
We suggest naming this
YYYYDDMM-HHMM_user_details.csvbut this is up to youRemove the example user and add the required details for each user
SamAccountName: Log in username without the@<SRE domain>part.Tip
We recommend using
firstname.lastnameformat.Warning
Ensure that
SamAccountNamehas a maximum of 20 characters from the 7-bit ASCII set (unaccented letters, numbers and some punctuation) or synchronisation will fail.GivenName: User’s first / given nameWarning
Ensure that
GivenNameuses only characters from the 7-bit ASCII set (unaccented letters, numbers and some punctuation) or synchronisation will fail.Surname: User’s last name / surnameWarning
Ensure that
Surnameuses only characters from the 7-bit ASCII set (unaccented letters, numbers and some punctuation) or synchronisation will fail.Mobile: Phone number to use for initial password reset.Important
This must include country code in the format
+<country-code> <local number>(e.g.+44 7123456789).Include a space between the country code and local number parts but no other spaces.
Remove the leading
0from local number if present.This can be a landline or or mobile but must be accessible to the user when resetting their password and setting up MFA.
Users can add the authenticator app and/or additional phone numbers during MFA self-registration.
SecondaryEmail: An existing organisational email address for the user.Note
This is not uploaded to their Data Safe Haven user account but is needed when sending account activation messages.
GroupName: The name of the 🔒 SRE Security Groups that the users should be added to. Users will need to be added to the relevant security group before they can access an SRE. You can also change this manually later on (see 👩 👨 Modifying user SRE access).Tip
If the user needs to be added to multiple groups, separate them with a pipe-character (
|).
Run the following command on the remote domain controller VM to create and synchronise the users
PS> C:\Installation\CreateUsers.ps1 <path_to_user_details_file>
This script will add the users and trigger a sync with Microsoft Entra ID
Wait a few minutes for the changes to propagate

Click
Users > All usersand confirm that the new user is shown in the user list.The new user account should have the
On-premises sync enabledfield set toYes
Error
If you get the message New-ADUser: The specified account already exists you should first check to see whether that user actually does already exist!
Once you’re certain that you’re adding a new user, make sure that the following fields are unique across all users in the Active Directory.
SamAccountName: Specified explicitly in the CSV file.If this is already in use, consider something like
firstname.middle.initials.lastname
DistinguishedName: Formed ofCN=<DisplayName>,<OUPath>by Active directory on user creation.If this is in use, consider changing
DisplayNamefrom<GivenName> <Surname>to<GivenName> <Middle> <Initials> <Surname>.
Configure AAD side of AD connect#

From the Azure portal, navigate to the Microsoft Entra ID you have created.
Select
Password resetfrom the left hand menuSelect
On-premises integrationfrom the left hand side barEnsure
Enable password writeback for synced usersis ticked.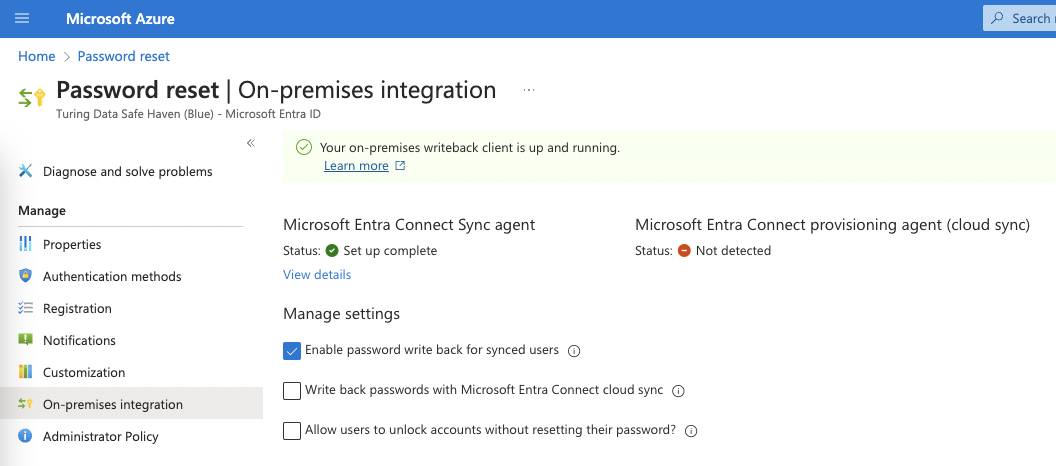
If you changed this setting, click the
Saveicon
9. 📱 Enable MFA and self-service password reset#
To enable self-service password reset (SSPR) and MFA-via-phone-call, you must have sufficient licences for all users.
Add licences that support self-service password reset#
Click the heading that applies to you to expand the instructions for that scenario.
Test deployments
For testing you can enable a free trial of the P2 License (NB. it can take a while for these to appear on your Microsoft Entra ID). You can activate the trial while logged in as your deafult guest administrator account.
From the Azure portal, navigate to the Microsoft Entra ID you have created.
Click on
Licencesin the left hand sidebarClick on
All productsin the left hand sidebarClick on the
+Try/Buytext above the empty product list and add a suitable licence product.Expand the
Free trialarrow underMicrosoft Entra ID P2Click the
ActivatebuttonWait for the
Microsoft Entra ID P2licence to appear on the list ofAll Products(this could take several minutes)
Production deployments
For production you should buy P1 licences. This requires you to be logged in with an native Global Administrator account. As activating self-service password reset requires active MFA licences, this is one of the rare occasions you will need to use the emergency access admin account.
Switch to the the emergency administrator account:
Click on your username at the top right corner of the screen, then click “Sign in with a different account”
Enter
aad.admin.emergency.access@<SHM domain>as the usernameOpen a new browser tab and go to the Azure Portal
Change to the Microsoft Entra ID associated with the Safe Haven SHM subscription (e.g. an existing corporate Microsoft Entra ID). Do this by clicking on your username at the top right corner of the screen, then
Switch directory, then selecting the directory you wish to switch to.Click the “hamburger” menu in the top left corner (three horizontal lines) and select
SubscriptionsClick on the Safe Haven SHM subscription
Click on
Resource Groupsin the left hand sidebar thenRG_SHM_<SHM ID>_SECRETSClick on the
kv-shm-<shm id>Key VaultClick on
Secretsin the left hand sidebarClick on the
shm-<shm id>-aad-emergency-admin-passwordsecretClick on the entry in the
Current versionsectionClick on the clipboard icon next to the
Secret valuefieldThe emergency admin account password in now in your clipboard
Switch back to the browser tab with the Azure login page
Paste the password you copied from the Key Vault
Click the
Sign inbutton
Click the
Purchase serviceslink in the information panel above the trial options.In the “Microsoft 365 Admin Centre” portal that opens:
Expand the
Billingsection of the left hand side barClick on
Purchase servicesScroll down the list of products and select
Microsoft Entra ID Premium P1and clickBuySelect
Pay monthlyEnter the number of licences required.
Leave
automatically assign all of your users with no licencescheckedClick
Check out nowEnter the address of the organisation running the Safe Haven on the next screen
Click next and enter payment details when requested
Switch back to your original administrator account
Click on your username at the top right corner of the screen, then click “Sign in with a different account”
Log in as the user you used to create the Safe Haven Microsoft Entra ID
Enable self-service password reset#
Ensure your Azure Portal session is using the new Safe Haven Management (SHM) Microsoft Entra ID. The name of the current directory is under your username in the top right corner of the Azure portal screen. To change directories click on your username at the top right corner of the screen, then
Switch directory, then the name of the new SHM directory.Click the “hamburger” menu in the top left corner (three horizontal lines) and select
Microsoft Entra IDClick
Password resetin the left hand sidebarSet the
Self service password reset enabledtoggle toAll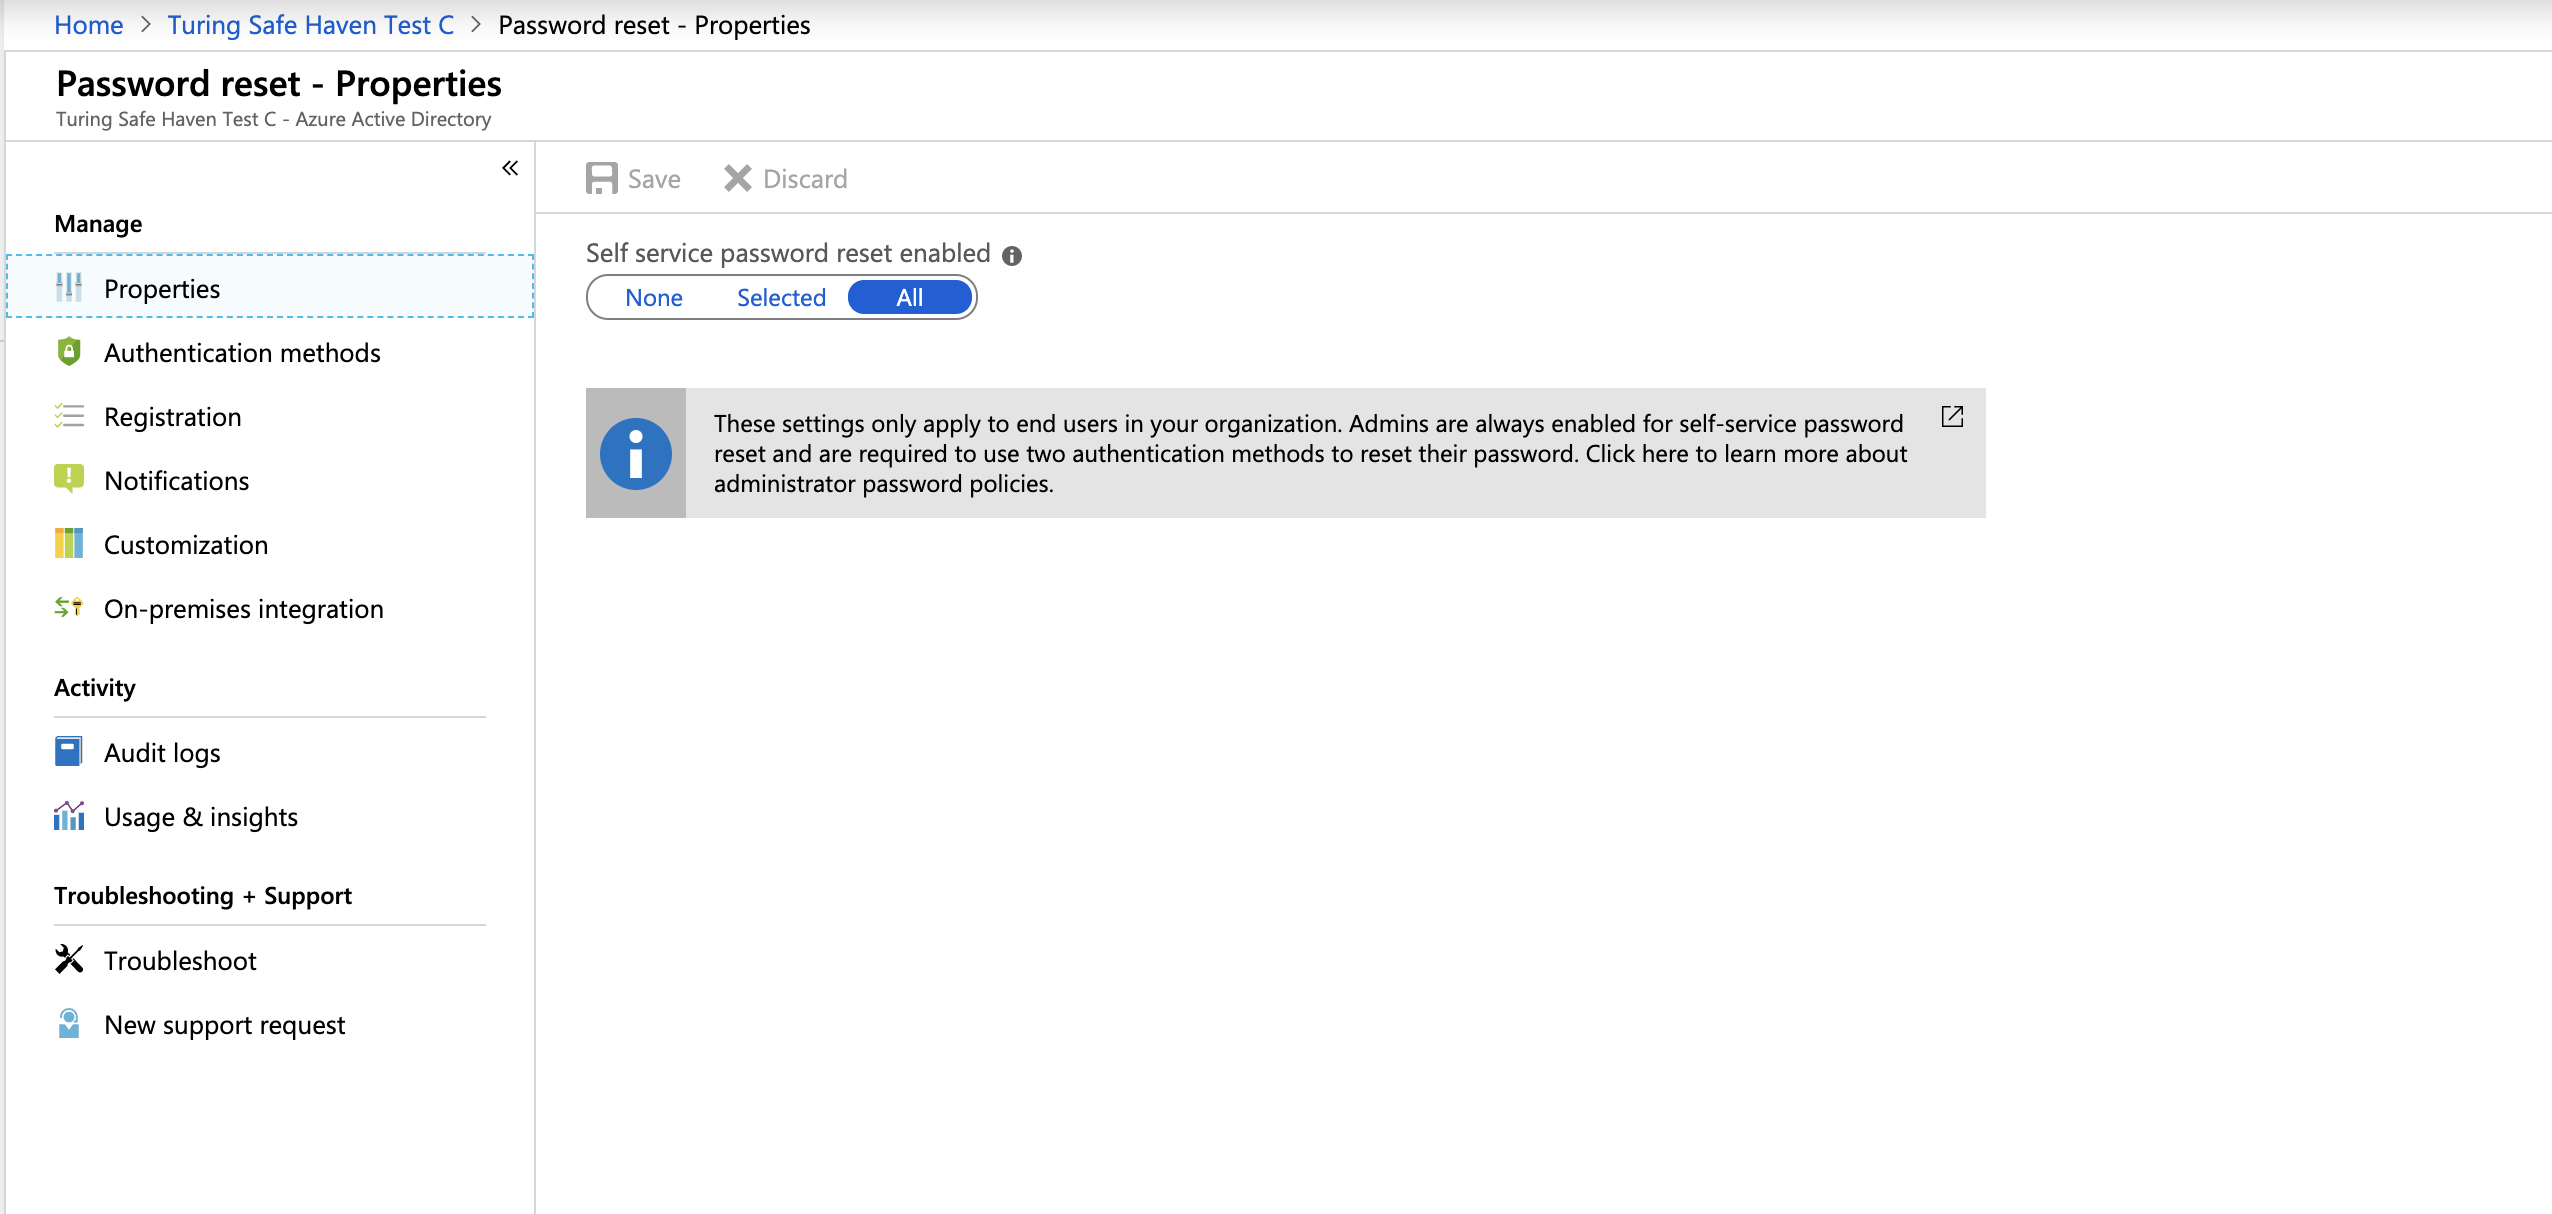
Click the
Saveicon
Error
If you see a message about buying licences, you may need to refresh the page for the password reset option to show.
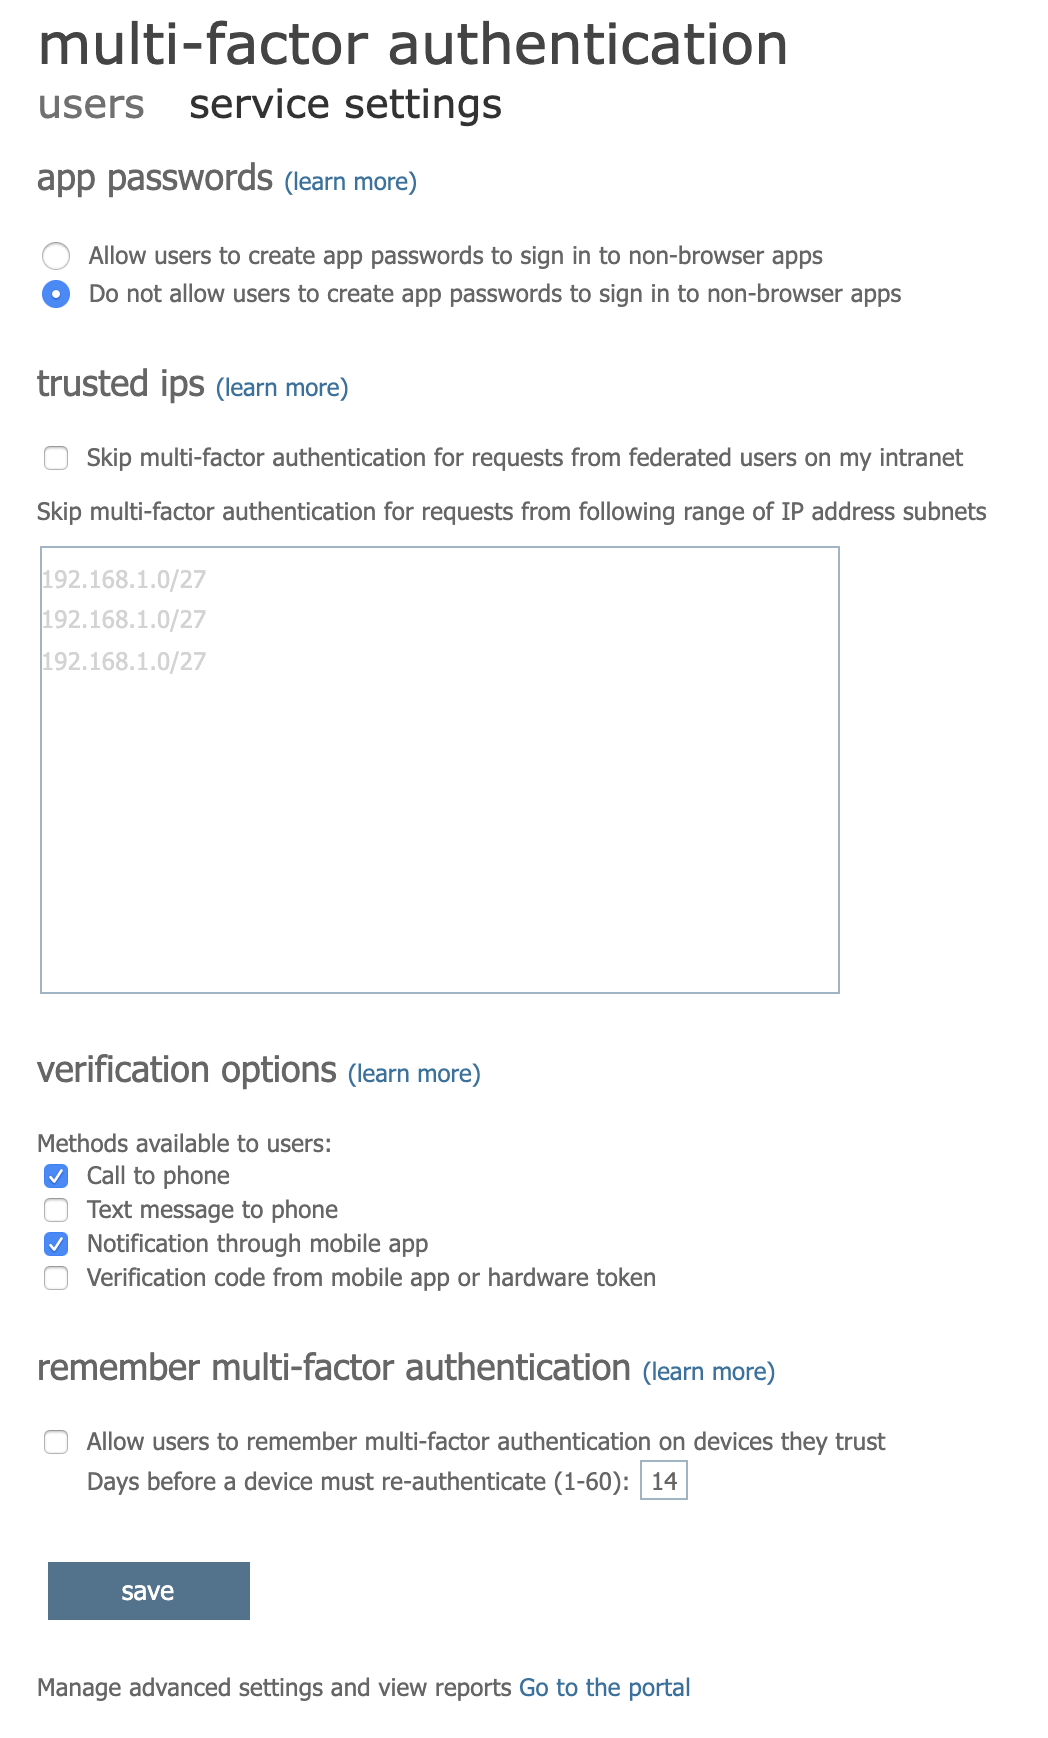
Configure MFA on Microsoft Entra ID#
From the Azure portal, navigate to the Microsoft Entra ID you have created.
Click
Usersin the left hand sidebarClick the
Per-user MFAicon in the top bar of the users list.Click on
Service settingsat the top of the panelConfigure MFA as follows:
In the
App passwordssection selectDo not allow users to create app passwords to sign in to non-browser appsEnsure the
Verification optionsare set as follows:check
Call to phoneandNotification through mobile app(Call to phoneis not available with a trial P2 licence)uncheck
Text message to phoneandVerification code from mobile app or hardware token
In
Remember multi-factor authenticationsectionensure
Allow users to remember multi-factor authentication on devices they trustis unchecked
Click “Save” and close window
Screenshots
10. 🔐 Apply conditional access policies#
Require MFA for all users#
Warning
Before completing this step, make sure you have confirmed you are able to successfully log in as the emergency access admin, as this account will be the only one excluded from the MFA requirement.
From the Azure portal, navigate to the Microsoft Entra ID you have created.
Click
Propertiesin the left hand sidebar and disable security defaults as shown in the screenshot hereSelect
NOfromEnable Security defaultsSelect
My organization is using Conditional Accessand hit theSavebutton
Click
Securityin the left hand sidebarClick
Conditional accessin the left hand sidebarClick the
+New Policyicon in the top bar above the (empty) policy listCreate a new policy as follows:
Set the name to
Require MFAUnder
Users or workload identitiesset theUsers and groupscondition to:Include: Select
All usersExclude:
Check
Users and groupsSelect the
Admin - EMERGENCY ACCESSuserSelect all
On-Premises Directory Synchronization Service AccountusersClick
Select
Under
Cloud apps or actionsselectCloud appsin the drop-down menu and set:Include: Select
All cloud appsExclude: Leave unchanged as
None
Leave the
Conditionscondition unchanged (all showing asNot configured)Set the
Grantcondition to:Check
Grant accessCheck
Require multi-factor authenticationClick
Select
Leave the
Sessioncondition unchangedUnder
Enable policyselectOnCheck
I understand that my account will be impacted by this policy. Proceed anyway.Click the
Createbutton
Block portal access for normal users#
Most users have no reason to access the Azure portal using the SHM tenant. Therefore we will block access for all users other than Global Administrators.
From the Azure portal, navigate to the Microsoft Entra ID you have created.
Click
Securityin the left hand sidebarClick
Conditional Accessin the left hand sidebarClick on
New Policyat the top of the panelConfigure the policy as follows
In the
Namefield enterRestrict Microsoft Entra ID accessUnder
Users or workload identitiesset theUsers and groupscondition to:Include: Select
All usersExclude:
Check
Directory rolesIn the drop-down menu select
Global administrator. This will ensure that only the administrator accounts you created in the previous section are able to access the portal.
Under
Cloud apps or actionsselectCloud appsin the drop-down menu and set:Include:
Select
Select appsIn the pop-up menu on the right, select
Microsoft Azure ManagementandMicrosoft Graph PowerShellthen
Click
Select
Exclude: Leave unchanged as
None
Leave the
Conditionscondition unchanged (all showing asNot configured)Under the
Access controlsandGrantHeadings click0 controls selectedIn the pop-up menu on the right select the
Block Accessradio button and clickSelect
Under
Enable policyselectOnClick the
Createbutton
Error
Security defaults must be disabled in order to create this policy. This should have been done when creating a policy to require MFA for all users.
11. 🚷 Add MFA licences to any non-admin users#
Administrator accounts can use MFA and reset their passwords without a licence needing to be assigned. However, when you create non-admin users they will need to be assigned an Azure Active Directory licence in order to reset their own password.
Assigning MFA licences#
Ensure you are logged in to the Azure Portal in with the native administrator account you created.
Ensure your session is using the new Safe Haven Management (SHM) Microsoft Entra ID. The name of the current directory is under your username in the top right corner of the Azure portal screen. To change directories click on your username at the top right corner of the screen, then
Switch directory, then the name of the new SHM directory.Click the “hamburger” menu in the top left corner (three horizontal lines) and select
Microsoft Entra IDClick
Licencesin the left hand sidebarClick
All productsin the left hand sidebarClick the relevant licence product [
Microsoft Entra ID P1(production) orMicrosoft Entra ID P2(test)]Click
Licensed usersin the left hand sidebarClick the
+Assignicon in the top bar above the list of user licence assignmentsClick
+ Add users and groupsunderUsers and groupsClick on the users you want to assign licences to
Click
SelectClick
Review + AssignClick
Assign
Testing password self-reset#
Add a licence to the user you want to test with
Go to https://aka.ms/mfasetup in an incognito / private browsing tab
Enter the researcher username
Click the
Forgotten my passwordlinkEnter the captcha text and press next
Enter your mobile phone number, making sure to prefix it with the country code and to not include the leading zero (
+<country-code> <phone-number-without-leading-zero>e.g.+44 7700900000).Enter the code that was texted to your phone
Enter a new password
Click the
Sign in with new passwordlink on the following page, or go to https://aka.ms/mfasetup againEnter the username and the new password
Click
Nextat theHelp us to protect your accountpromptFollow the instructions to configure
Microsoft Authenticator