Migrating an SHM#
These instructions will walk you through migrating an existing Safe Haven Management (SHM) environment to a newer Data Safe Haven release and migrating the users to it.
Note
This document assumes that you have already deployed a Safe Haven Management (SHM) environment and one or more Secure Research Environments (SREs) that are linked to it.
Danger
This is a complex operation and may not always work. You may lose data or user accounts in the migration process.
Explanation of symbols used in this guide#
Powershell command

This indicates a
Powershellcommand which you will need to run locally on your machineEnsure you have checked out (or downloaded) the appropriate tag of the Safe Haven repository from alan-turing-institute/data-safe-haven.
Open a
Powershellterminal and navigate to the indicated directory of your locally checked-out version of the Safe Haven repositoryEnsure that you are logged into Azure by running the
Connect-AzAccountcommandTip
If your account is a guest in additional Azure tenants, you may need to add the
-Tenant <Tenant ID>flag, where<Tenant ID>is the ID of the Azure tenant you want to deploy into.This command will give you a URL and a short alphanumeric code.
Go to URL in a web browser, enter the code and log in to your account on Azure.
Tip
If you have several Azure accounts, make sure you use one that has permissions to make changes to the subscription you are using
Remote command

This indicates a command which you will need to run remotely on an Azure virtual machine (VM) using
Microsoft Remote DesktopOpen
Microsoft Remote Desktopand clickAdd Desktop/Add PCEnter the private IP address of the VM that you need to connect to in the
PC namefield (this can be found by looking in the Azure portal)Enter the name of the VM (for example
DC1-SHM-PROJECT) in theFriendly namefieldClick
AddEnsure you are connected to the SHM VPN that you have set up
Double click on the desktop that appears under
Saved DesktopsorPCs.Use the
usernameandpasswordspecified by the appropriate section of the guide
Tip
If you see a warning dialog that the certificate cannot be verified as root, accept this and continue.
Azure Portal operation

This indicates an operation which needs to be carried out in the
Azure Portalusing a web browser on your local machine.You will need to login to the portal using an account with privileges to make the necessary changes to the resources you are altering
Azure Active Directory operation

This indicates an operation which needs to be carried out in the
Azure Portalusing a web browser on your local machine.You will need to login to the portal using an account with administrative privileges on the
Azure Active Directorythat you are altering.Note that this might be different from the account which is able to create/alter resources in the Azure subscription where you are building the Safe Haven.
OS-dependent steps
The following icons indicate steps that depend on the OS you are using to deploy the SHM
MacOS
Windows
Linux
1. 🌱 Prerequisites#
All of the Safe Haven Management (SHM) environment prerequisites
The following variables will be used during deploying
<old SHM ID>: the management environment ID for the previously deployed SHM<SHM ID>: the management environment ID for the new SHM you want to deploy<AAD tenant ID>: the Tenant ID for theAzure Active Directorythat your previously deployed SHM is connected to
2. 🔓 Disconnect the old domain controller from the Azure Active Directory#

Log into the SHM primary domain controller for the old SHM (
DC1-SHM-<old SHM ID>) VM using theprivate IP address,<admin login>and<admin password>from the portalOpen
Powershellas an administratorNavigate to
C:\InstallationRun
.\Disconnect_AD.ps1You will need to provide login credentials (including MFA if set up) for
<admin username>@<SHM domain>
Warning
Do not attempt to add users to the old SHM after this point as they will not be synchronised to the Azure Active Directory!
Attention
Full disconnection of the Azure Active Directory can take up to 72 hours but will typically take around one day.
3. 📋 Safe Haven Management configuration#
Create a copy of the configuration file for your previous SHM
You may want to change some of the following attributes:
{
  "azure": {
    "subscriptionName": "Azure subscription to deploy the SHM into. You might want to use a different subscription than for your previous SHM."
  },
  "shmId": "The <SHM ID> for the new SHM. If you try to deploy two SHMs with the same ID into the same subscription some resources will not deploy correctly."
}
4. 🚪 Configure DNS for the custom domain#

./deployment/safe_haven_management_environment/setup
See the Safe Haven Management documentation for more details.
5. 📁 Ensure the Azure Active Directory domain is registered#
./deployment/safe_haven_management_environment/setup
See the Safe Haven Management documentation for more details.
Note
You will need to use an AAD global admin when the AzureAD module asks you to sign-in.
6. 🔑 Deploy Key Vault for SHM secrets and create emergency admin account#

./deployment/safe_haven_management_environment/setup
See the Safe Haven Management documentation for more details.
Note
You will need to use an AAD global admin when the AzureAD module asks you to sign-in.
7. 🚉 Deploy network and VPN gateway#

./deployment/safe_haven_management_environment/setup
See the Safe Haven Management documentation for more details.
8. 🏡 Deploy the domain controllers#

./deployment/safe_haven_management_environment/setup
See the Safe Haven Management documentation for more details.
Important
Do not run any of the domain controller configuration steps yet
9. ⚡ Configure the new domain controllers#
🔏 Suspend MFA for all users#

From the
Azureportal, navigate to the AAD.Click
Securityin the left hand sidebarClick
Conditional accessin the left hand sidebarClick the
Require MFApolicy from the policy listToggle
Enable policytoOffClick the
Savebutton
👥 Copy SHM users from old domain controller#

./deployment/safe_haven_management_environment/setup
PS> ./Copy_SHM_Users.ps1 -oldShmId <old SHM ID> -newShmId <SHM ID>
where
<old SHM ID>is the management environment ID for the previously deployed SHMwhere
<SHM ID>is the management environment ID for this SHM
⚓ Reset Azure AD source anchors#

Log into the SHM primary domain controller (
DC1-SHM-<SHM ID>) VM that you have just deployed using theprivate IP address,<admin login>and<admin password>that you obtained from the portal
Run the following Powershell commands
# Get local users
$userOuPath = (Get-ADObject -Filter * | Where-Object { $_.Name -eq "Safe Haven Research Users" }).DistinguishedName
$users = Get-ADUser -Filter * -SearchBase "$userOuPath" -Properties *

# Connect to AzureAD
# Use the credentials for an AzureAD global admin (eg. `aad.admin.firstname.surname@<SHM domain>`)
Connect-MsolService

# Reset source anchor for AzureAD users
foreach ($user in $users) {
  $immutableId = [System.Convert]::ToBase64String($user.ObjectGUID.ToByteArray())
  Set-MsolUser -UserPrincipalName $($user.UserPrincipalName) -immutableID $immutableId
  Write-Output "Set source anchor for $($user.UserPrincipalName) to $immutableId"
}
Note
All research users in this SHM will have to go to https://aka.ms/sspr to reset their passwords although their MFA configuration will stay the same.
🚋 Install Azure Active Directory Connect#
See the Safe Haven Management documentation for more details.
Error
Since you are trying to connect the new SHM to an Azure Active Directory that was already synchronised, you may find the AzureADConnect installation fails due to a Directory synchronisation failure.
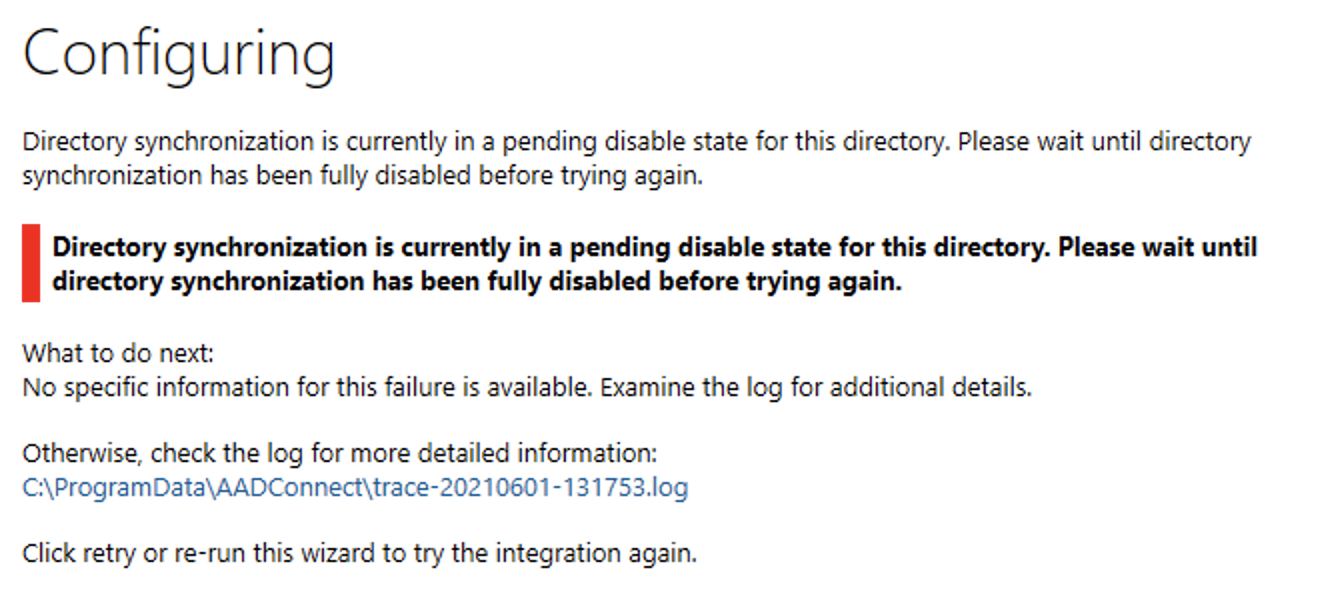
If this happens then you will need to wait for the previous disconnection to complete, which may take up to 72 hours.
♻️ Update Azure Active Directory Connect rules#
See the Safe Haven Management documentation for more details.
🚮 Unregister the old domain controller in Azure Active Directory#

From the
Azureportal, navigate to the AAD you have created.Select
Azure AD Connectfrom the left hand menuUnder
Health And AnalyticsclickAzure AD Connect HealthSelect
Sync servicesfrom the left hand menuClick on
<Safe Haven identifier>.onmicrosoft.comClick on the
Azure Active Directory Connect Serverthat corresponds to the old DC (marked asUnhealthy)Click
Deletein the top bar, type the server name when prompted then clickDelete
☑️ Validate Active Directory synchronisation#
See the Safe Haven Management documentation for more details.
10. 🚓 Deploy and configure network policy server#
./deployment/safe_haven_management_environment/setup
See the Safe Haven Management documentation for more details.
11. 🔐 Require MFA for all users#

See the Safe Haven Management documentation for more details.
12. 🚷 Block portal access for normal users#
See the Safe Haven Management documentation for more details.
13. 📦 Deploy Python/R package repositories#

./deployment/safe_haven_management_environment/setup
See the Safe Haven Management documentation for more details.
14. 📈 Deploy logging#
./deployment/safe_haven_management_environment/setup
See the Safe Haven Management documentation for more details.
15. 🚒 Deploy firewall#
./deployment/safe_haven_management_environment/setup
See the Safe Haven Management documentation for more details.