User Guide: Apache Guacamole#
🔰 Introduction#
🎉 Welcome to the Turing Data Safe Haven! 🎉
Secure research environments (SREs) for analysis of sensitive datasets are essential to give data providers confidence that their datasets will be kept secure over the course of a project. The Data Safe Haven is a prescription for how to set up one or more SREs and give users access to them. The Data Safe Haven SRE design is aimed at allowing groups of researchers to work together on projects that involve sensitive or confidential datasets at scale. Our goal is to ensure that you are able to implement the most cutting edge data science techniques while maintaining all ethical and legal responsibilities of information governance and access.
The data you are working on will have been classified into one of five sensitivity tiers, ranging from open data at Tier 0, to highly sensitive and high risk data at Tier 4.
The tiers are defined by the most sensitive data in your project, and may be increased if the combination of data is deemed to be require additional levels of security.
You can read more about this process in our policy paper: Arenas et al, 2019, arXiv:1908.08737.
The level of sensitivity of your data determines whether you have access to the internet within the SRE and whether you are allowed to copy and paste between the secure research environment and other windows on your computer. This means you may be limited in which data science tools you are allowed to install. You will find that many software packages are already available, and the administrator of the SRE will ingress - bring into the environment - as many additional resources as possible.
Important
Please read this user guide carefully and remember to refer back to it when you have questions. In many cases the answer is already here, but if you think this resource could be clearer, please let us know so we can improve the documentation for future users.
Definitions#
The following definitions might be useful during the rest of this guide
- Secure Research Environment (SRE)
the environment that you will be using to access the sensitive data.
- Data Safe Haven
the overall project that details how to create and manage one or more SREs.
- Username domain
the domain (for example
projects.turingsafehaven.ac.uk) which your user account will belong to. Multiple SREs can share the same domain for managing users in common.
- SRE ID
each SRE has a unique short ID, for example
sandboxwhich your System Manager will use to distinguish different SREs in the same Data Safe Haven.
- SRE URL
each SRE has a unique URL (for example
sandbox.projects.turingsafehaven.ac.uk) which is used to access the data.
🚀 Set up your account#
This section of the user guide will help you set up your new account on the SRE you’ll be using.
🌱 Prerequisites#
Make sure you have all of the following in front of you when connecting to the SRE.
📧 The email from your System Manager with your account details.
🔧 Your username, given in an email from your System Manager.
🏰 The domain name and URL for the SRE, given in an email from your System Manager.
💻 Your computer.
📡 Access to the specific wired or wireless network detailed in the email from your System Manager.
🔒 Data security training for those working on health datasets.
📱 Your phone, with good signal connectivity.
You should also know who the designated contact for your SRE is. This might be an administrator or one of the people working on the project with you. They will be your primary point of contact if you have any issues in connecting to or using the SRE.
Note
For example, during the Turing Data Study Groups, the facilitator of each SRE is the designated contact
Username#
Your username will usually be in the format firstname.lastname.
In some places, you will need to enter it in the form username@<username domain>
Tip
You can find your username in the email you received from your System Manager.
Caution
If you have a hyphenated last name, or multiple surnames, or a long family name, your assigned username may not follow the same pattern of firstname.lastname.
Please check with the designated contact for your SRE if you are unsure about your username.
Note
In this document we will use Ada Lovelace as our example user. Her username is:
short-form:
ada.lovelacelong-form:
ada.lovelace@projects.turingsafehaven.ac.uk
Network access#
The SRE that you’re using may be configured to allow access only from a specific set of IP addresses. This may involve being connected to a specific wired or wireless network or using a VPN. You also may be required to connect from a specific, secure location. You will be told what these requirements are for your particular environment.
Tip
Make sure you know the networks from which you must connect to your SRE. This information will be available in the email you received with your connection information.
Data security training requirements#
Depending on your project, you may be required to undertake data security awareness training.
Tip
Check with your designated contact to see whether this is the case for you.
Your phone for multi-factor authentication#
Multi-factor authentication (MFA) is one of the most powerful ways of verifying user identity online. We therefore use MFA to protect the project data - specifically, we will use your phone number.
Important
Make sure to have your phone with you and that you have good signal connectivity when you are connecting to the SRE.
Caution
You may encounter some connectivity challenges if your phone network has poor connectivity. The SRE is not set up to allow you to authenticate through other methods.
Domain names#
You should be given the username domain in the initial email from your System Manager. You might receive the SRE URL at this time, or you might be assigned to a particular SRE at a later point.
Note
In this document Ada Lovelace - our example user - will be participating in the sandbox project at a Turing Data Study Group.
Her username domain is
projects.turingsafehaven.ac.uk.Her SRE URL is
https://sandbox.projects.turingsafehaven.ac.uk
🔐 Password and MFA#
For security reasons, you must reset your password before you log in for the first time. Please follow these steps carefully.
Open a private/incognito browser session on your computer.
Tip
One of the most common problems that users have in connecting to the SRE is automatic completion of usernames and passwords from other accounts on their computer. This can be quite confusing, particularly for anyone who logs into Microsoft services for work or personal use.
Caution
Look out for usernames or passwords that are automatically completed, and make sure that you’re using the correct details needed to access the SRE.
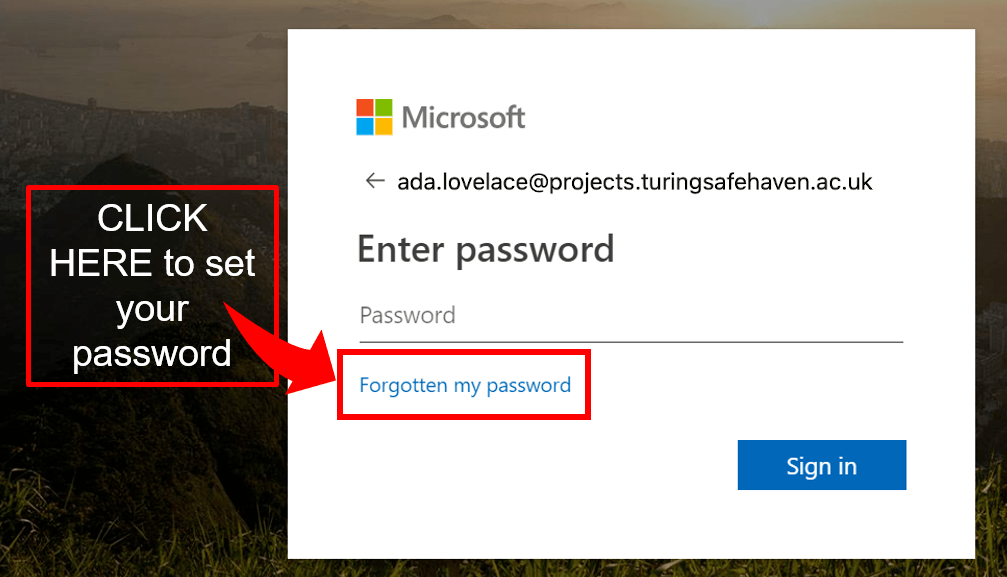
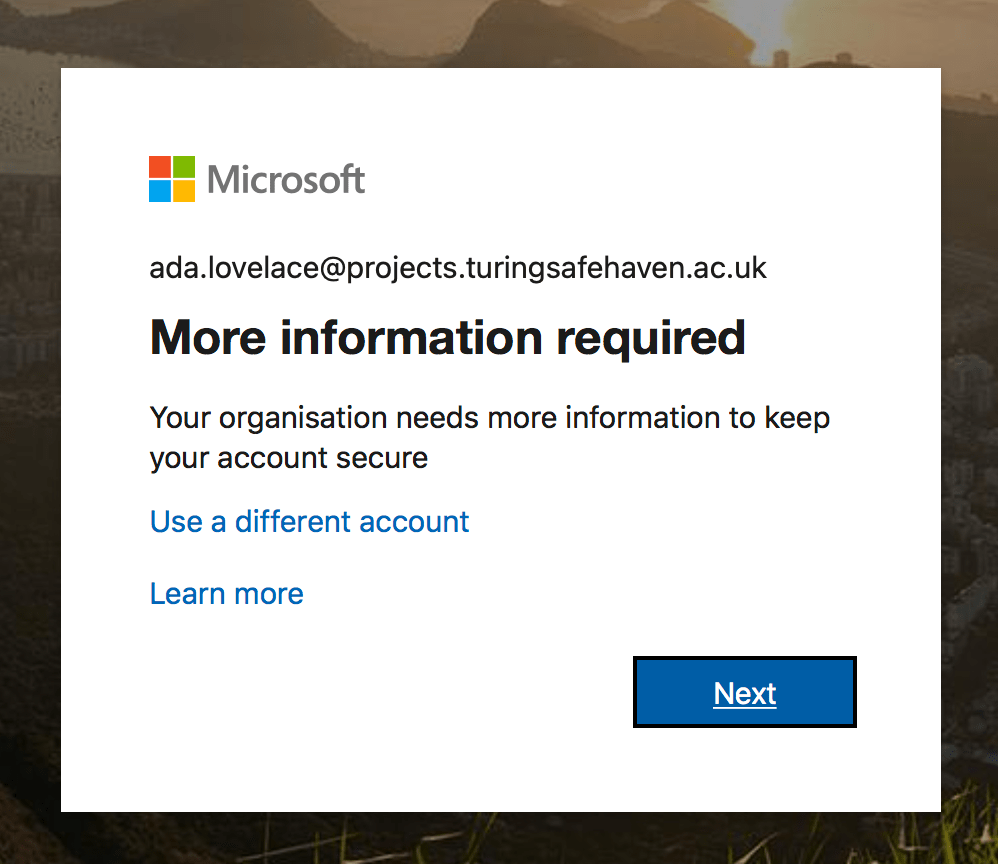
Navigate to the following URL in your browser:
https://aka.ms/mfasetup. This short link starts the process of logging into your account.At the login prompt enter
username@<username domain>and confirm/proceed. Remember that your username will probably be in the formatfirstname.lastname.Note
Our example user, Ada Lovelace, participating in the
sandboxproject at a Turing Data Study Group, would enterada.lovelace@projects.turingsafehaven.ac.ukThere will then be a password prompt.
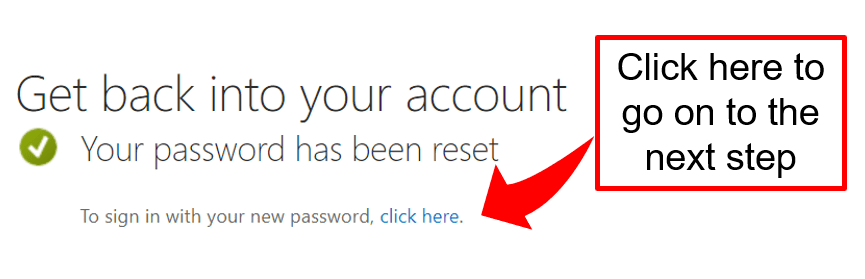
The first time you log in you need to click “Forgotten my password”.
Caution
If you reset your password, you will need to wait 5-10 mins before logging in again, to allow the user management system to sync up with the new password.
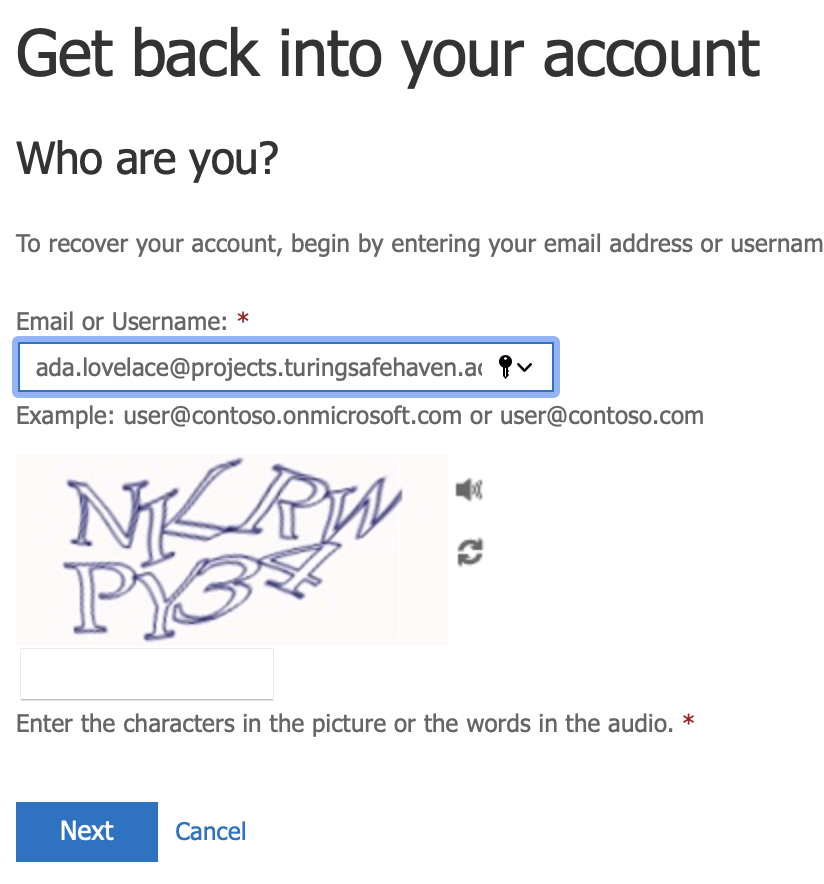
Fill out the requested CAPTCHA (your username should be pre-filled).
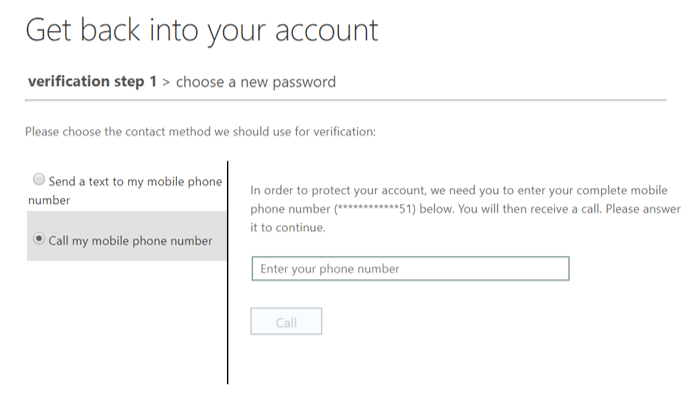
Confirm your phone number, which you provided to the System Manager when you registered for access to the environment.
Select a password.
Your password must comply with the following requirements:
Important
alphanumeric
minimum 12 characters
at least one each of:
🔠 uppercase character
🔡 lowercase character
🔢 number
you should choose a unique password for the SRE to ensure it is secure
Caution
Do not use special characters or symbols in your password! The virtual keyboard inside the SRE may not be the same as your physical keyboard and this can make it difficult to type some symbols.
Note that this will also ensure that it passes the Microsoft Azure AD password requirements.
Tip
We recommend using a password generator like this one to create a password that meets these requirements. This will ensure that the password is different from any others that you might use and that it is unlikely to be on any list of commonly used passwords.
If your password is too difficult to memorise, we recommend using a password manager, for example BitWarden or LastPass, to store it securely.
Enter your password into the
Enter new passwordandConfirm new passwordfields.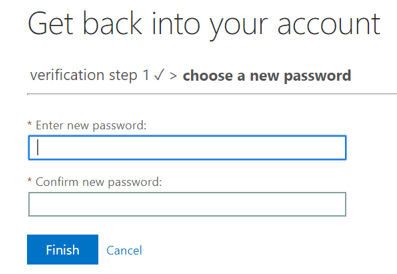
Then continue to the next step
Log into your account when prompted and at this point you will be asked for additional security verification.
🚪 Set up multi-factor authentication#
The next step in setting up your account is to authenticate your account from your phone. This additional security verification is to make it harder for people to impersonate you and connect to the environment without permission. This is known as multi-factor authentication (MFA).
📞 Phone number registration#
In order to set up MFA you will need to enter your phone number
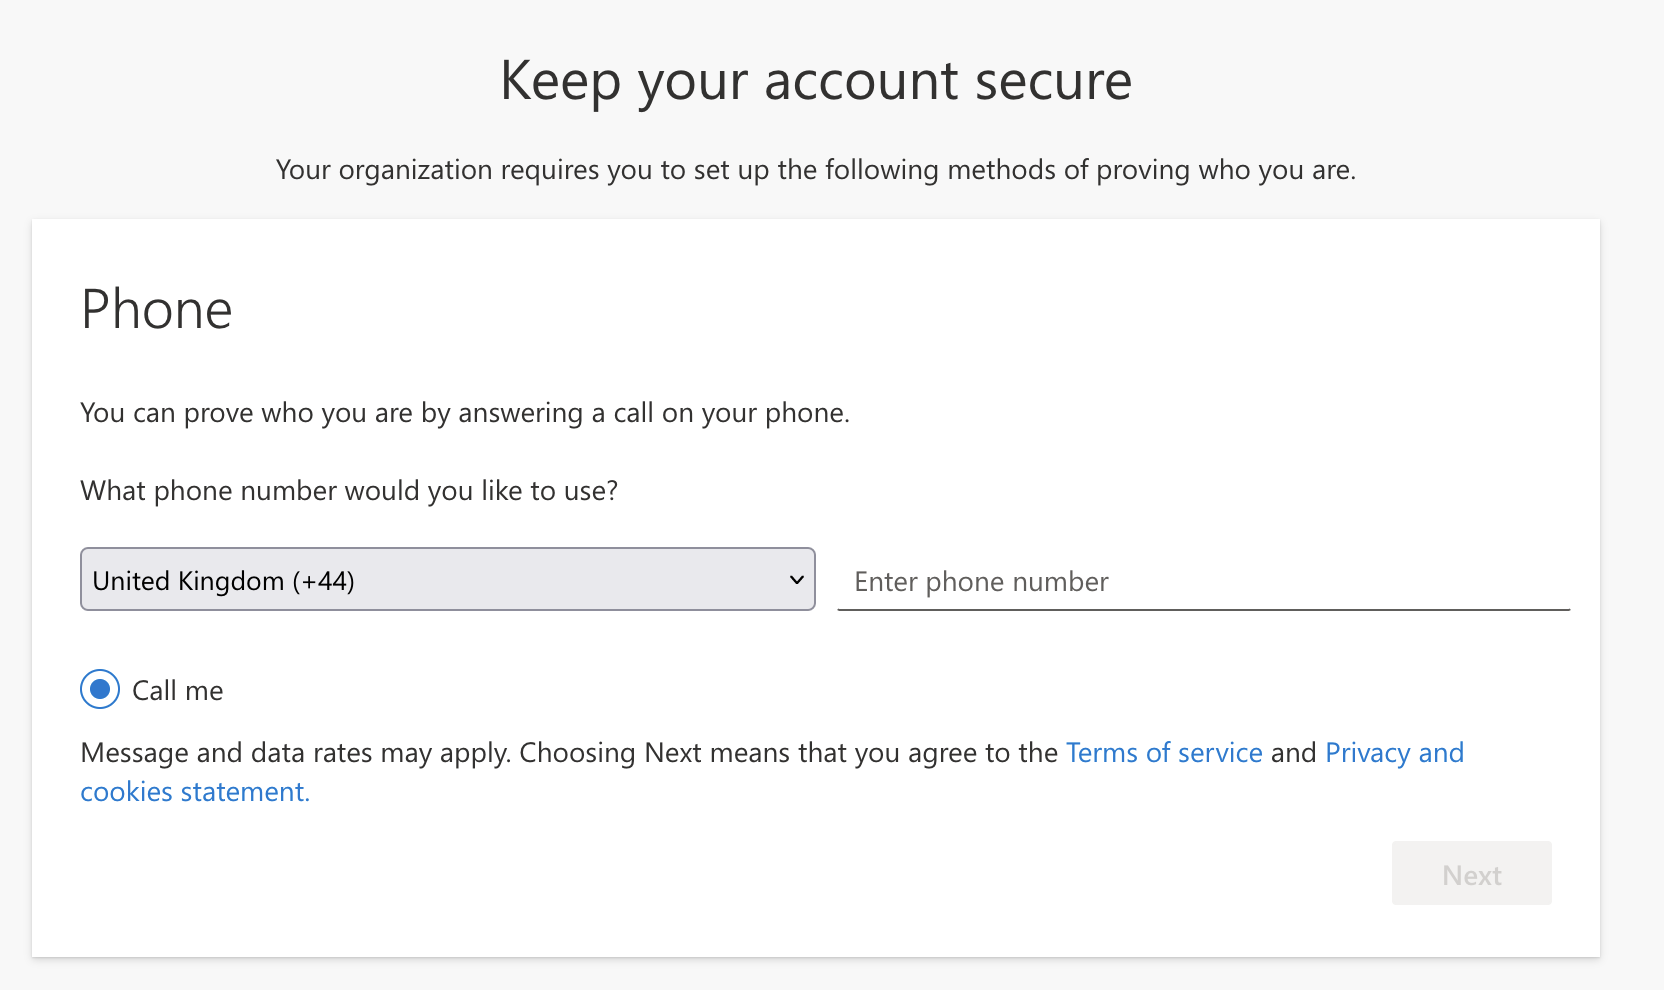
Once you click next you will receive a phone call straight away.
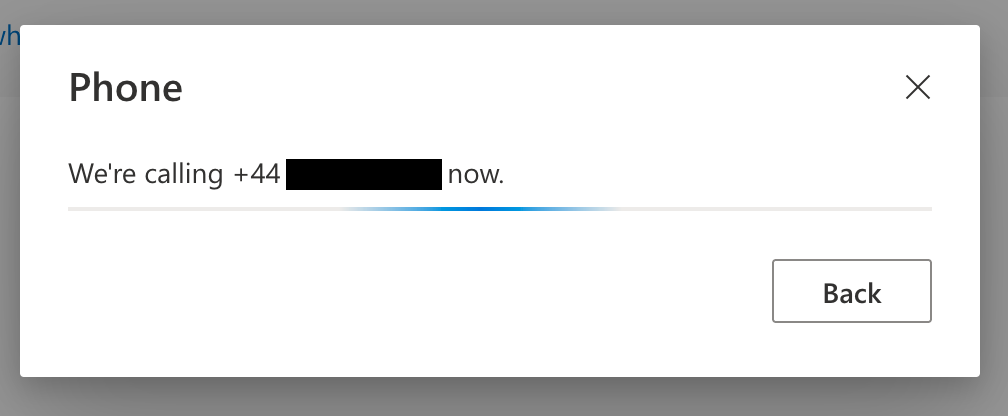
Tip
The call might say press the pound key or press the hash key both mean hit the
#button.After following the instructions you will see the following screen
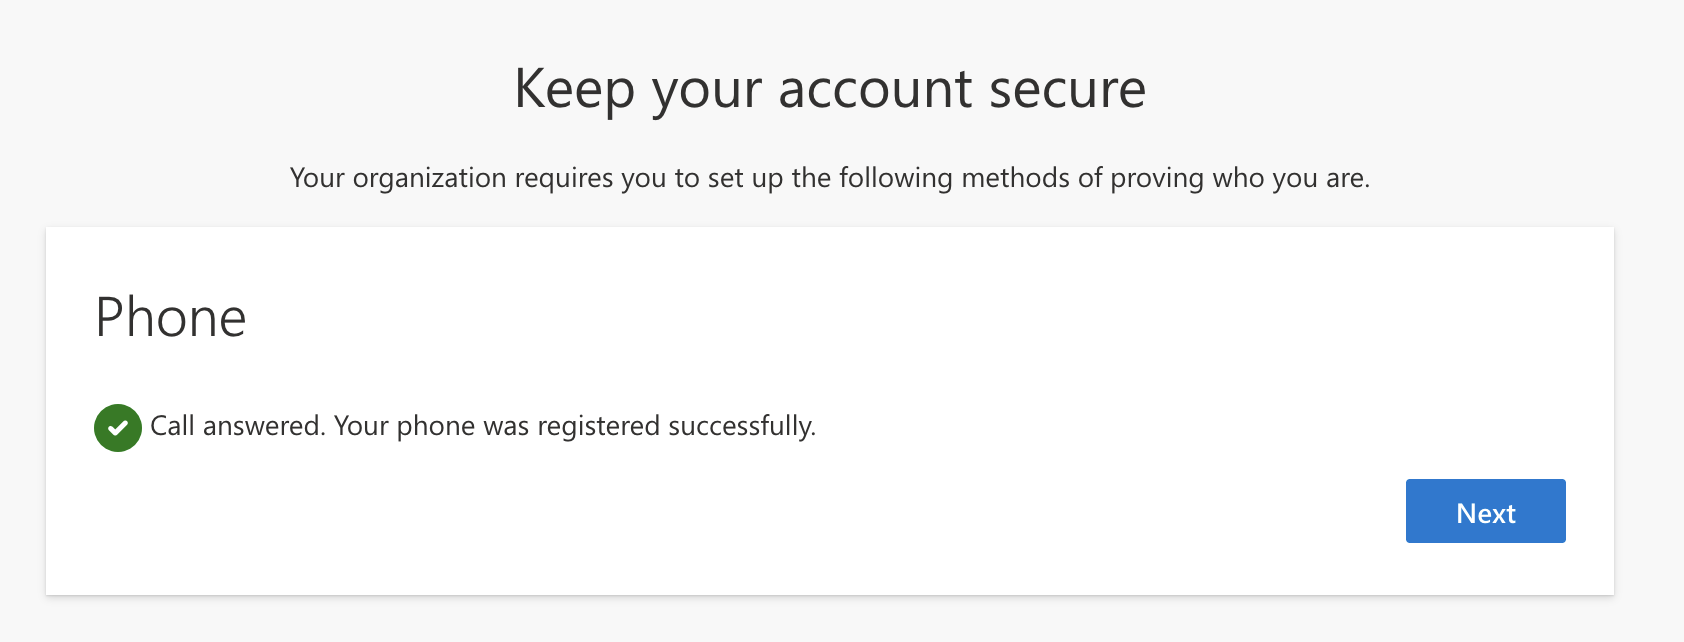
Click
Nextto register this phone number for MFA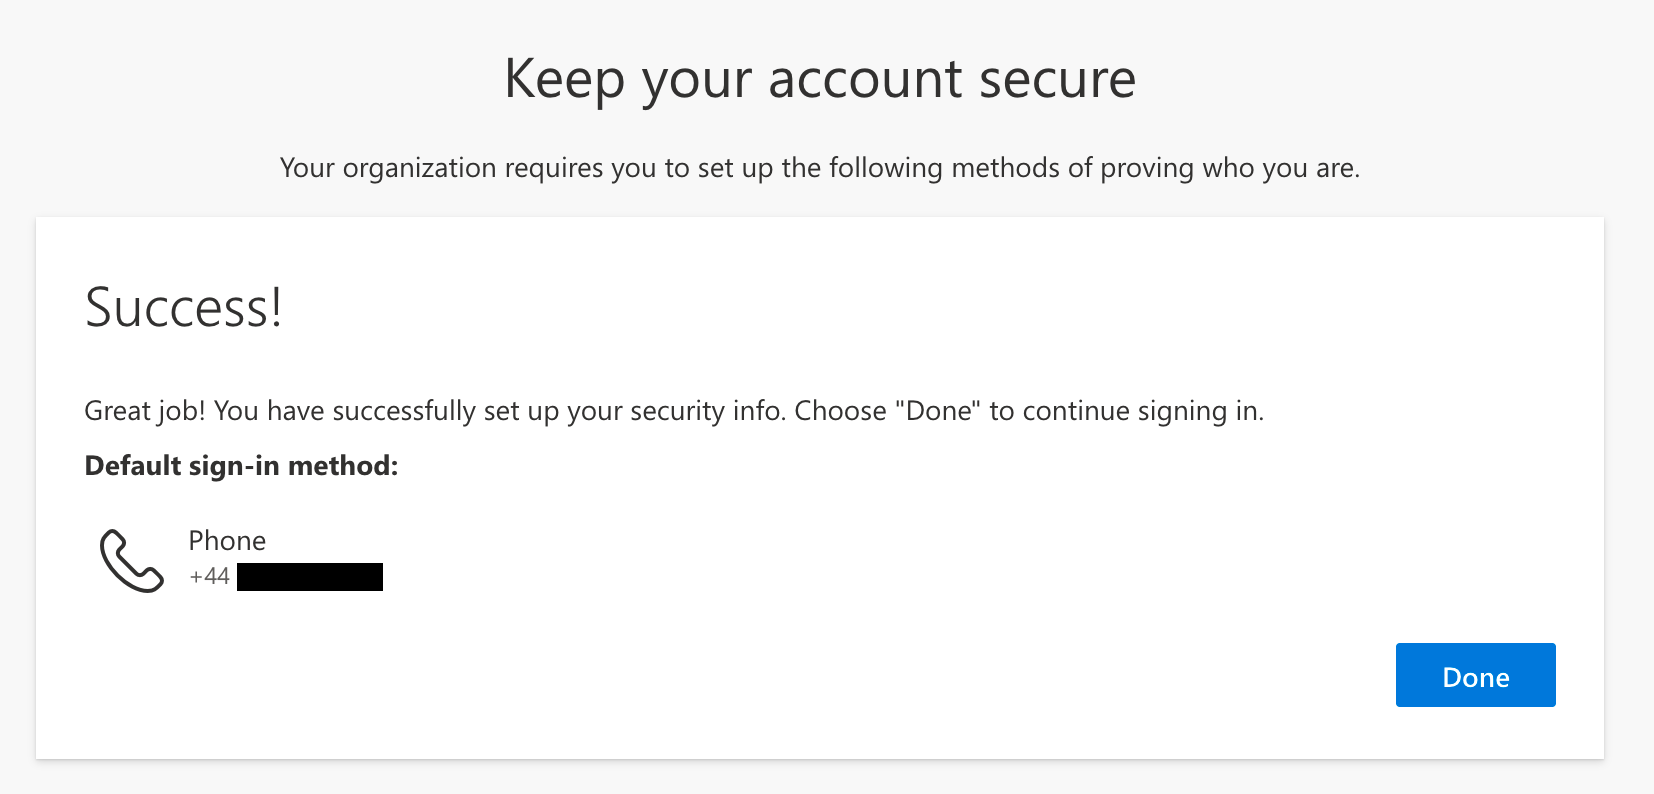
You should now see the Security Information dashboard that lists all your verified MFA methods
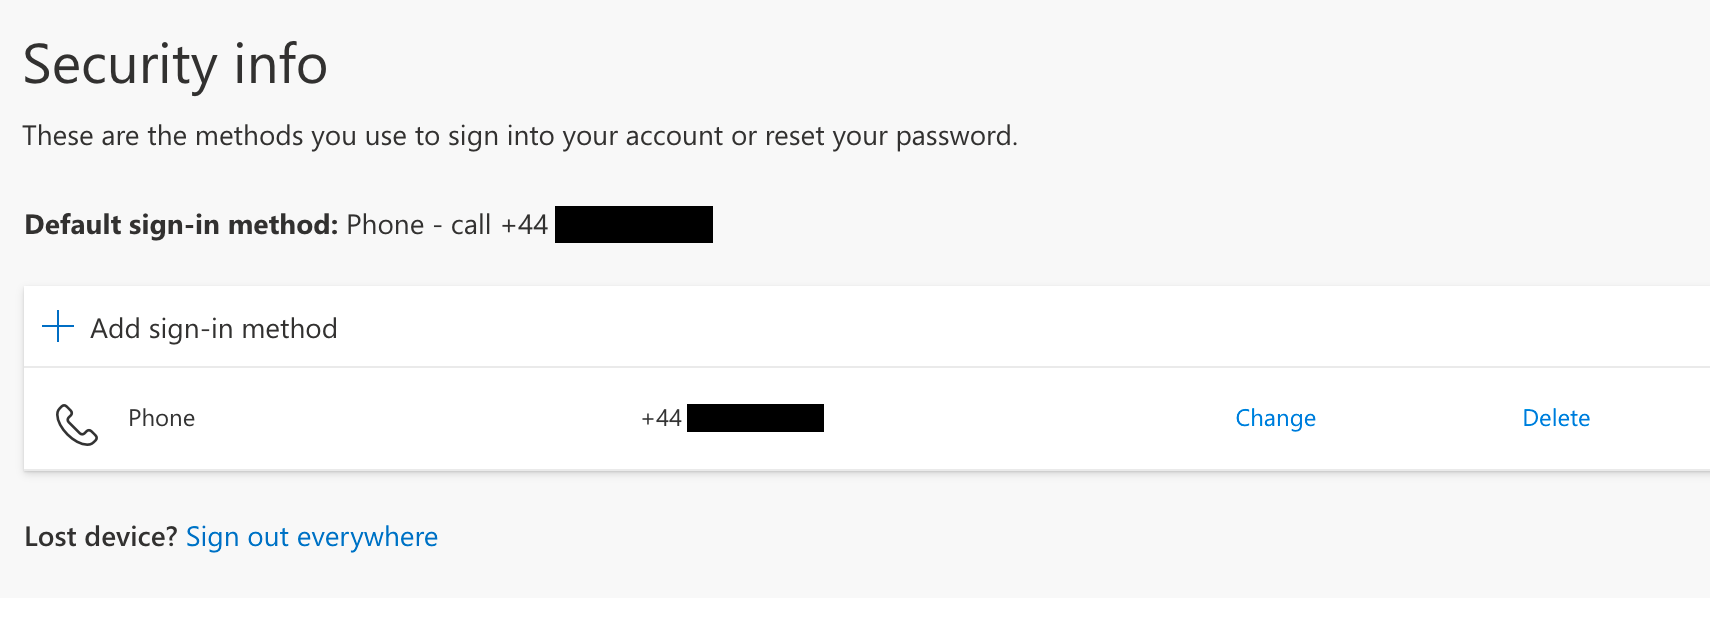
📱 Authenticator app registration#
If you want to use the Microsoft Authenticator app for MFA (which will work if you have wifi but no phone signal) then click on
+ Add sign-in methodand selectAuthenticator app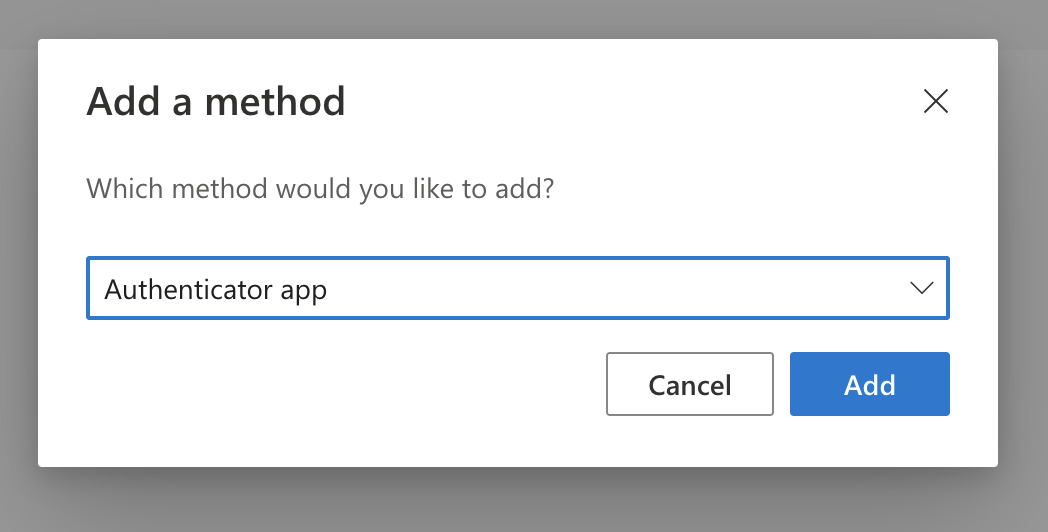
This will prompt you to download the
Microsoft Authenticatorphone app.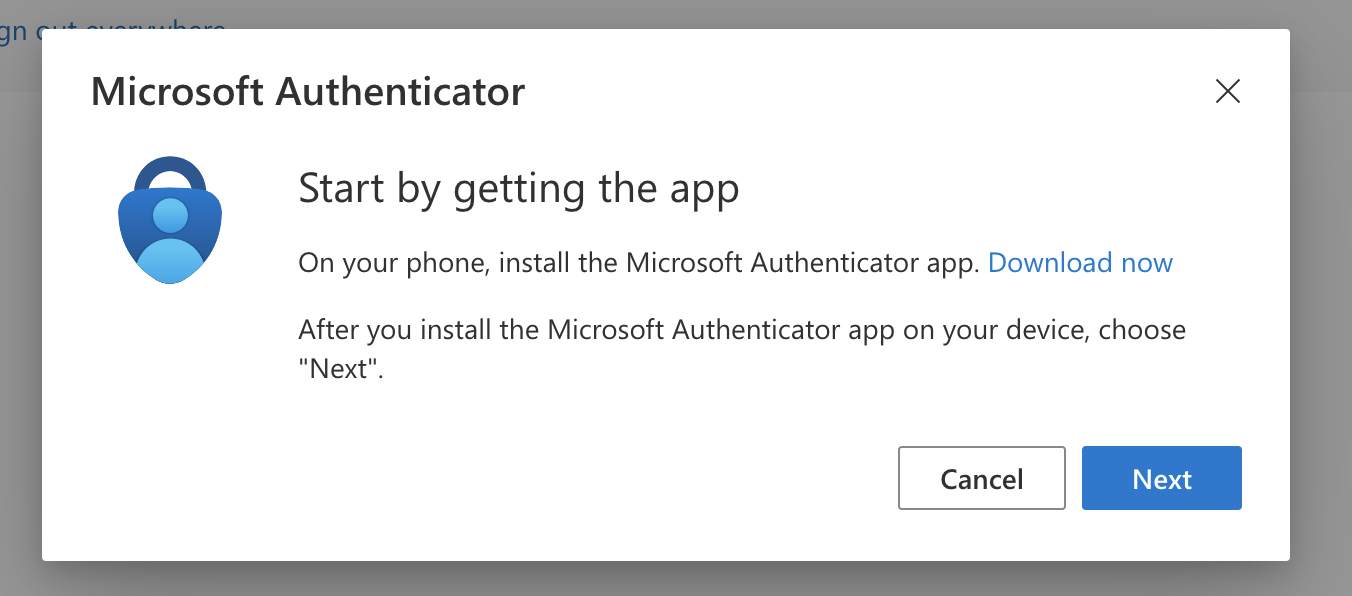
You can click on the link in the prompt or follow the appropriate link for your phone here:
🍎 iOS:
https://bit.ly/iosauthenticator🤖 Android:
https://bit.ly/androidauthenticator🍱 Windows mobile:
https://bit.ly/windowsauthenticator
You will now be prompted to open the app and:
To allow notifications
Select
Add an accountSelect
Work or School account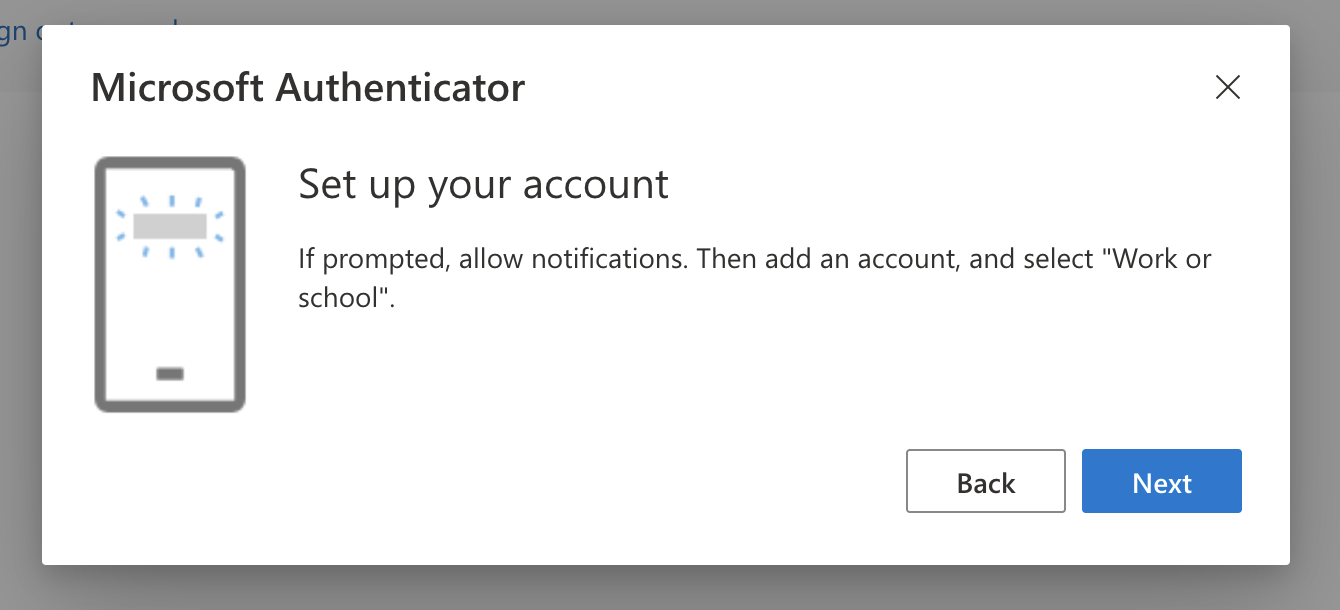
Important
You must give permission for the authenticator app to send you notifications for the app to work as an MFA method.
The next prompt will give you a QR code to scan, like the one shown below
Scan the QR code on the screen
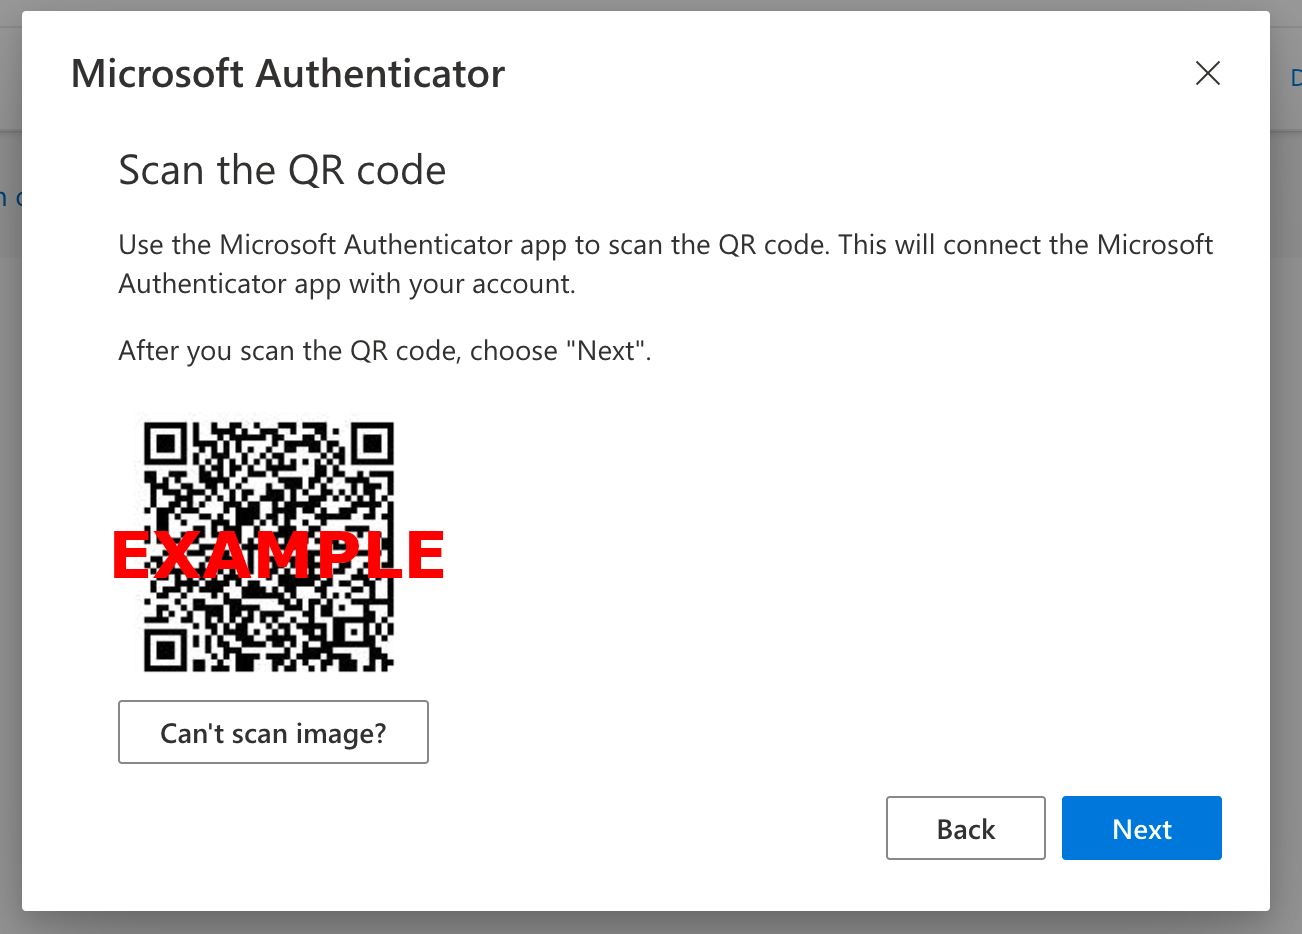
Once this is completed, Microsoft will send you a test notification to respond to
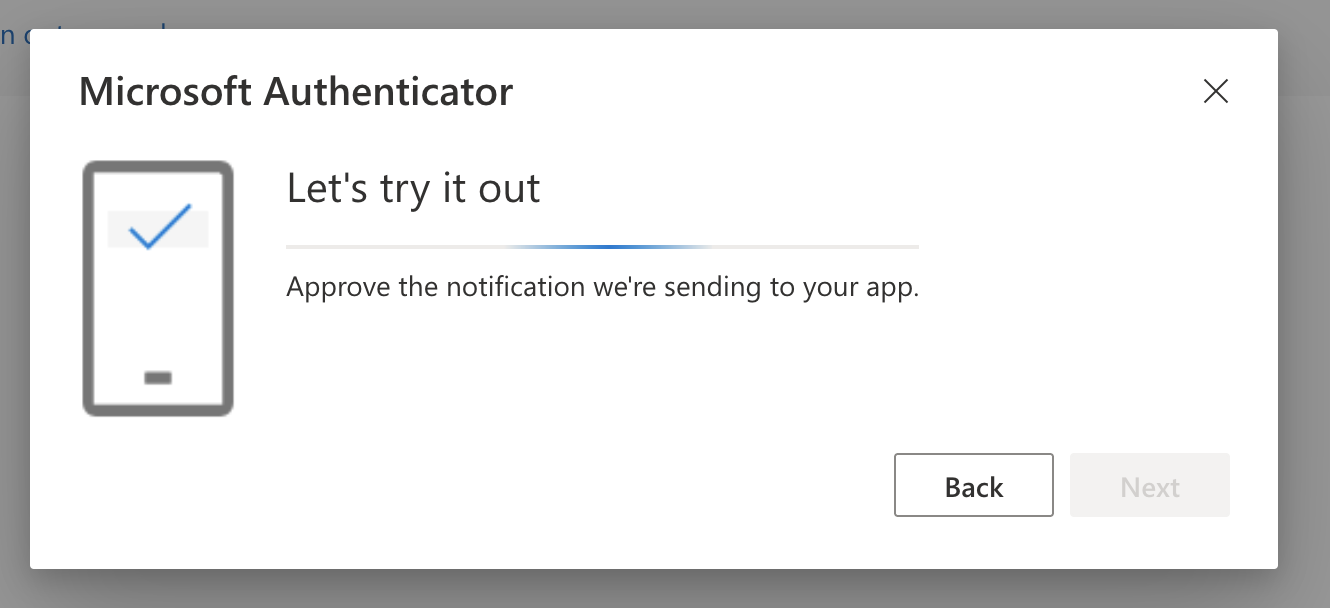
When you click
Approveon the phone notification, you will get the following message in your browser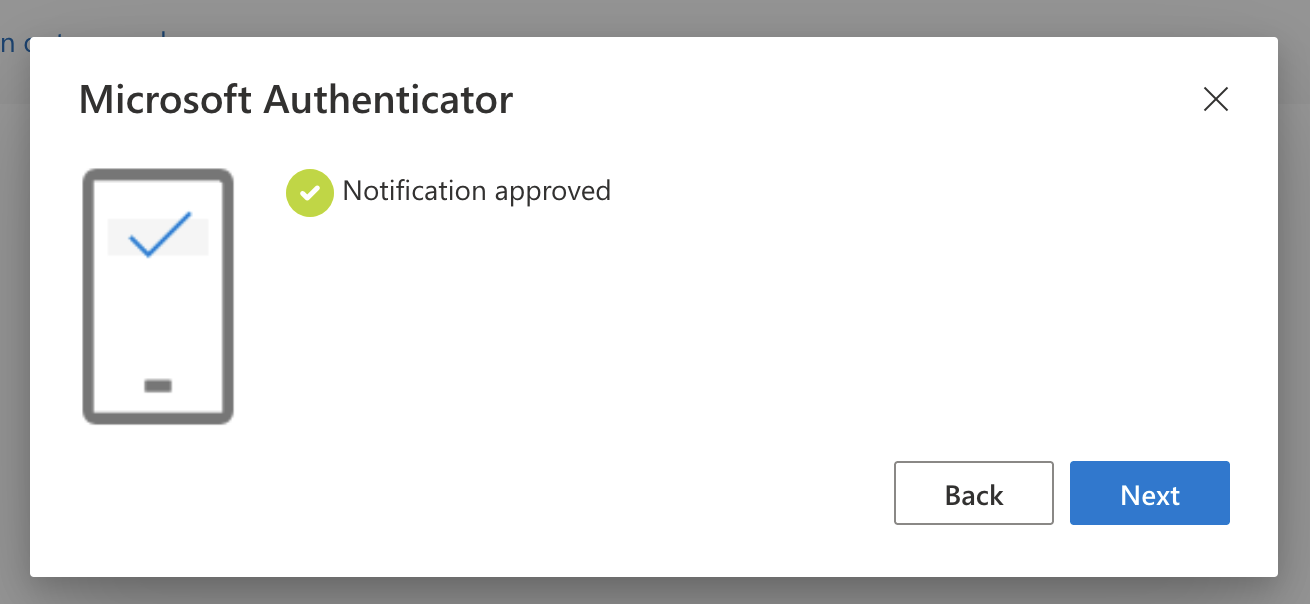
You should now be returned to the Security Information dashboard that lists two verified MFA methods
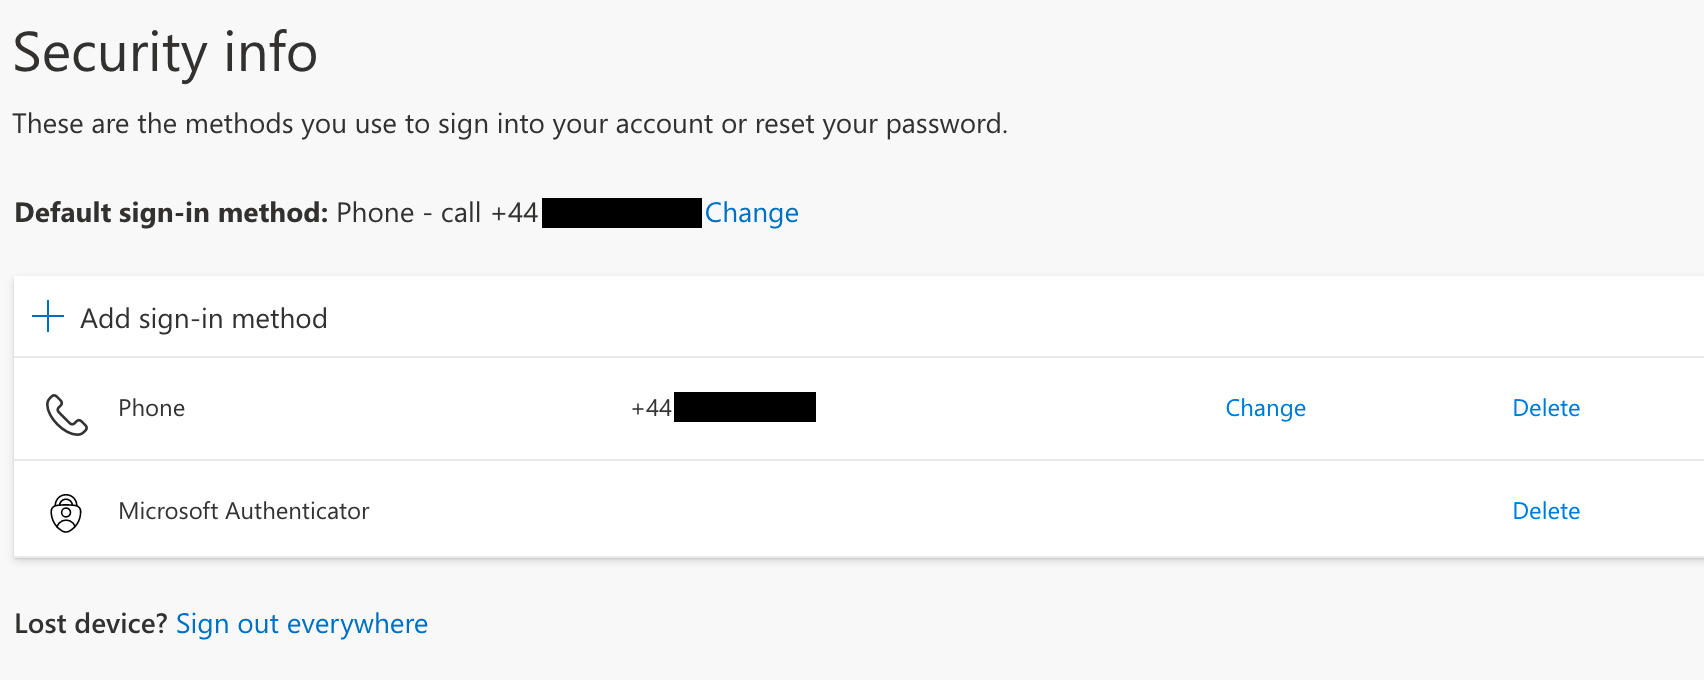
Choose whichever you prefer to be your
Default sign-in methods.You have now finished setting up MFA and you can close your browser
Troubleshooting MFA#
Sometimes setting up MFA can be problematic. You may find the following tips helpful:
📥 Make sure you allow notifications on your authenticator app.
😴 Check you don’t have Do not Disturb mode on.
⚡ You have to be SUPER FAST at acknowledging the notification on your app, since the access codes update every 30 seconds.
😕 Sometimes just going through the steps again solves the problem
🔓 Access the Secure Research Environment#
🌱 Prerequisites#
After going through the account setup procedure, you should have access to:
Your
usernameYour
passwordThe SRE URL
Multifactor authentication
Tip
If you aren’t sure about any of these then please return to the Set up your account section above.
🏠 Log into the research environment#
Open a private/incognito browser session, so that you don’t pick up any existing Microsoft logins
Go to the SRE URL given by your System Manager.
Note
Our example user, Ada Lovelace, participating in the
sandboxproject at a Turing Data Study Group, would navigate tohttps://sandbox.projects.turingsafehaven.ac.uk.Important
Don’t forget the https:// as you will not be able to login without it!
You should arrive at a login page that needs you to enter:
your
username@<username domain>your password
then click
Login.You should arrive at a login page that looks like the image below:
Note
Our example user, Ada Lovelace, participating in the
sandboxproject at a Turing Data Study Group, would enterada.lovelace@projects.turingsafehaven.ac.ukin theUser namebox, enter her password and then clickLogin.
You will now receive a call or mobile app notification to authenticate using multifactor authentication (MFA).
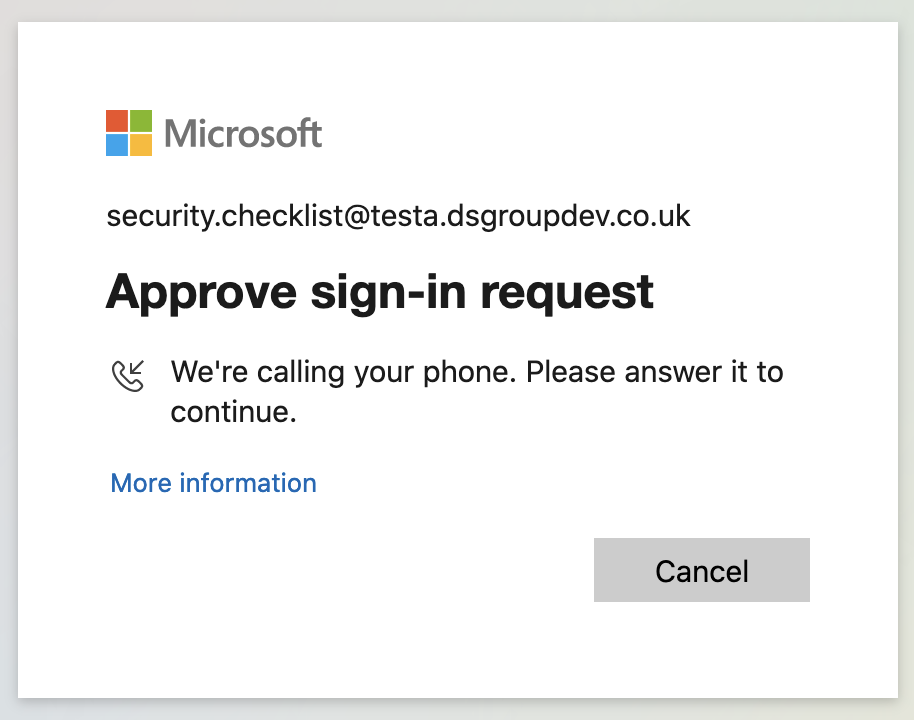
📞 For the call, you may have to move to an area with good reception and/or press the hash (
#) key multiple times in-call.📱 For the app you will see a notification saying “You have received a sign in verification request”. Go to the app to approve the request.
Caution
If you don’t respond to the MFA request quickly enough, or if it fails, you may get an error. If this happens, please retry
If you are successful, you’ll see the a screen with icons for the available apps.
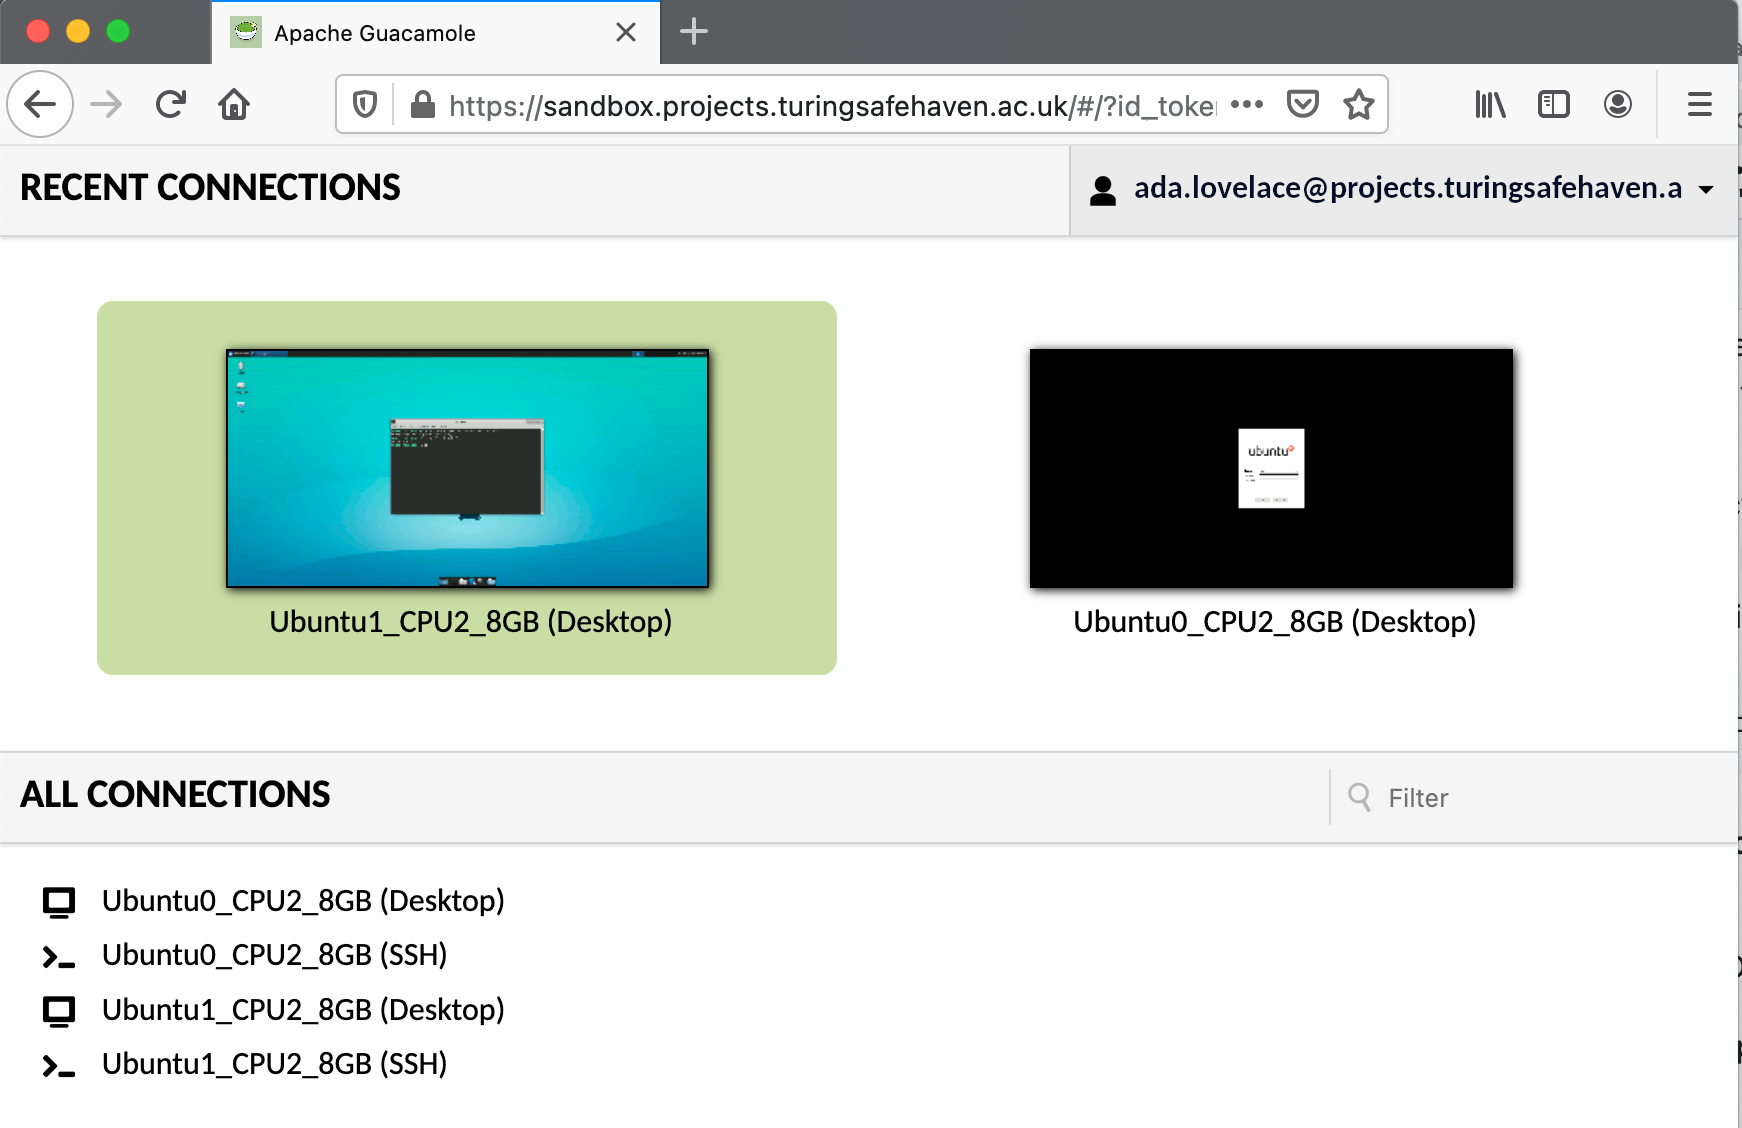
Welcome to the Data Safe Haven! 👋
🐧 Log into the Secure Research Desktop#
The primary method of performing data analysis in the SRE is using the Secure Research Desktop (SRD).
This is a virtual machine (VM) with many different applications and programming languages pre-installed on it. Once connected to it, you can analyse the sensitive data belonging to your project while remaining completely isolated from the internet.
Click on one of the
Desktopconnections (for exampleUbuntu0_CPU2_8GB (Desktop)to connect to the desktop.
Insert your username and password.
Note
Our example user, Ada Lovelace, would enter
ada.lovelaceand her password.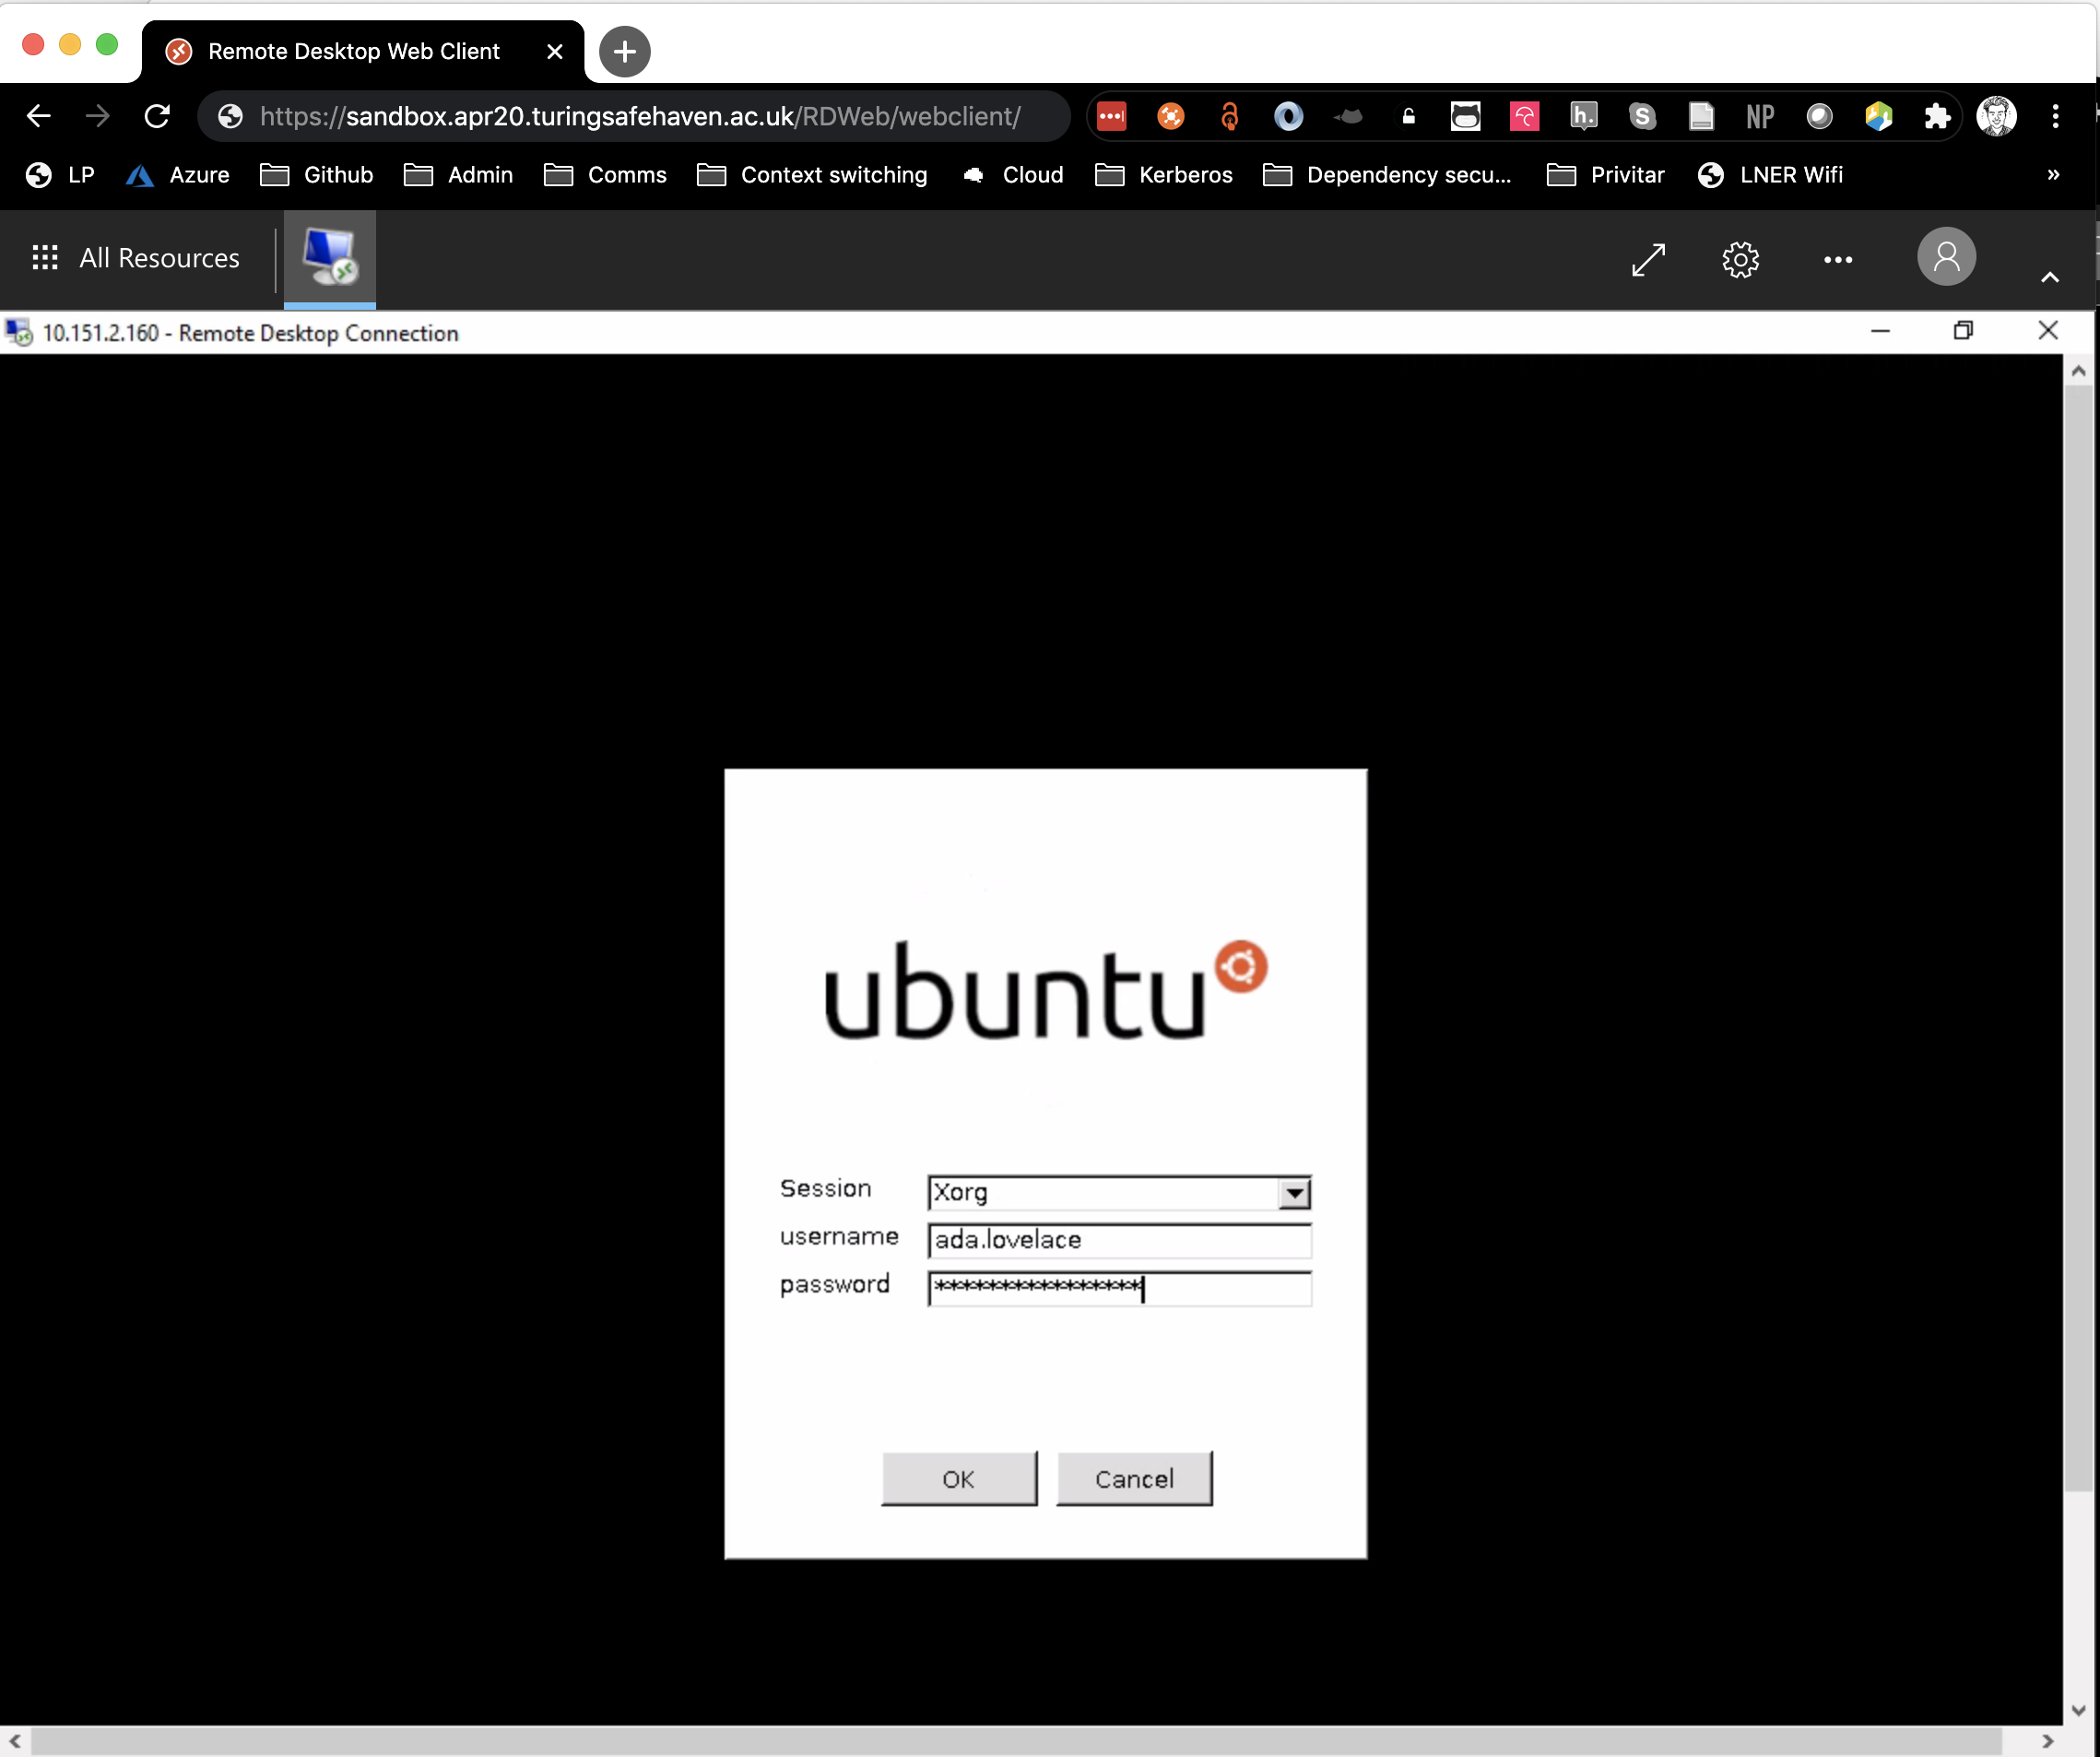
Error
If you enter your username and/or password incorrectly you will see a warning like the one below. If this happens, please try again, entering your username and password carefully.
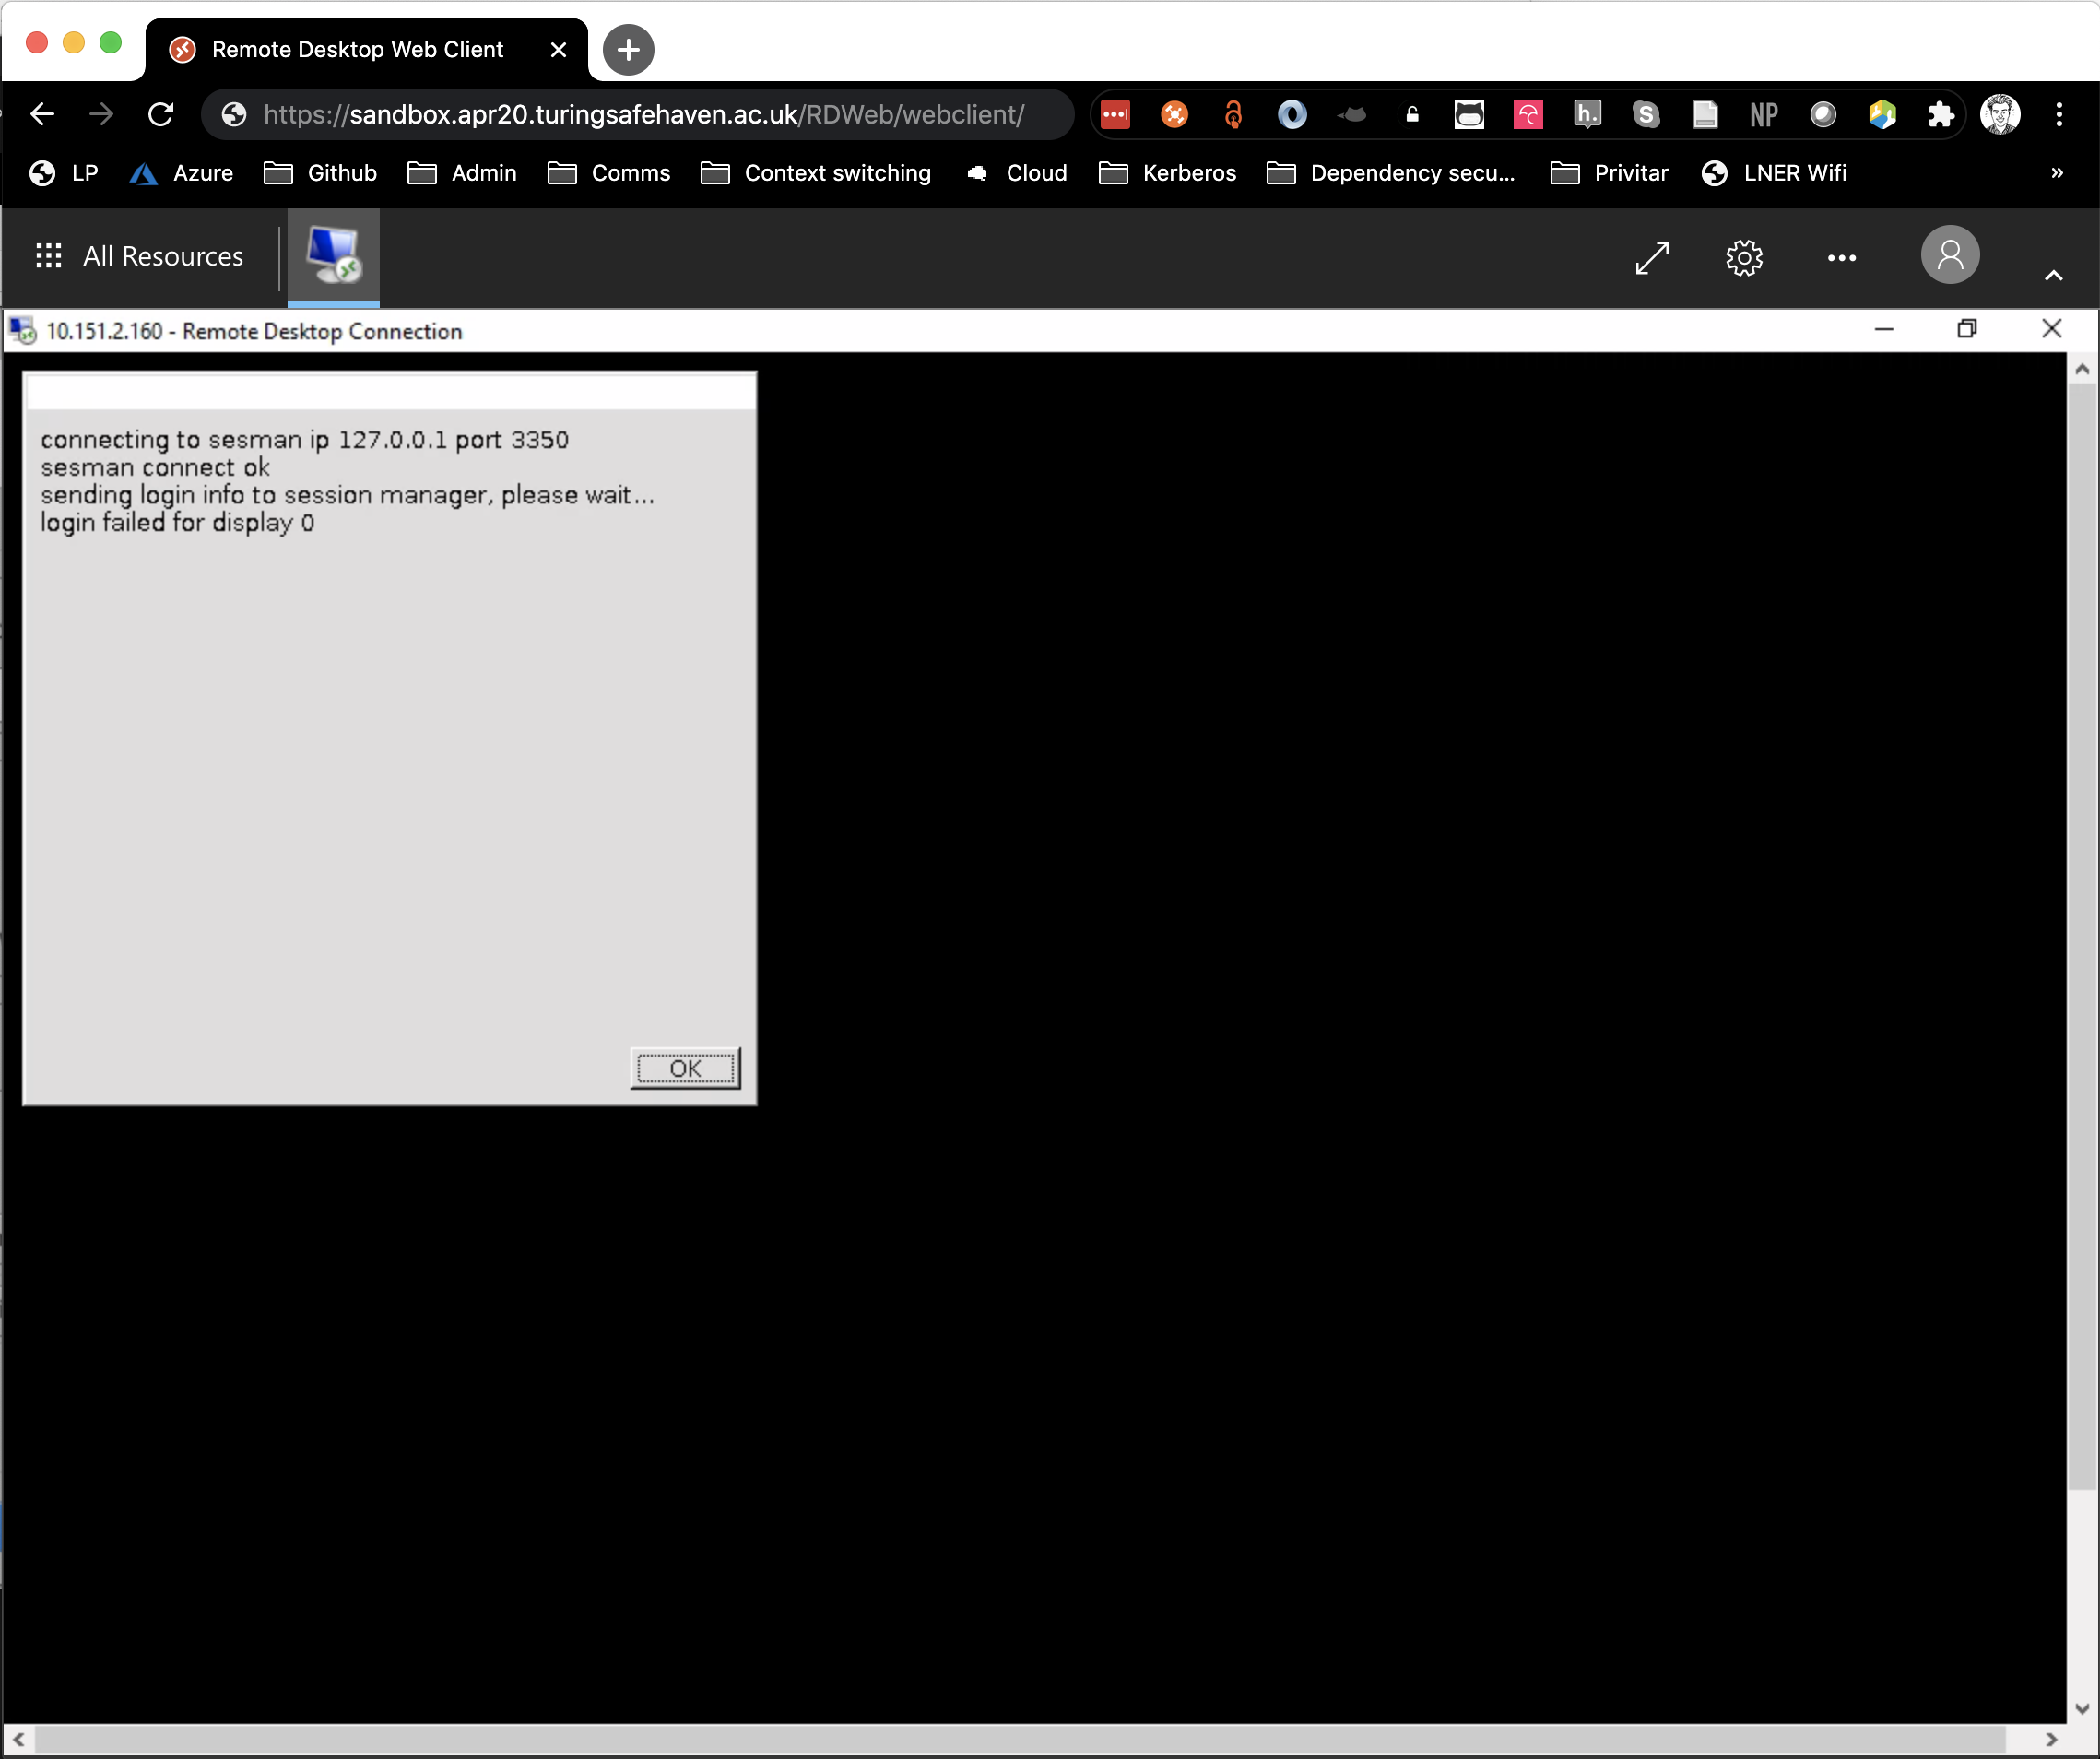
Caution
We recommend not including special characters in your password as the keyboard layout expected by the login screen may be different from the one you’re using.
if you want to reset your password, follow the steps defined in the Set your password section above.
if you want to continue with special characters in your password, please test that they are being entered correctly by typing them in the username field.
You should now be greeted by a Linux desktop.
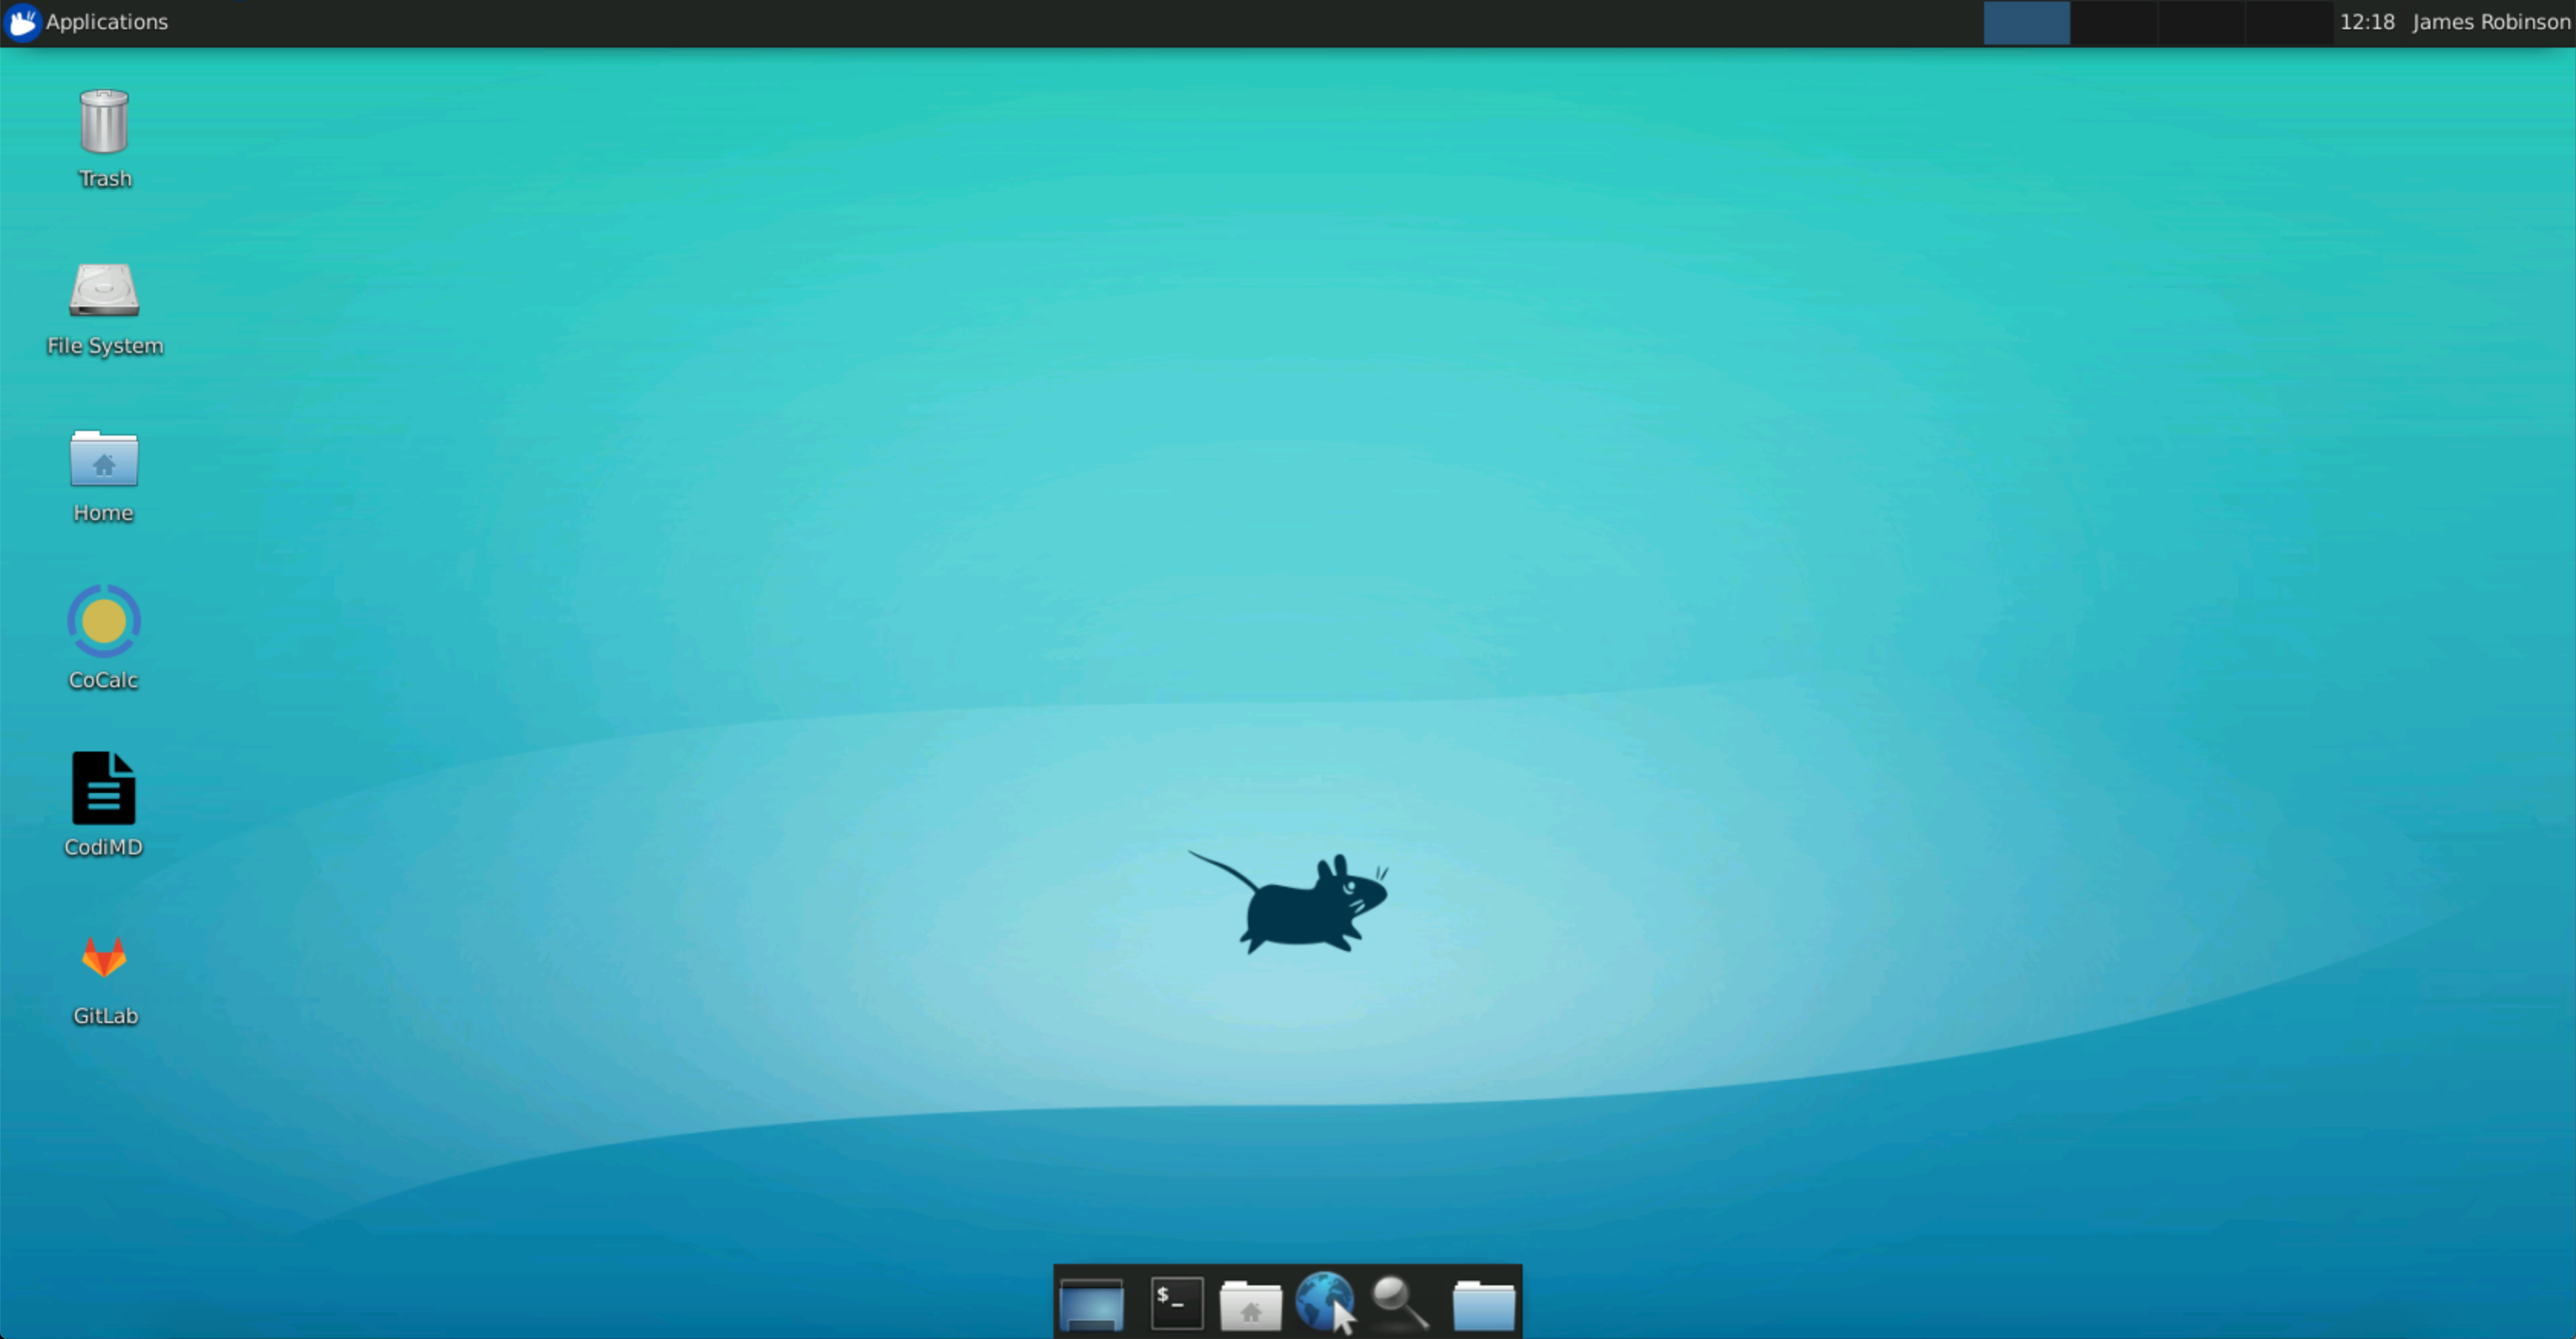
You are now logged into the Data Safe Haven SRE! Welcome 👋
💻 Analysing sensitive data#
The SRD has several pre-installed applications and programming languages to help with your data analysis.
📦 Pre-installed applications#
Programming languages / compilers#
CC++CMakecompilerFortrangcccompilersJavaJulia(plus common data science libraries)Microsoft .NETframeworkPython[three most recent versions] (plus common data science libraries)R(plus common data science libraries)Rustcompiler withcargopackage managerscalaspark-shell
Editors / IDEs#
emacsnanoPyCharmRStudioSpydervimVisual Studio Code
Writing / presentation tools#
TeXStudiofor technical writingLaTeX/pdflatex/xelatexfor producing different document outputsLibreOfficefor creating presentations
Database access tools#
Azure Data StudioDBeaverpsqlsqlcmd
Other useful software#
Firefoxgitweka
If you need anything that is not already installed, please discuss this with the designated contact for your SRE.
Attention
This secure research desktop SRD is your interface to a single computer running in the cloud. You may have access to additional SRDs so be careful to check which machine you are working in as files and installed packages may not be the same across the machines.
🎹 Keyboard mapping#
When you access the SRD you are actually connecting through the cloud to another computer - via a few intermediate computers/servers that monitor and maintain the security of the SRE.
Caution
You may find that the keyboard mapping on your computer is not the same as the one set for the SRD.
Click on Desktop and Applications > Settings > Keyboard to change the layout.
Tip
We recommend opening a text editor (such as Atom , see Access applications below) to check what keys the remote desktop thinks you’re typing – especially if you need to use special characters.
🔓 Access applications#
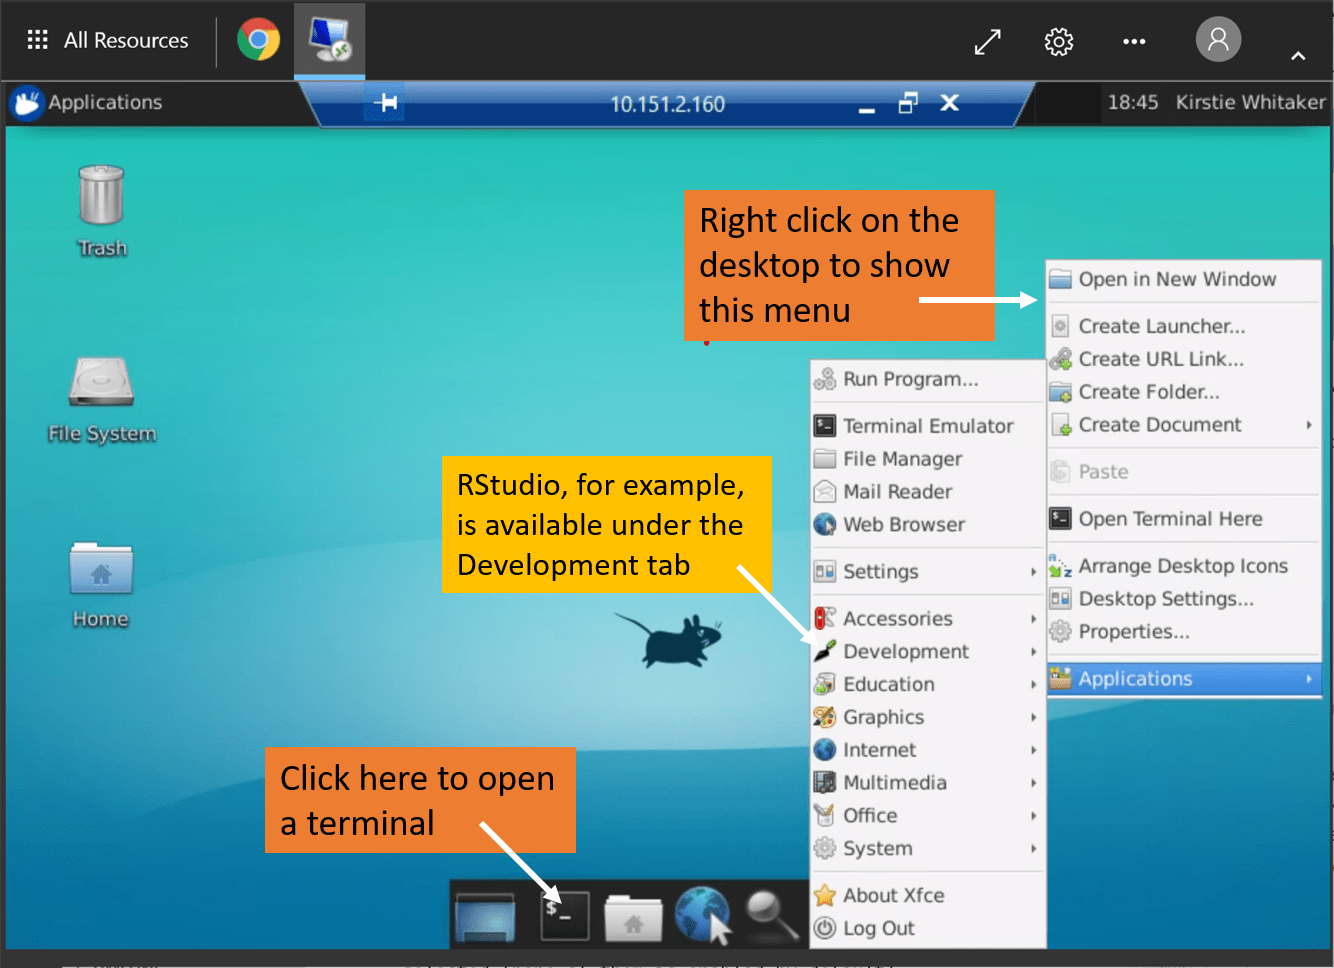
You can access applications from the desktop in two ways: the terminal or via a drop down menu.
Applications can be accessed from the dropdown menu. For example:
Applications > Development > AtomApplications > Development > Jupyter NotebookApplications > Development > PyCharmApplications > Development > RStudioApplications > Education > QGIS Desktop
Applications can be accessed from a terminal. For example:
Open
Terminaland runjupyter notebook &if you want to usePythonwithin a jupyter notebook.
🐍 Available Python and R versions#
Typing R at the command line will give you the system version of R with many custom packages pre-installed.
There are several versions of Python installed, which are managed through pyenv.
You can see the default version (indicated by a ‘*’) and all other installed versions using the following command:
> pyenv versions
This will give output like:
  system
  3.8.12
* 3.9.10 (set by /home/ada.lovelace/.pyenv_version)
  3.10.2
You can change your preferred Python version globally or on a folder-by-folder basis using
pyenv global <version number>(to change the version globally)pyenv local <version number>(to change the version for the folder you are currently in)
Creating virtual environments#
We recommend that you use a dedicated virtual environment for developing your code in Python.
You can easily create a new virtual environment based on any of the available Python versions
> pyenv virtualenv 3.8.12 myvirtualenv
You can then activate it with:
> pyenv shell myvirtualenv
or if you want to automatically switch to it whenever you are in the current directory
> pyenv local myvirtualenv
🎁 Install R and python packages#
There are local copies of the PyPI and CRAN package repositories available within the SRE.
You can install packages you need from these copies in the usual way, for example pip install and install.packages for Python and R respectively.
Caution
You will not have access to install packages system-wide and will therefore need to install packages in a user directory.
For
CRANyou will be prompted to make a user package directory when you install your first package.For
PyPIyou will need to install using the--userargument topip.
R packages#
You can install R packages from inside R (or RStudio):
> install.packages(<package-name>)
You will see something like the following:
Installing package into '/usr/local/lib/R/site-library'
(as 'lib' is unspecified)
Warning in install.packages("cluster") :
  'lib = "/usr/local/lib/R/site-library"' is not writable
Would you like to use a personal library instead? (yes/No/cancel)
Enter yes, which prompts you to confirm the name of the library:
Would you like to create a personal library
'~/R/x86_64-pc-linux-gnu-library/3.5'
to install packages into? (yes/No/cancel)
Enter yes, to install the packages.
Python packages#
You can install python packages from a terminal.
pip install --user <package-name>
Tip
If you are using a virtual environment as recommended above, you will not need the --user flag.
Package availability#
Depending on the type of data you are accessing, different R and python packages will be available to you (in addition to the ones that are pre-installed):
Tier 2 (medium security) environments have full mirrors of
PyPIandCRANavailable.Tier 3 (high security) environments only have pre-authorised packages available.
If you need to use a package that is not on the allowlist see the section on how to bring software or data into the environment below.
👫 Collaborate on code using CoCalc#
CoCalc is a collaborative calculation and data science environment.
It lets you work with others on projects, using Jupyter, LaTeX, Octave, Python or R in collaborative notebooks.
The CoCalc instance within the SRE is the easiest way to work directly with others in your team (for example pair-programming) who might not be physically near you.
You do not need to worry about the security of the information you upload there as it is fully contained within the SRE and there is no access to the internet and / or external servers.
Important
The CoCalc instance within the SRE is entirely separate from the https://cocalc.com service.
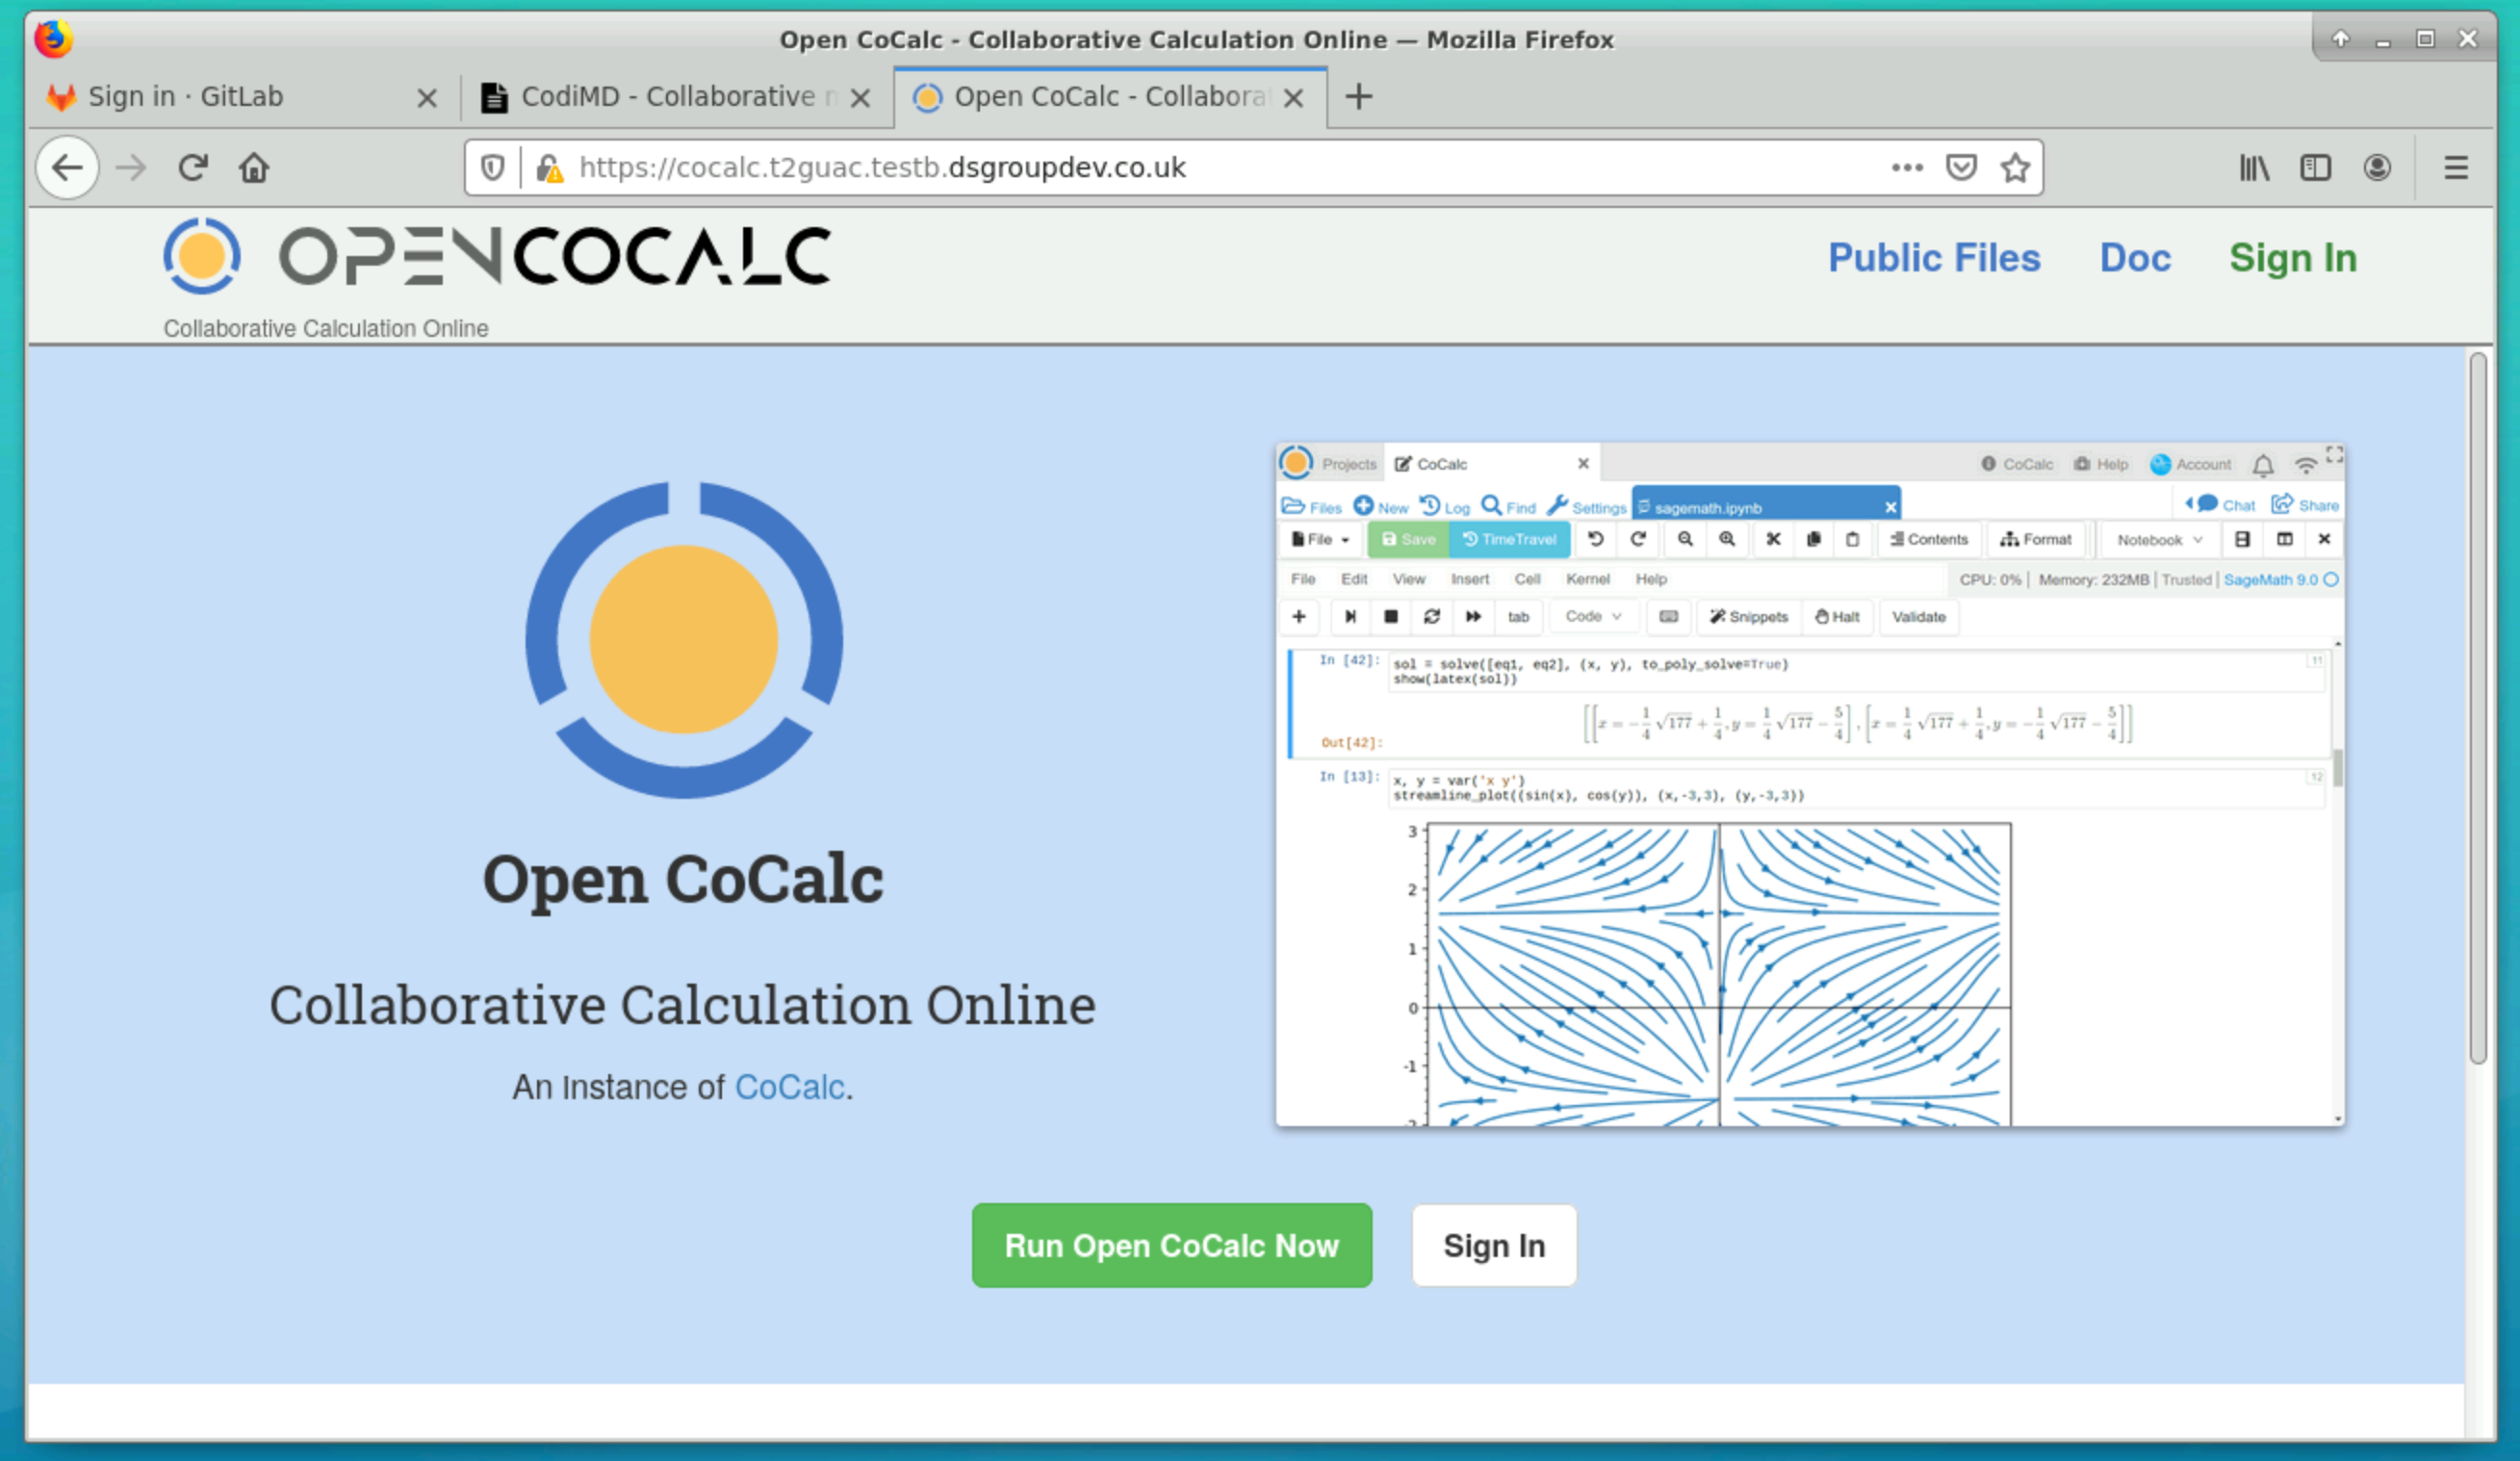
🔓 Access CoCalc#
You can access CoCalc from an internet browser in the SRD using the desktop shortcut.
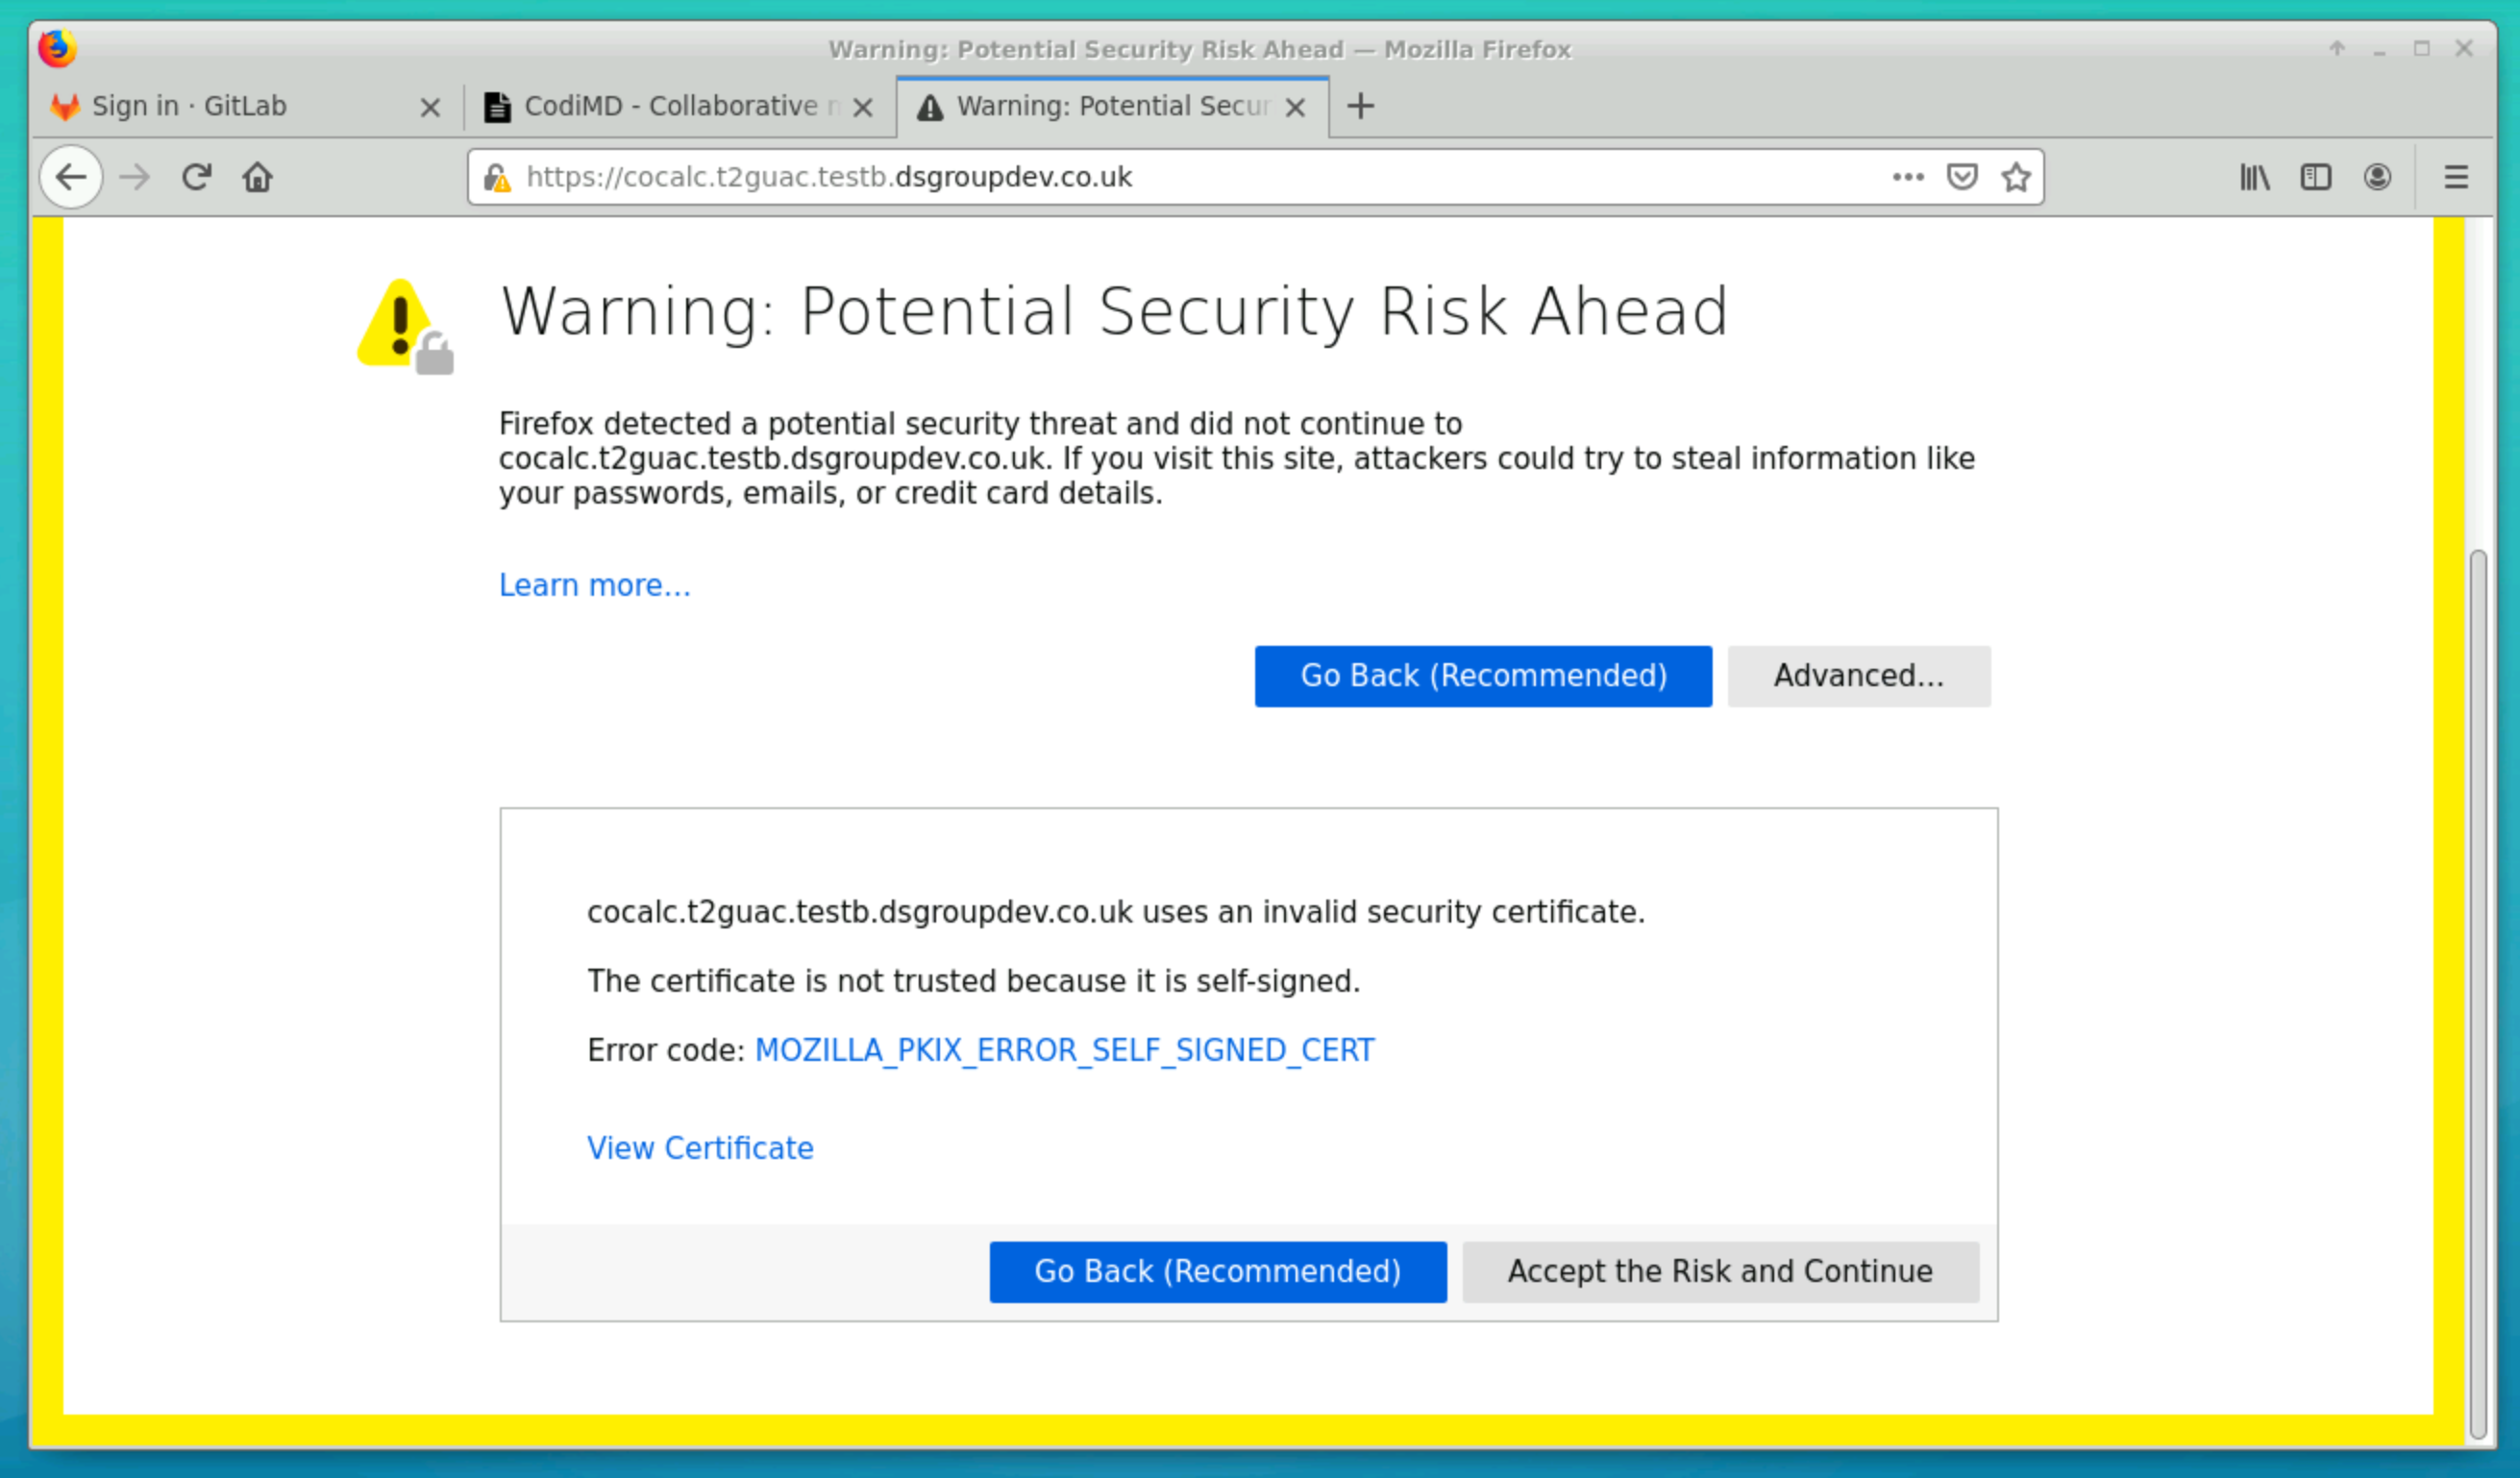
The first time that you login, you will see a security warning.
This is expected, please click on Advanced and then Accept the Risk and Continue.
You will then get to the CoCalc homepage where you should click on Sign In
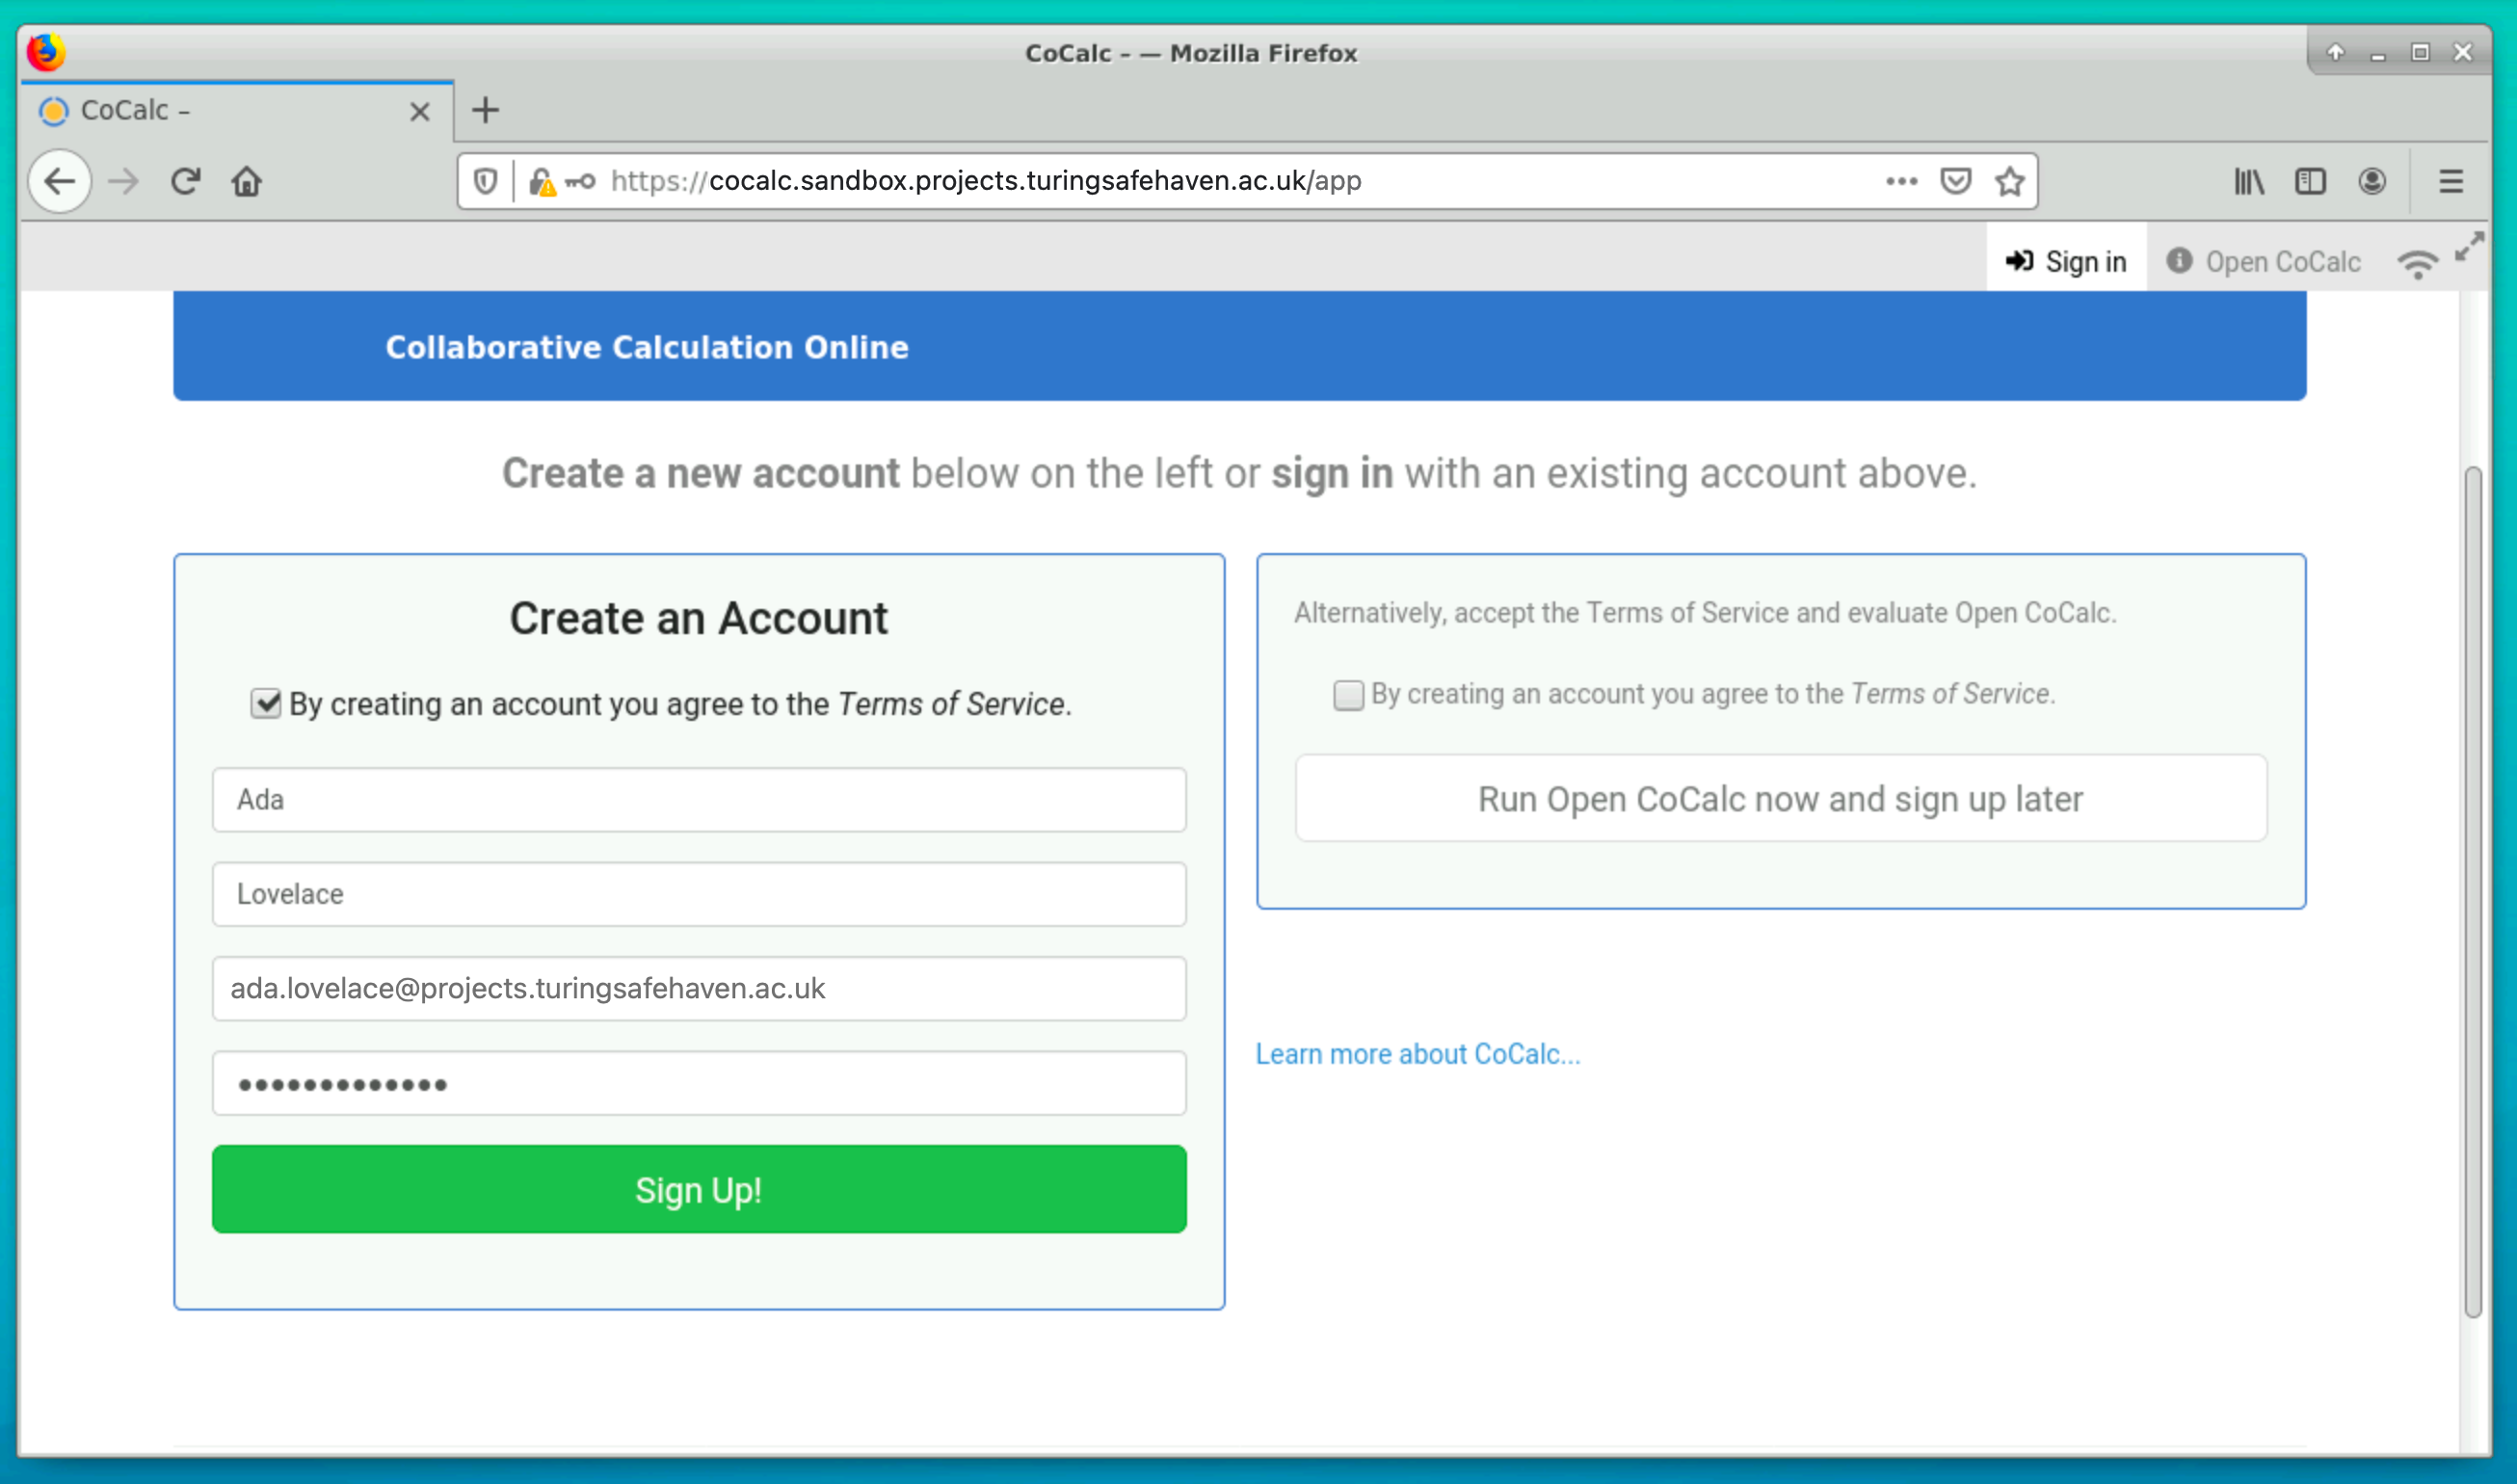
You will need to create a new account. You can use any username/password here - it is not connected to your main Safe Haven account.
Note
Our example user, Ada Lovelace has used ada.lovelace@projects.turingsafehaven.ac.uk as her username and set her own password
💊 Versioning code using GitLab#
GitLab is a code hosting platform for version control and collaboration - similar to GitHub.
It allows you to use git to version control your work, coordinate tasks using GitLab issues and review work using GitLab merge requests.
Note
GitLab is a fully open source project.
This information doesn’t matter at all for how you use GitLab within the SRE, but we do want to thank the community for maintaining free and open source software for us to use and reuse.
You can read more about GitLab at their code repository.
The GitLab instance within the SRE can contain code, documentation and results from your team’s analyses.
You do not need to worry about the security of the information you upload there as it is fully contained within the SRE and there is no access to the internet and/or external servers.
Important
The GitLab instance within the SRE is entirely separate from the https://gitlab.com service.
📚 Maintaining an archive of the project#
The Data Safe Haven SRE is hosted on the Microsoft Azure cloud platform. One of the benefits of having cloud based infastructure is that it can be deleted forever when the project is over. Deleting the infrastructure ensures that neither sensitive data nor insights derived from the data or modelling techniques persist.
Make sure that every piece of code you think might be useful is stored in a GitLab repository within the secure environment.
Any other work should be transferred to the shared /shared/ drive.
Anything that you think should be considered for egress from the environment (eg. images or processed datasets) should be transferred to the shared /output/ drive.
Caution
If you are participating in a Turing Data Study Group, everything that is not stored in a GitLab repository or on the shared /shared/ or /output/ drives by Friday lunchtime will be DESTROYED FOR EVER.
🔓 Access GitLab#
You can access GitLab from an internet browser in the SRD using the desktop shortcut.
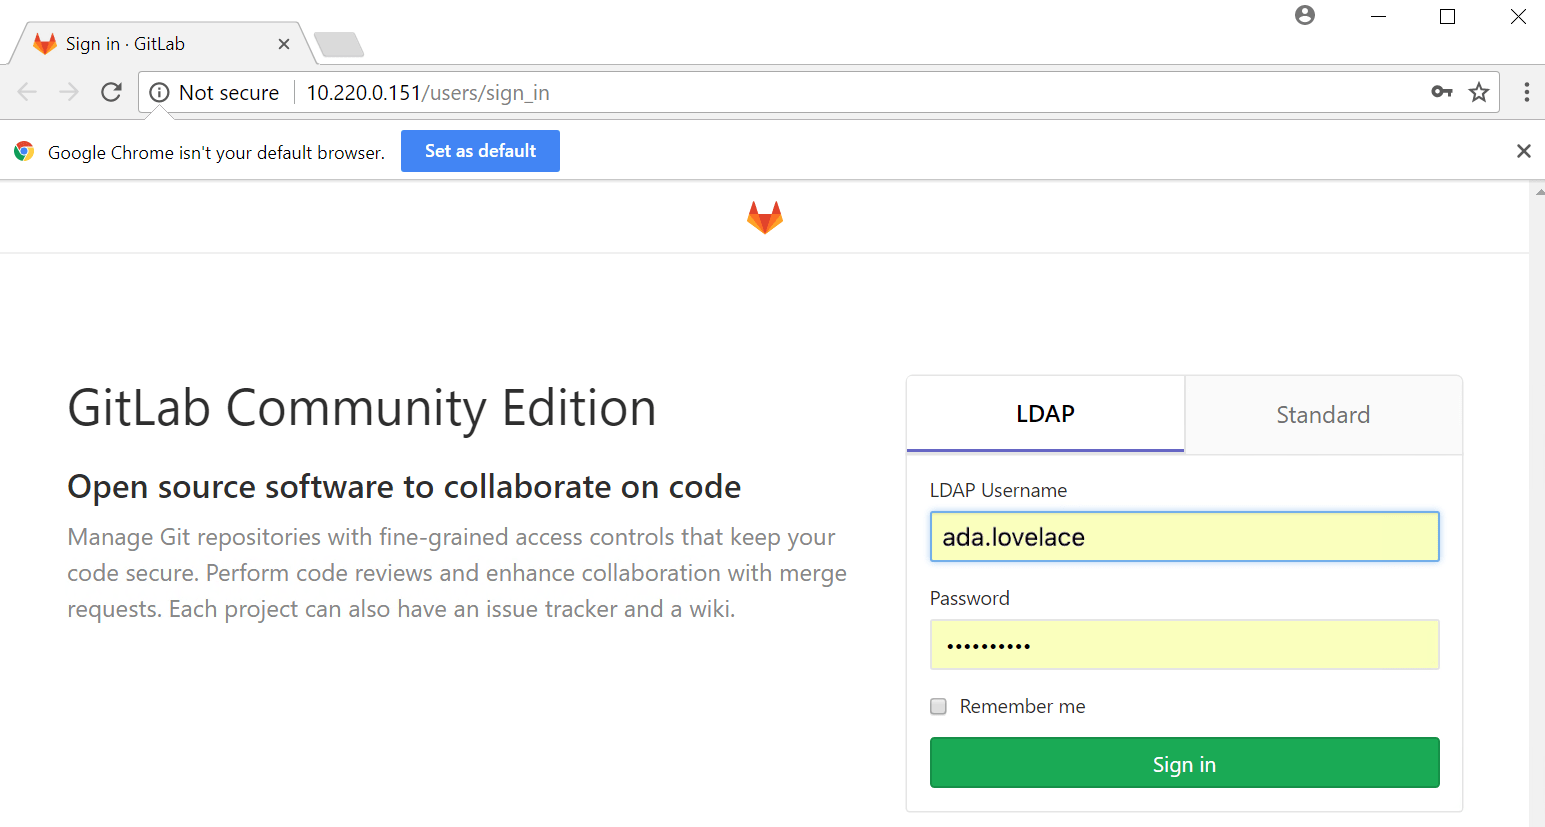
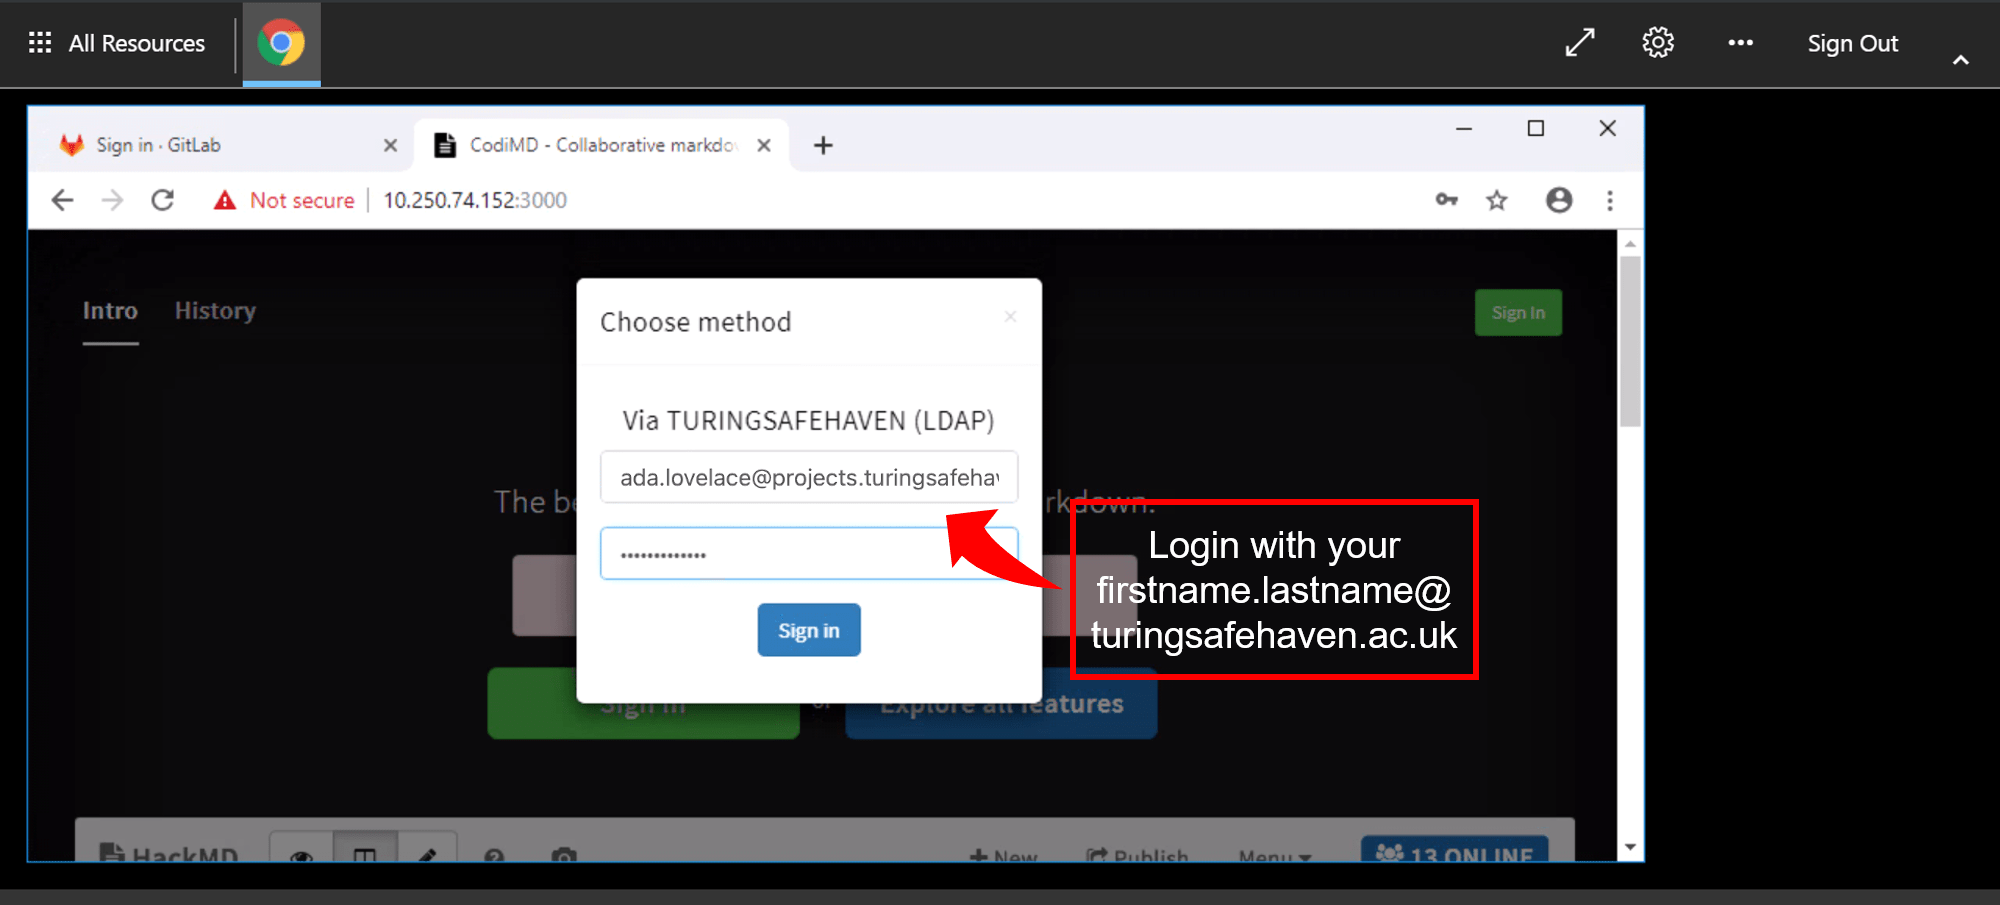
Login with username firstname.lastname (the domain is not needed) and password .
Note
Our example user, Ada Lovelace would enter ada.lovelace in the LDAP Username box, enter her password and then click Sign in .
Accessing GitLab from the browser on the SRD is an easy way to switch between analysis work and documenting the process or results.
Warning
Do not use your username and password from a pre-existing GitLab account!
The GitLab instance within the SRE is entirely separate from the https://gitlab.com service and is expecting the same username and password that you used to log into the SRE.
👐 Public repositories within the SRE#
The GitLab instance inside the secure research environment is entirely contained inside the SRE.
When you make a repository inside the SRE “public” it is visible to your collaborators who also have access to the SRE. A “public” repository within the SRE is only visible to others with the same data access approval, it is not open to the general public via the internet.
Tip
We recommend that you make your repositories public to facilitate collaboration within the secure research environment.
👷 Support for GitLab use#
If you have not used GitLab before:
There is a small tutorial available as an Appendix to this user guide.
You can find the official documentation on the GitLab website.
Ask your team mates for help.
Ask the designated contact for your SRE.
There may be a dedicated discussion channel, for example during Turing Data Study Groups you can ask in the Slack channel.
📖 Collaborate on documents using CodiMD#
CodiMD is a locally installed tool that allows you to collaboratively write reports.
It uses Markdown which is a simple way to format your text so that it renders nicely in full HTML.
Note
CodiMD is a fully open source version of the HackMD software.
This information doesn’t matter at all for how you use CodiMD within the SRE, but we do want to thank the community for maintaining free and open source software for us to use and reuse.
You can read more about CodiMD at their GitHub repository.
We recommend this Markdown cheat sheet.
🔓 Access CodiMD#
You can access CodiMD from an internet browser from the SRD using the desktop shortcut.
Login with username firstname.lastname (the domain is not needed) and password .
Note
Our example user, Ada Lovelace would enter ada.lovelace in the Username box, enter her password and then click Sign in .
Accessing CodiMD from the browser on the SRD is an easy way to switch between analysis work and documenting the process or results.
👥 Editing other people’s documents#
The CodiMD instance inside the secure research environment is entirely contained inside the SRE.
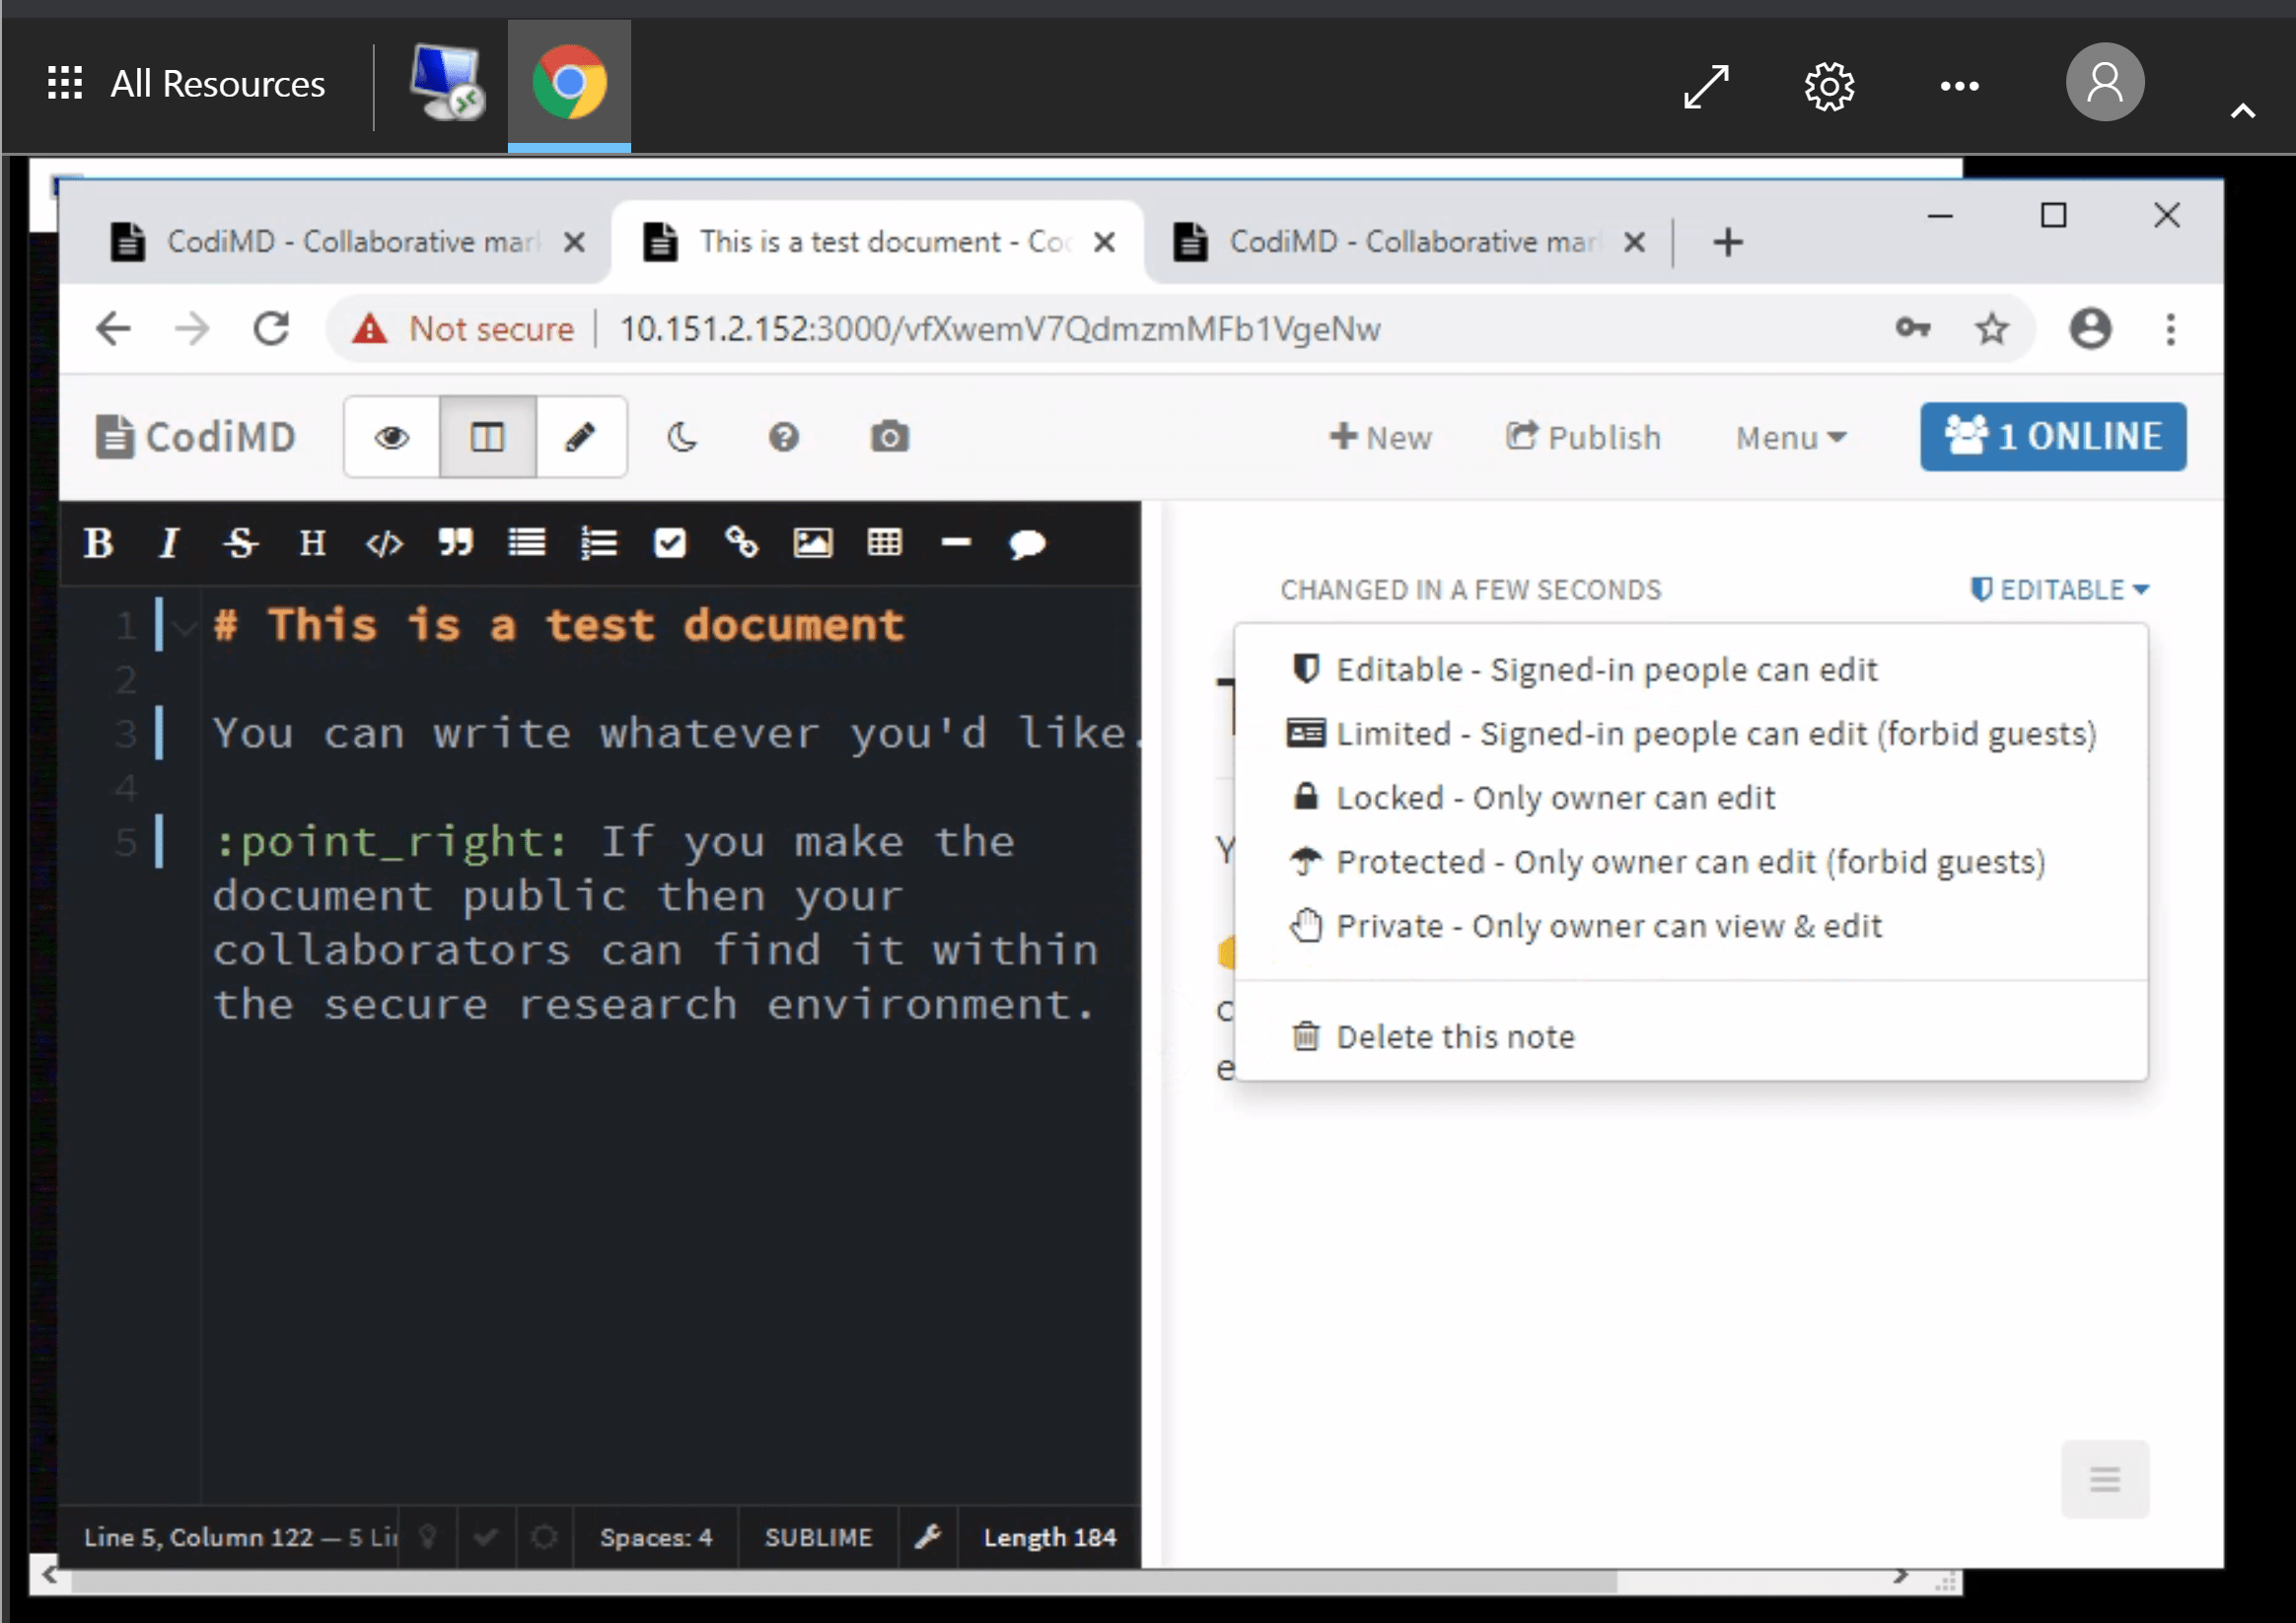
When you make a markdown document inside the SRE “editable” your collaborators who also have access to the SRE can access it via the URL at the top of the page. They will have the right to change the file if they are signed into the CodiMD instance.
The link will only work for people who have the same data access approval, it is not open to the general public via the internet.
Tip
We recommend that you make your documents editable to facilitate collaboration within the secure research environment. Alternatively, the locked option allows others to read but not edit the document.
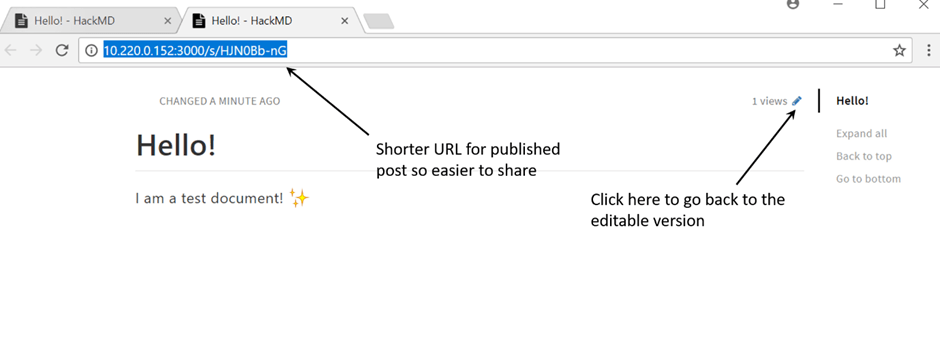
The default URL is quite long and difficult to share with your collaborators. We recommend publishing the document to get a much shorter URL which is easier to share with others.
Click the Publish button to publish the document and generate the short URL.
Click the pen button (shown in the image below) to return to the editable markdown view.
Important
Remember that the document is not published to the internet, it is only available to others within the SRE.
Tip
If you are attending a Turing Data Study Group you will be asked to write a report describing the work your team undertook over the five days of the projects. Store a copy of the CodiMD URL in a text file in the outputs folder. You will find some example report templates that outline the recommended structure. We recommend writing the report in CodiMD - rather than GitLab - so that everyone can edit and contribute quickly.
🔬 Troubleshooting CodiMD#
We have noticed that a lower case L and an upper case I look very similar and often trip up users in the SRE.
Tip
Double check the characters in the URL, and if there are ambiguous ones try the one you haven’t tried yet!
Rather than proliferate lots of documents, we recommend that one person is tasked with creating the file and sharing the URL with other team members.
Tip
You could use the GitLab wiki or README file to share links to collaboratively written documents.
🔓 Access additional SRDs#
Your project might make use of further SRDs in addition to the main shared desktop. Usually this is because of a requirement for a different type of computing resource, such as access to one or more GPUs (graphics processing units).
You will access this machine in a similar way to the main shared desktop, by selecting a different Desktop connection.
Note
Our example user, Ada Lovelace, participating in the sandbox project at a Turing Data Study Group, might select Ubuntu1_CPU2_8GB (Desktop) instead of Ubuntu0_CPU2_8GB (Desktop)
This will bring you to the normal login screen, where you use the same
usernameandpasswordcredentials as before.Any local files that you have created in the
/output/folder on other VMs (e.g. analysis scripts, notes, derived data) will be automatically available in the new VM.
Tip
The naming pattern of the available desktop connections lets you know their compute capabilities.
For example Ubuntu1_CPU2_8GB has 2 CPUs and 8GB of RAM.
📗 Access databases#
Your project might use a database for holding the input data.
You might also/instead be provided with a database for use in analysing the data.
The database server will use either Microsoft SQL or PostgreSQL.
If you have access to one or more databases, you can access them using the following details, replacing <SRE ID> with the SRE ID for your project.
🍱 Microsoft SQL#
Server name:
MSSQL-<SRE ID>(e.g.MSSQL-SANDBOX)Database name: <provided by your System Manager>
Port: 1433
📮 PostgreSQL#
Server name:
PSTGRS-<SRE ID>(e.g.PSTGRS-SANDBOX)Database name: <provided by your System Manager>
Port: 5432
Examples are given below for connecting using Azure Data Studio, DBeaver, Python and R.
The instructions for using other graphical interfaces or programming languages will be similar.
🎨 Connecting using Azure Data Studio#
Azure Data Studio is currently only able to connect to Microsoft SQL databases.
Note
Our example user Ada Lovelace, working in the sandbox SRE on the projects.turingsafehaven.ac.uk Safe Haven, would connect using Azure Data Studio as follows:
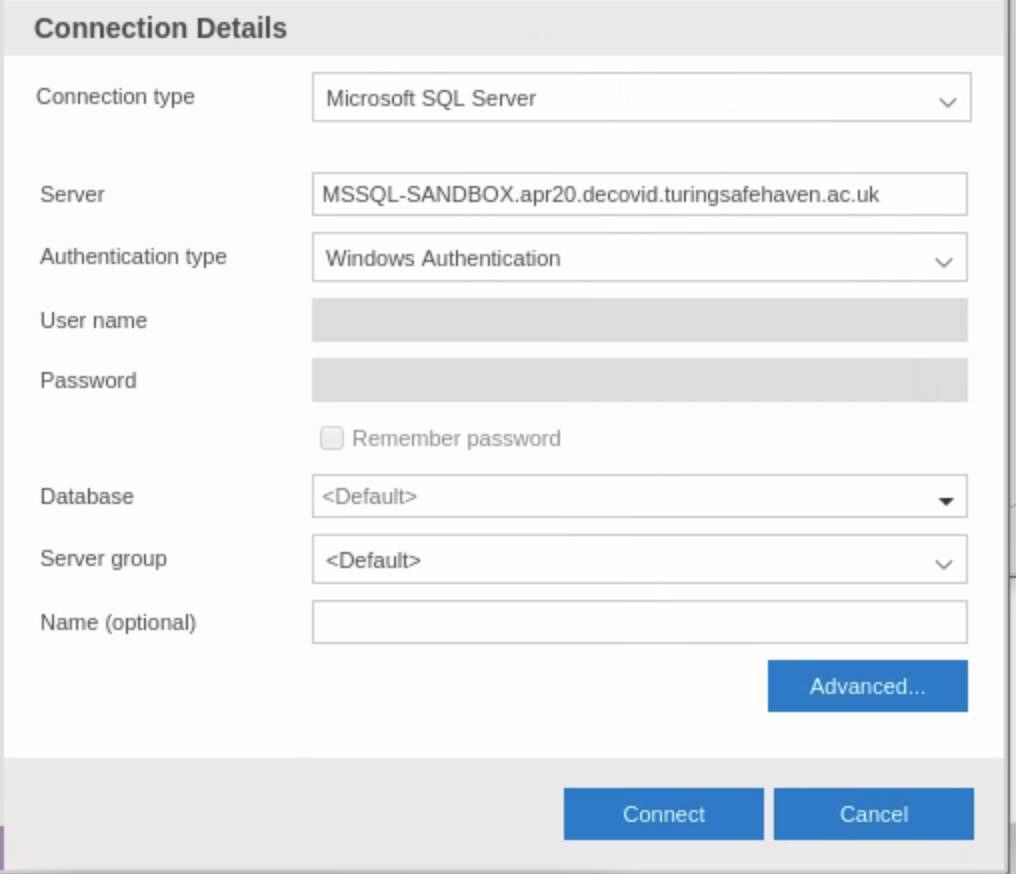
Important
Be sure to select Windows authentication here so that your username and password will be passed through to the database.
🐻 Connecting using DBeaver#
Click on the New database connection button (which looks a bit like an electrical plug with a plus sign next to it)
Microsoft SQL#
Select
SQL Serveras the database typeEnter the necessary information in the
HostandPortboxes and setAuthenticationtoKerberosTick
Show All Schemasotherwise you will not be able to see the input data
Note
Our example user Ada Lovelace, working in the sandbox SRE on the projects.turingsafehaven.ac.uk Safe Haven, would connect using DBeaver as follows:
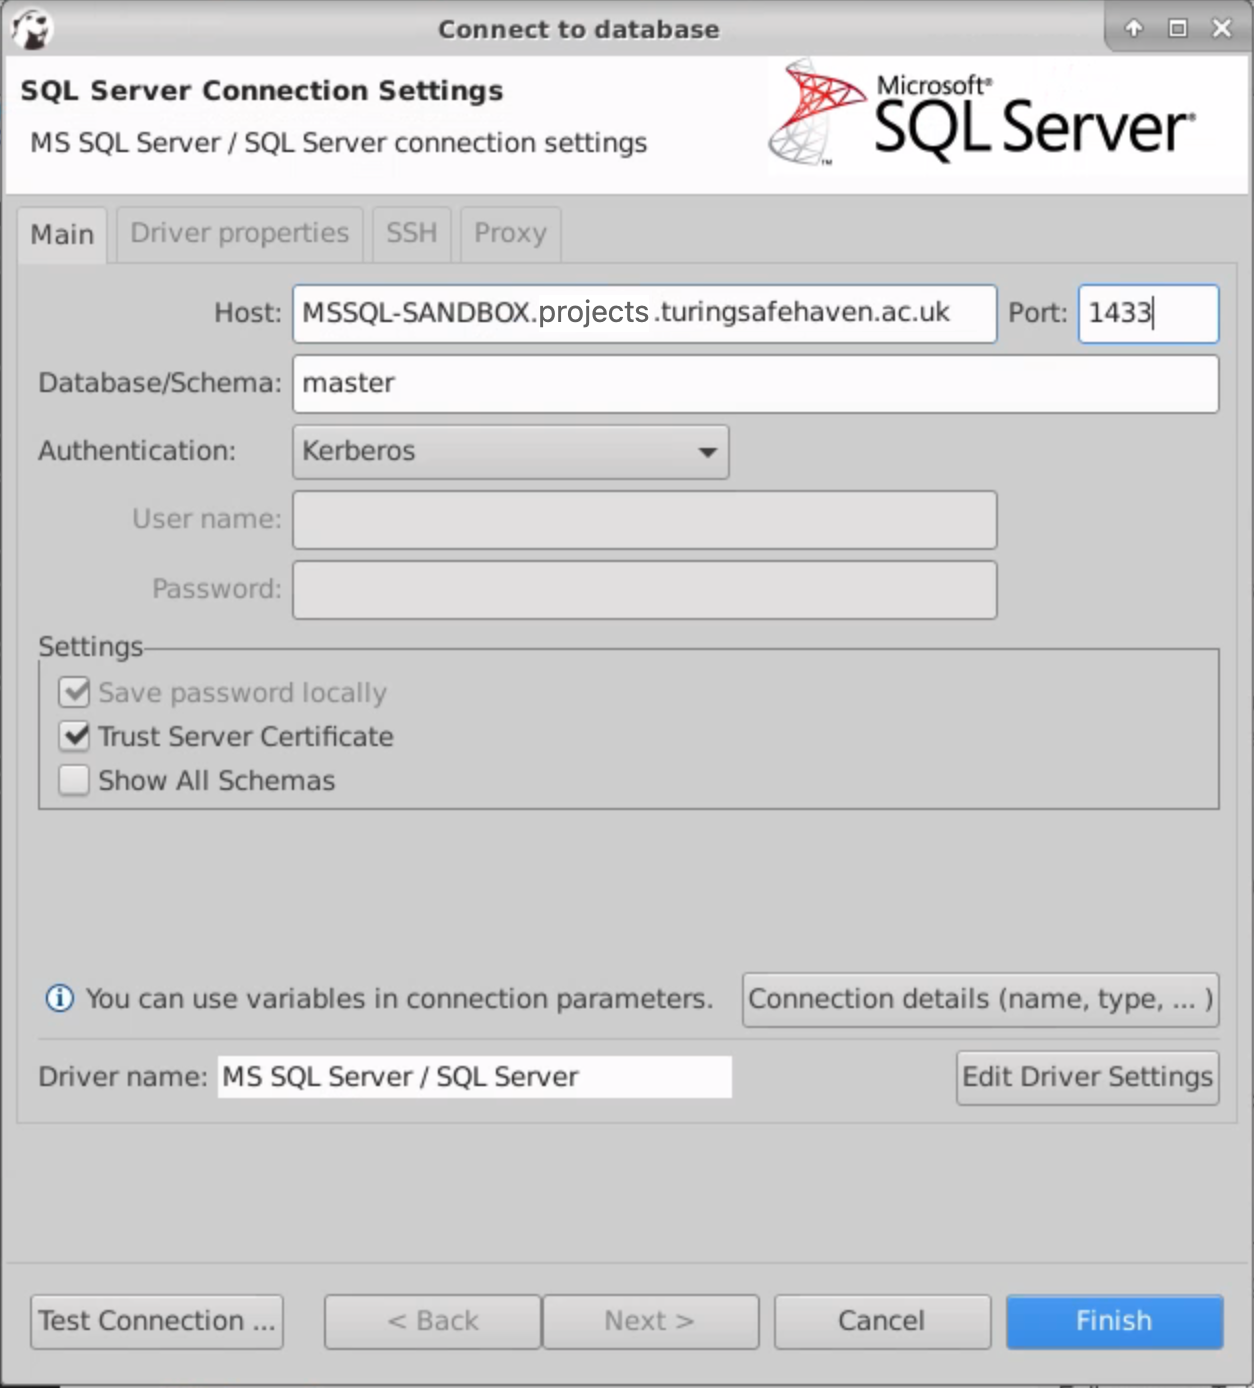
Important
Be sure to select Kerberos authentication so that your username and password will be passed through to the database
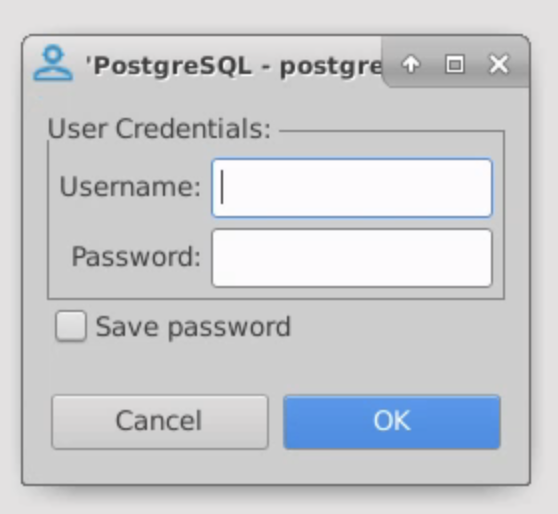
PostgreSQL#
Select
PostgreSQLas the database typeEnter the necessary information in the
HostandPortboxes and setAuthenticationtoDatabase Native
Important
You do not need to enter any information in the Username or Password fields
Note
Our example user Ada Lovelace, working in the sandbox SRE on the projects.turingsafehaven.ac.uk Safe Haven, would connect using DBeaver as follows:
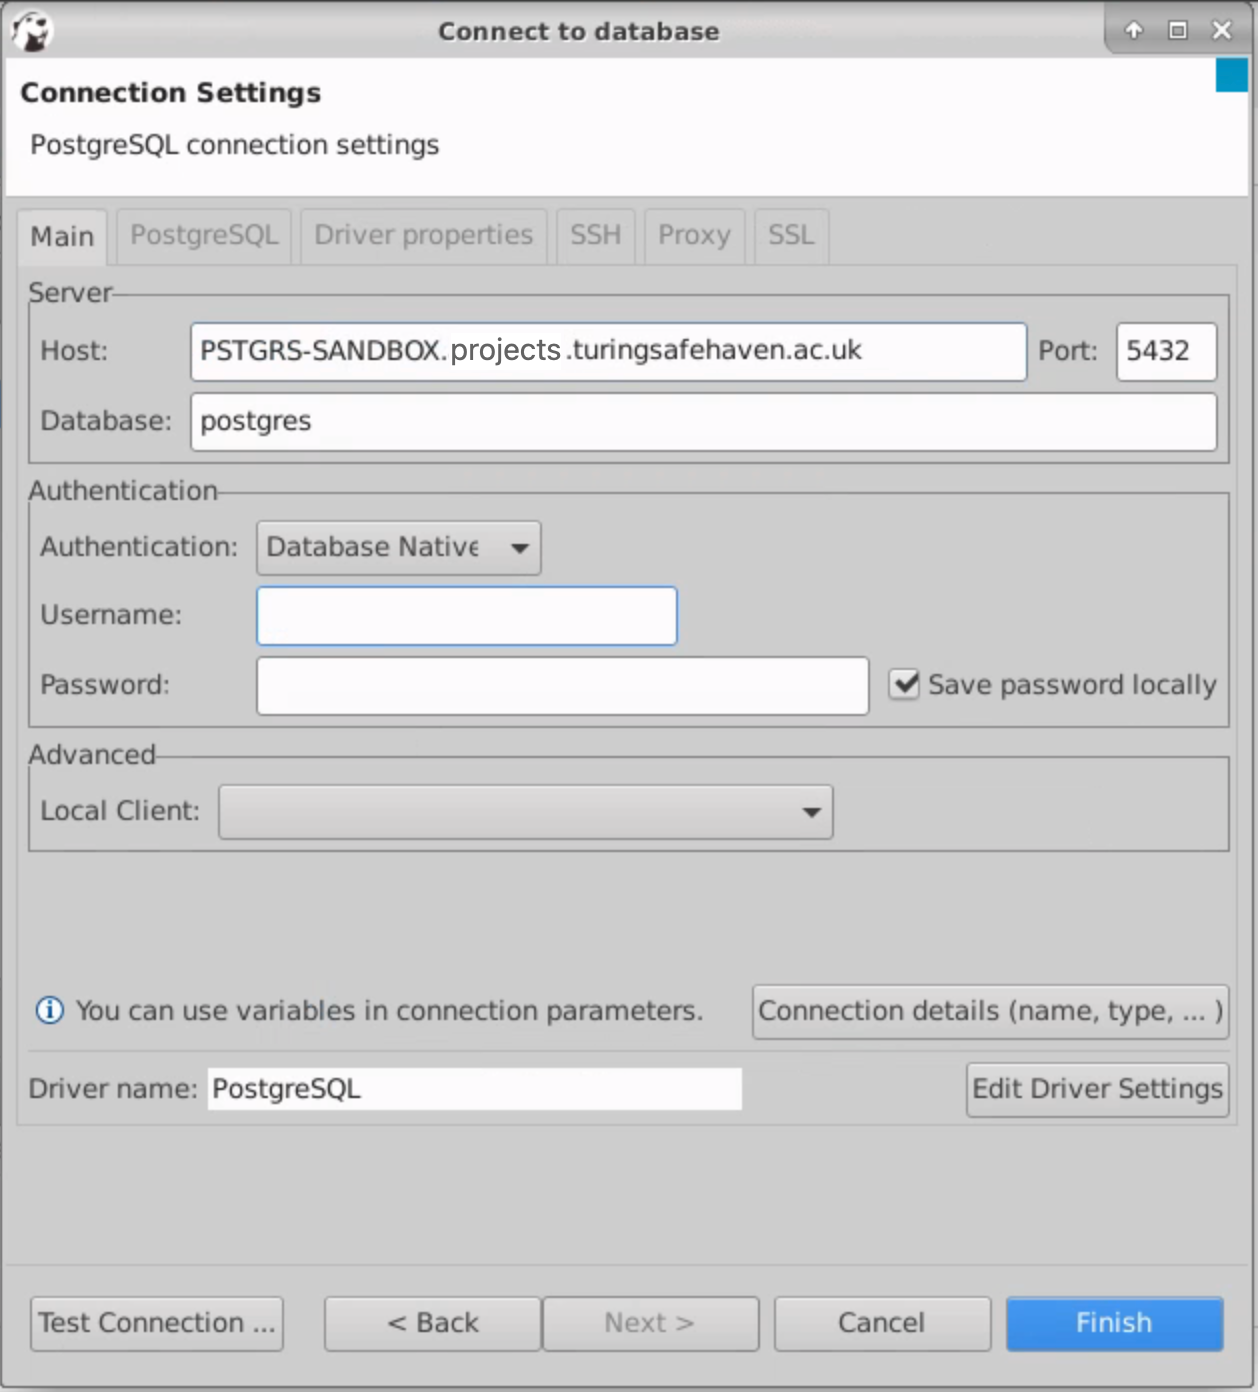
Tip
If you are prompted for Username or Password when connecting, you can leave these blank and the correct username and password will be automatically passed through to the database
🐍 Connecting using Python#
Database connections can be made using pyodbc or psycopg2 depending on which database flavour is being used.
The data can be read into a dataframe for local analysis.
Note
Our example user Ada Lovelace, working in the sandbox SRE on the projects.turingsafehaven.ac.uk Safe Haven, would connect using DBeaver as follows:
Microsoft SQL#
import pyodbc
import pandas as pd

server = "MSSQL-SANDBOX.projects.turingsafehaven.ac.uk"
port = "1433"
db_name = "master"

cnxn = pyodbc.connect("DRIVER={ODBC Driver 17 for SQL Server};SERVER=" + server + "," + port + ";DATABASE=" + db_name + ";Trusted_Connection=yes;")

df = pd.read_sql("SELECT * FROM information_schema.tables;", cnxn)
print(df.head(3))
PostgreSQL#
import psycopg2
import pandas as pd

server = "PSTGRS-SANDBOX.projects.turingsafehaven.ac.uk"
port = 5432
db_name = "postgres"

cnxn = psycopg2.connect(host=server, port=port, database=db_name)
df = pd.read_sql("SELECT * FROM information_schema.tables;", cnxn)
print(df.head(3))
🌹 Connecting using R#
Database connections can be made using odbc or RPostgres depending on which database flavour is being used.
The data can be read into a dataframe for local analysis.
Note
Our example user Ada Lovelace, working in the sandbox SRE on the projects.turingsafehaven.ac.uk Safe Haven, would connect using DBeaver as follows:
Microsoft SQL#
library(DBI)
library(odbc)

# Connect to the databases
cnxn <- DBI::dbConnect(
    odbc::odbc(),
    Driver = "ODBC Driver 17 for SQL Server",
    Server = "MSSQL-SANDBOX.projects.turingsafehaven.ac.uk,1433",
    Database = "master",
    Trusted_Connection = "yes"
)

# Run a query and save the output into a dataframe
df <- dbGetQuery(cnxn, "SELECT * FROM information_schema.tables;")
head(df, 3)
PostgreSQL#
library(DBI)
library(RPostgres)

# Connect to the databases
cnxn <- DBI::dbConnect(
    RPostgres::Postgres(),
    host = "PSTGRS-SANDBOX.projects.turingsafehaven.ac.uk",
    port = 5432,
    dbname = "postgres"
)

# Run a query and save the output into a dataframe
df <- dbGetQuery(cnxn, "SELECT * FROM information_schema.tables;")
head(df, 3)
🐛 Report a bug#
The Data Safe Haven SRE has been developed in close collaboration with our users: you!
We try to make the user experience as smooth as possible and this document has been greatly improved by feedback from project participants and researchers going through the process for the first time. We are constantly working to improve the SRE and we really appreciate your input and support as we develop the infrastructure.
Important
If you find problems with the IT infrastructure, please contact the designated contact for your SRE.
🔧 Help us to help you#
To help us fix your issues please do the following:
Make sure you have read this document and checked if it answers your query.
Please do not log an issue before you have read all of the sections in this document.
Log out of the SRE and log back in again at least once
Re-attempt the process leading to the bug/error at least twice.
We know that “turn it off and turn it back on again” is a frustrating piece of advice to receive, but in our experience it works rather well! (Particularly when there are lots of folks trying these steps at the same time.)
The multi-factor authentication step in particular is known to have quite a few gremlins.
If you are getting frustrated, log out of everything, turn off your computer, take a 15 minute coffee break, and then start the process from the beginning.
Write down a comprehensive summary of the issue.
A really good bug report makes it much easier to pin down what the problem is. Please include:
Your computer’s operating system and operating system version.
Precise condition under which the error occurs.
What steps would someone need to take to get the exact same error?
A precise description of the problem.
What happens? What would you expect to happen if there were no error?
Any workarounds/fixes you have found.
Send the bug report to the designated contact for your SRE.
Hint
We very strongly recommend “rubber ducking” this process before you talk to the designated contact for your SRE. Either talk through to your imaginary rubber duck, or find a team member to describe the error to, as you write down the steps you have taken. It is amazing how often working through your problem out loud helps you realise what the answer might be.
🙏 Acknowledgments#
This user guide is based on an initial document written in March/April 2018 by Kirstie Whitaker.
Updates:
December 2018 by Catherine Lawrence, Franz Király, Martin O’Reilly, and Sebastian Vollmer.
March/April 2019 by Miguel Morin, Catherine Lawrence, Alvaro Cabrejas Egea, Kirstie Whitaker, James Robinson and Martin O’Reilly.
November 2019 by Ben Walden, James Robinson and Daisy Parry.
April 2020 by Jules Manser, James Robinson and Kirstie Whitaker.
November 2021 by James Robinson
🛂 Appendix A: Command Line Basics#
If you have never used a Linux desktop before, you might find some of the following commands useful if you are using a terminal.
Go into a project directory to work in it
cd NAME-OF-PROJECT
Go back one directory
cd ..
List what’s in the current directory
ls
Create a new directory
mkdir NAME-OF-YOUR-DIRECTORY
Remove a file
rm NAME-OF-FILE
Remove a directory and all of its contents
rm -r NAME-OF-DIRECTORY
View command history
history
Show which directory I am in
pwd
Clear the shell window
clear
📓 Appendix B: Gitlab tutorial notes#
GitLab can be thought of as a local version of GitHub - that is a git server along with useful features such as:
Project wiki - exactly what it says
Project pastebin - share bits of code
Project issue tracker - track things TODO and bugs
Pull requests - Way to keep track of changes individuals have made to be included in master
Some teams design their entire workflows around these things. A comparison in terms of features can be found here.
Getting started with Git#
If you have never used git before, you might want to take a look at an introductory guide.
There are multiple git cheat sheets such asthis one from the JIRA authors and this interactive one and .
Repositories#
A repository is usually used to organize a single project. Repositories can contain folders and files, images, videos, spreadsheets, and data sets – anything your project needs. We recommend including a README, or a file with information about your project. Over the course of the work that you do in your SRE, you will often be accessing and adding files to the same project repository.
Add your Git username and set your email#
It is important to configure your git username and email address, since every git commit will use this information to identify you as the author.
On your shell, type the following command to add your username:
git config --global user.name "YOUR_USERNAME"
Then verify that you have the correct username:
git config --global user.name
To set your email address, type the following command:
git config --global user.email "your_email_address@example.com"
To verify that you entered your email correctly, type:
git config --global user.email
You’ll need to do this only once, since you are using the --global option.
It tells Git to always use this information for anything you do on that system.
If you want to override this with a different username or email address for specific projects, you can run the command without the --global option when you’re in that project.
Cloning projects#
In git, when you copy a project you say you “clone” it.
To work on a git project in the SRD, you will need to clone it.
To do this, sign in to GitLab.
When you are on your Dashboard, click on the project that you’d like to clone.
To work in the project, you can copy a link to the git repository through a SSH or a HTTPS protocol.
SSH is easier to use after it’s been set up, you can find the details here.
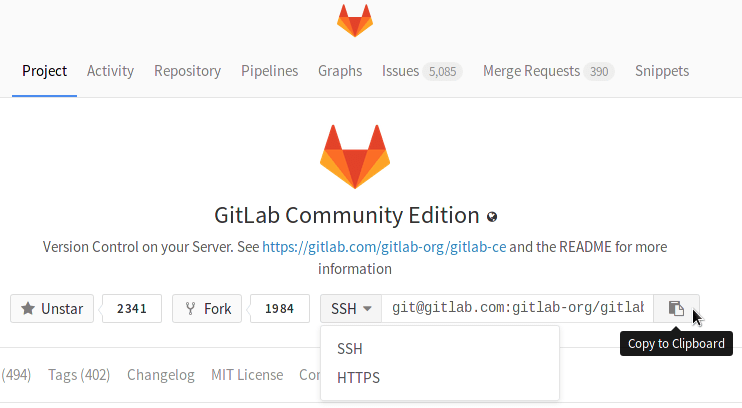
While you are at the Project tab, select HTTPS or SSH from the dropdown menu and copy the link using the Copy URL to clipboard button (you’ll have to paste it on your shell in the next step>).
Go to your computer’s shell and type the following command with your SSH or HTTPS URL:
git clone <PASTE HTTPS OR SSH HERE>
Branches#
Branching is the way to work on different versions of a repository at one time.
By default your repository has one branch usually named master or main which is considered to be the definitive branch.
We use branches to experiment and make edits before committing them to main.
When you create a branch off the main branch, you’re making a copy, or snapshot, of main as it was at that point in time.
If someone else made changes to the main branch while you were working on your branch, you could pull in those updates.
To create a branch:
git checkout -b NAME-OF-BRANCH
Work on an existing branch:
git checkout NAME-OF-BRANCH
To merge the main branch into a created branch you need to be on the created branch.
git checkout NAME-OF-BRANCH
git merge main
To merge a created branch into the main branch you need to be on the created branch.
git checkout main
git merge NAME-OF-BRANCH
Downloading the latest changes in a project#
This is for you to work on an up-to-date copy (it is important to do this every time you start working on a project), while you set up tracking branches. You pull from remote repositories to get all the changes made by users since the last time you cloned or pulled the project. Later, you can push your local commits to the remote repositories.
git pull REMOTE NAME-OF-BRANCH
When you first clone a repository, REMOTE is typically origin.
This is where the repository came from, and it indicates the SSH or HTTPS URL of the repository on the remote server.
NAME-OF-BRANCH is usually main, but it may be any existing branch.
Add and commit local changes#
You’ll see your local changes in red when you type git status.
These changes may be new, modified, or deleted files/folders.
Use git add to stage a local file/folder for committing.
Then use git commit to commit the staged files:
git add FILE OR FOLDER
git commit -m "COMMENT TO DESCRIBE THE INTENTION OF THE COMMIT"
To add and commit all local changes in one command:
git add .
git commit -m "COMMENT TO DESCRIBE THE INTENTION OF THE COMMIT"
To push all local commits to the remote repository:
git push REMOTE NAME-OF-BRANCH
For example, to push your local commits to the main branch of the origin remote:
git push origin main
To delete all local changes in the repository that have not been added to the staging area, and leave unstaged files/folders, type:
git checkout .
Note: The . character typically means all in Git.
How to create a Merge Request#
Merge requests are useful to integrate separate changes that you’ve made to a project, on different branches. This is a brief guide on how to create a merge request. For more information, check the merge requests documentation.
Before you start, you should have already created a branch and pushed your changes to
GitLab.Go to the project where you’d like to merge your changes and click on the
Merge requeststab.Click on
New merge requeston the right side of the screen.From there on, you have the option to select the source branch and the target branch you’d like to compare to.
The default target project is the upstream repository, but you can choose to compare across any of its forks.
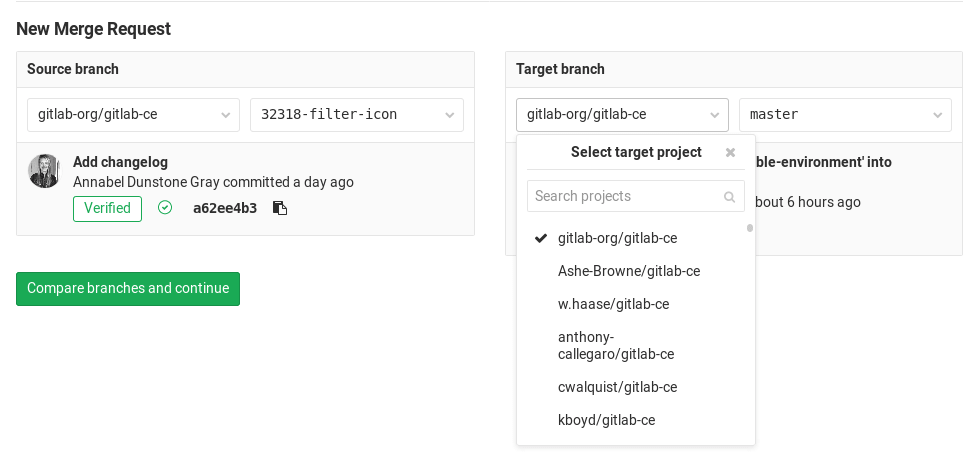
When ready, click on the Compare branches and continue button.
At a minimum, add a title and a description to your merge request.
Optionally, select a user to review your merge request and to accept or close it. You may also select a milestone and labels.
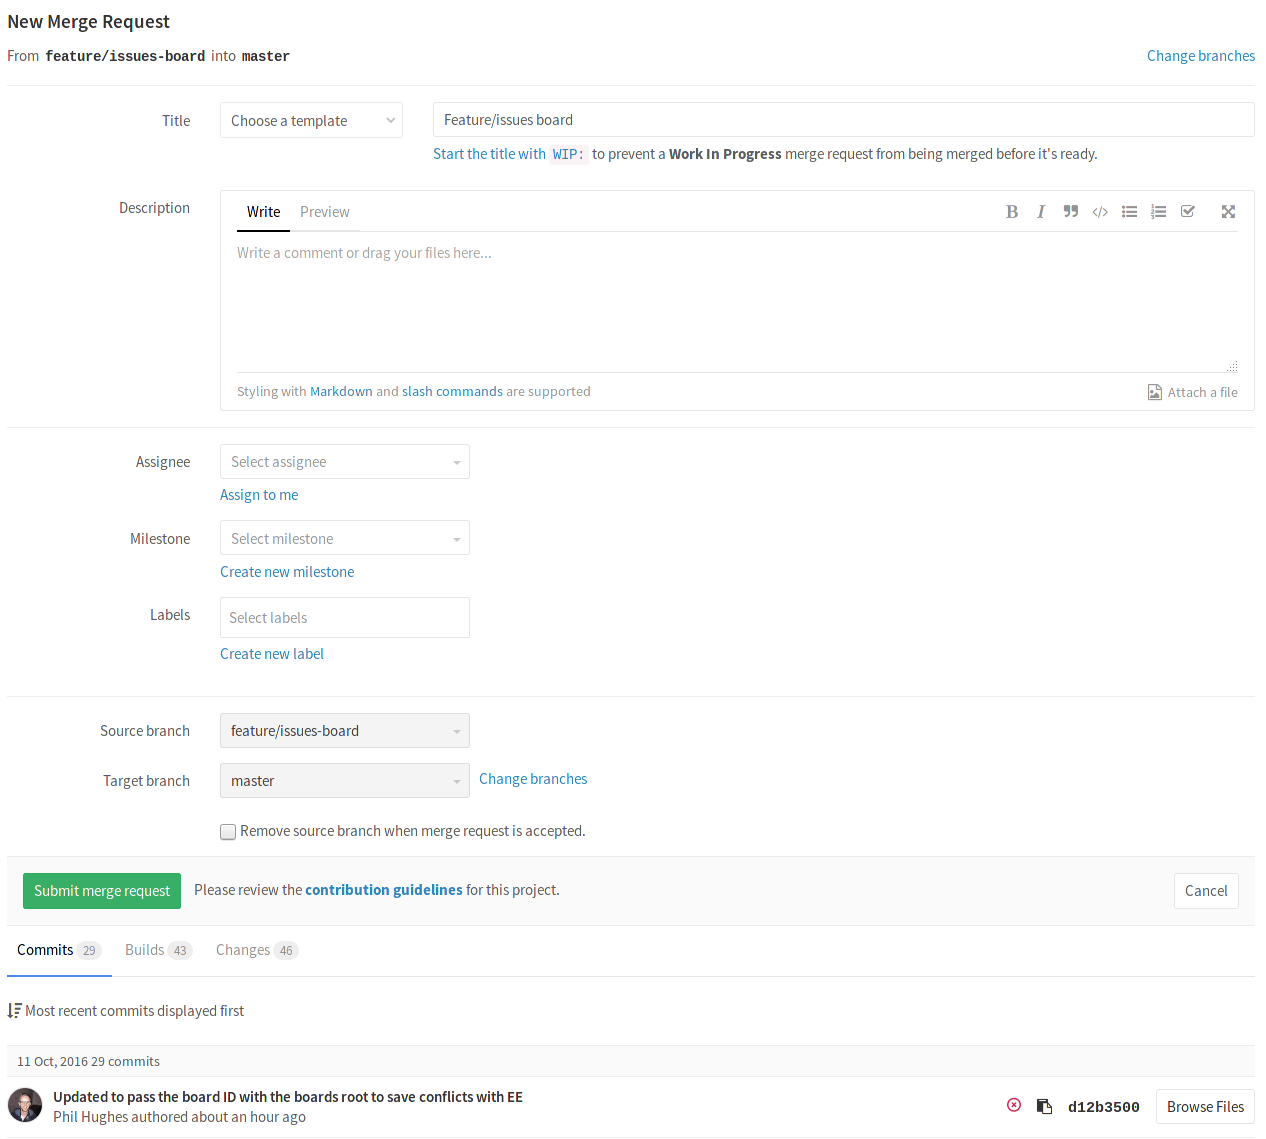
When ready, click on the
Submit merge requestbutton.
Your merge request will be ready to be approved and merged.
🔬 Appendix C: Troubleshooting#
❗ No applications available#
Symptom#
You can successfully log into the remote desktop web interface
Note
For our example user, Ada Lovelace, this would be https://sandbox.projects.turingsafehaven.ac.uk .
You do not see any available connections
Cause#
You have not been added to the correct SRE security group.
Solution#
Ask your System Manager to add you to the appropriate SRE security group.
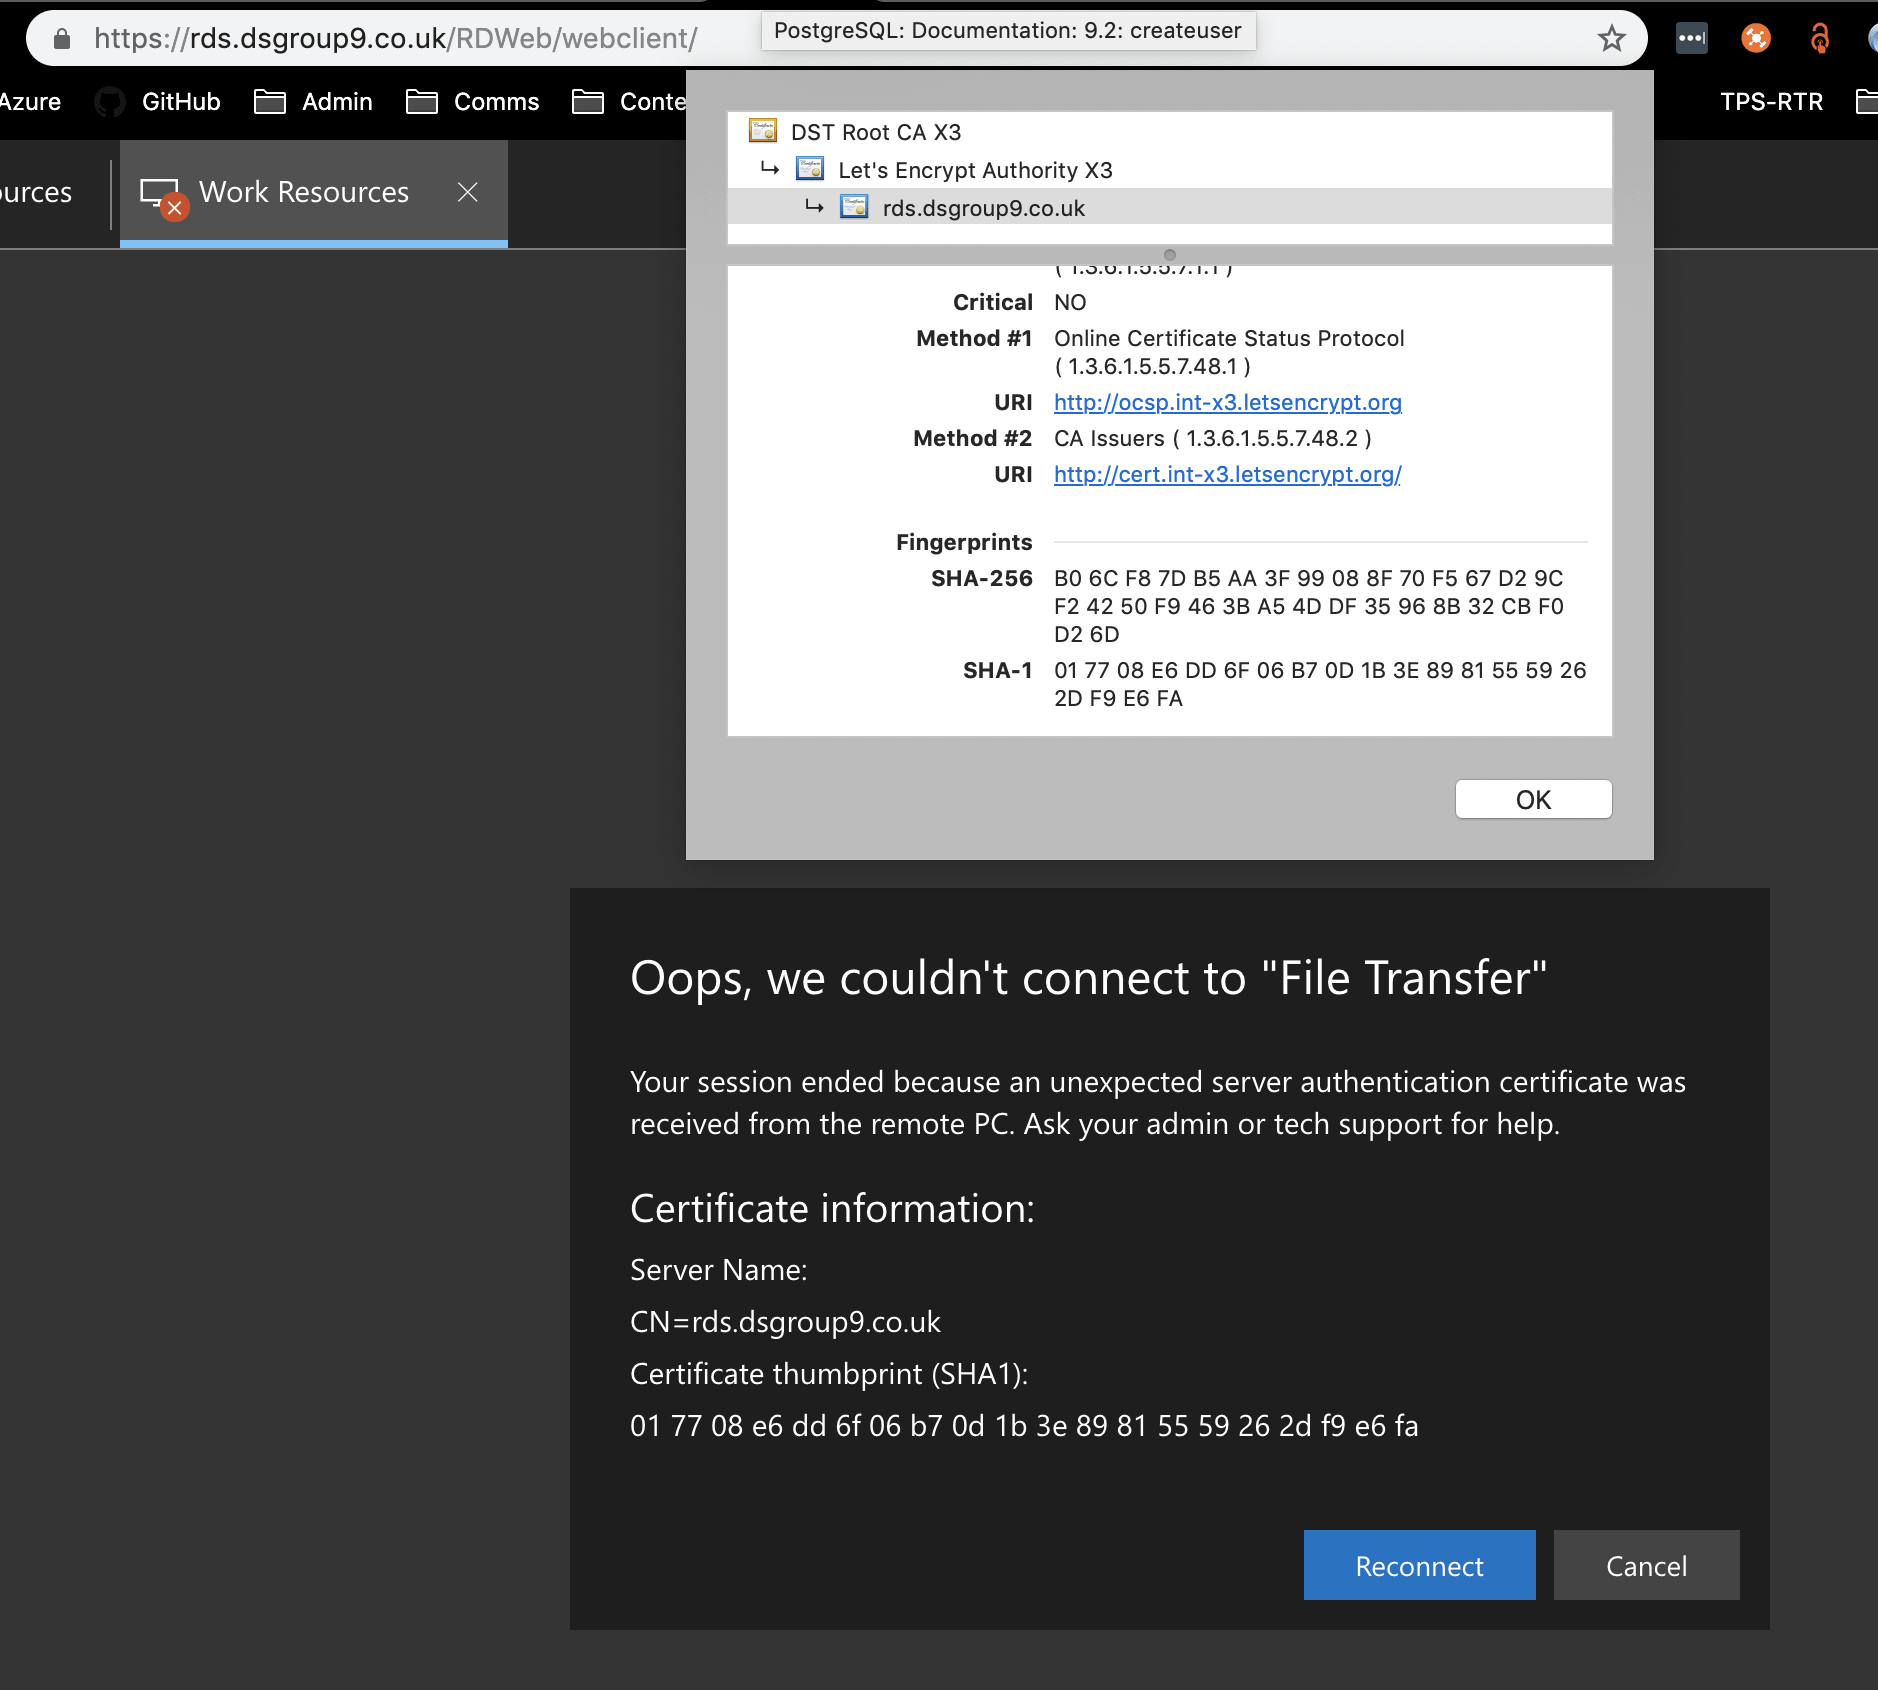
❗ Unexpected certificate error#
Symptom#
You can successfully log into the remote desktop web interface
Note
For our example user, Ada Lovelace, this would be
https://sandbox.projects.turingsafehaven.ac.uk.You can see several apps, but when you try to launch one of them, you receive an error saying “Your session ended because an unexpected server authentication certificate was received from the remote PC.”
When you click on the padlock icon in the address bar and view the SSL certificate, the “SHA-1 Fingerprint” in the certificate matches the “SHA-1 Thumbprint” in the error message.
Cause#
The SSL certificate protecting your connection to the RDS webclient expires every three months and is renewed every two months. The new SSL certificate is seamlessly picked up by your browser when connecting to the web page. However, the webclient downloads a separate copy of the certificate for its own use to validate connections to the apps it serves. This downloaded certificate is cached by your browser, which means that the old certificate will continue to be used by the web app when the browser is allowed to load things from its cache.
Solution#
Get your browser to do a hard reload of the page (instructions vary by browser and operating system). You may also need to clear your cache for this site. In either case, removing locally cached data should mean that you retrieve a copy of the new certificate.