Deploy an SRE with Microsoft RDS#
These instructions will walk you through deploying a Secure Research Environment (SRE) that uses an existing Safe Haven Management (SHM) environment.
Important
If you are deploying a Tier 0 or Tier 1 environment, or a development environment, we would suggest deploying with Guacamole.
Explanation of symbols used in this guide#
Powershell command

This indicates a
Powershellcommand which you will need to run locally on your machineEnsure you have checked out (or downloaded) the appropriate tag of the Safe Haven repository from alan-turing-institute/data-safe-haven.
Open a
Powershellterminal and navigate to the indicated directory of your locally checked-out version of the Safe Haven repositoryEnsure that you are logged into Azure by running the
Connect-AzAccountcommandTip
If your account is a guest in additional Azure tenants, you may need to add the
-Tenant <Tenant ID>flag, where<Tenant ID>is the ID of the Azure tenant you want to deploy into.This command will give you a URL and a short alphanumeric code.
Go to URL in a web browser, enter the code and log in to your account on Azure.
Tip
If you have several Azure accounts, make sure you use one that has permissions to make changes to the subscription you are using
Remote command

This indicates a command which you will need to run remotely on an Azure virtual machine (VM) using
Microsoft Remote DesktopOpen
Microsoft Remote Desktopand clickAdd Desktop/Add PCEnter the private IP address of the VM that you need to connect to in the
PC namefield (this can be found by looking in the Azure portal)Enter the name of the VM (for example
DC1-SHM-PROJECT) in theFriendly namefieldClick
AddEnsure you are connected to the SHM VPN that you have set up
Double click on the desktop that appears under
Saved DesktopsorPCs.Use the
usernameandpasswordspecified by the appropriate section of the guide
Tip
If you see a warning dialog that the certificate cannot be verified as root, accept this and continue.
Azure Portal operation

This indicates an operation which needs to be carried out in the
Azure Portalusing a web browser on your local machine.You will need to login to the portal using an account with privileges to make the necessary changes to the resources you are altering
Azure Active Directory operation

This indicates an operation which needs to be carried out in the
Azure Portalusing a web browser on your local machine.You will need to login to the portal using an account with administrative privileges on the
Azure Active Directorythat you are altering.Note that this might be different from the account which is able to create/alter resources in the Azure subscription where you are building the Safe Haven.
OS-dependent steps
The following icons indicate steps that depend on the OS you are using to deploy the SHM
MacOS
Windows
Linux
1. 🌱 Prerequisites#
An
SHM environmentthat has already been deployed in AzureFollow the Safe Haven Management (SHM) deployment guide if you have not done so already.
An Azure subscription with sufficient credits to build the environment in: we recommend around $1,000 as a reasonable starting point.
This can be the same or different from the one where the SHM is deployed
Tip
Ensure that the Owner of the subscription is an
Azure Security groupthat contains all administrators and no-one else.We recommend using separate
Azure Active Directoriesfor users and administrators
Access to a global administrator account on the SHM Azure Active Directory
🔰 Software#
PowerShellwith support for AzureInstall PowerShell v7.0 or above
Install the Azure PowerShell Module using
Install-Module -Name Az -RequiredVersion 5.0.0 -Repository PSGallery
Microsoft Remote DesktopOn macOS this can be installed from the Apple store
OpenSSLInstall using your package manager of choice
Hint
If you run:
PS> Start-Transcript -Path <a log file>
before you start your deployment and
PS> Stop-Transcript
afterwards, you will automatically get a full log of the Powershell commands you have run.
🔑 VPN connection to the SHM VNet#
For some operations, you will need to log on to some of the VMs that you deploy and make manual changes. This is done using the VPN which should have been deployed when setting up the SHM environment.
📛 SRE domain name#
You will need access to a public routable domain name for the SRE and its name servers.
This can be a subdomain of the Safe Haven Management domain, e.g, sandbox.project.turingsafehaven.ac.uk, or a top-level domain (eg. mydatasafehaven.co.uk ).
⏫ Deploying multiple SREs in parallel#
Important
You can only deploy to one SRE at a time from a given computer as the Az Powershell module can only work within one Azure subscription at a time.
If you need to deploy multiple SREs in parallel you will need to use multiple computers. These can be different physical computers or you can provision dedicated deployment VMs - this is beyond the scope of this guide.
VPN connection to the SHM VNet#
For some operations, you will need to log on to some of the VMs that you deploy and make manual changes. This is done using the VPN which should have been deployed when setting up the SHM environment.
2. 📋 Secure Research Environment configuration#
The full configuration details for a new SRE are generated by defining a few “core” properties for the new SRE and the management environment in which it will be deployed.
Secure research environment ID#
Choose a short ID <SRE ID> to identify the secure research environment (e.g. sandbox).
This can have a maximum of seven alphanumeric characters.
🍎 SHM configuration properties#
The core properties for the relevant pre-existing Safe Haven Management (SHM) environment must be defined in a JSON file named shm_<SHM ID>_core_config.json in the environment_configs folder.
Please read the instructions to find out what to put in this file.
🍏 SRE configuration properties#
The core properties for the secure research environment (SRE) must be defined in a JSON file named sre_<SHM ID><SRE ID>_core_config.json in the environment_configs folder.
The following core SRE properties are required - look in the environment_configs folder to see some examples.
{
  "sreId": "The <SRE ID> that you decided on above (eg. 'sandbox').",
  "tier": "The data classification tier for the SRE. This controls the outbound network restrictions on the SRE and which mirror set the SRE is peered with",
  "shmId": "The <SHM ID> that you decided on above (eg. 'testa').",
  "subscriptionName": "Azure subscription that the SRE will be deployed into.",
  "ipPrefix": "The three octet IP address prefix for the Class A range used by the SRE. See suggestion below on how to set this",
  "inboundAccessFrom": "A comma-separated string of IP ranges (addresses or CIDR ranges) from which access to the RDS webclient is permitted. See tip default below for suggestion on how to set this.",
  "outboundInternetAccess": "Whether to allow outbound internet access from inside the remote desktop environment. Either ('Yes', 'Allow', 'Permit'), ('No', 'Deny', 'Forbid') or 'default' (for Tier 0 and 1 'Allow' otherwise 'Deny')",
  "computeVmImage": {
    "type": "The name of the SRD image (most commonly 'Ubuntu')",
    "version": "The version of the SRD image (e.g. 0.1.2019082900)"
  },
  "remoteDesktopProvider": "Which remote desktop provider to use. Either 'ApacheGuacamole' (recommended, tiers 0-3) or 'MicrosoftRDS' (tiers 2-3 only)",
  "azureAdminGroupName": "[Optional] Azure Security Group that admins of this SRE will belong to. If not specified then the same one as the SHM will be used.",
  "dataAdminIpAddresses": "A list of one or more IP addresses which admins will be using to transfer sensitive data to/from the secure Azure storage area (if not specified then Turing IP addresses will be used).",
  "databases": "[Optional] A list of zero or more database flavours from the following list ('MSSQL', 'PostgreSQL'). For example ['MSSQL', 'PostgreSQL'] would deploy both an MS-SQL and a PostgreSQL database.",
  "deploymentIpAddresses": "[Optional] A list of one or more IP addresses which admins will be using when deploying the SRE (if not specified then deployment commands from any IP address will be permitted).",
  "domain": "[Optional] The fully qualified domain name for the SRE. If not specified then <SRE ID>.<SHM domain> will be used.",
  "overrides": "[Optional, Advanced] Do not use this unless you know what you're doing! If you want to override any of the default settings, you can do so by creating the same JSON structure that would be found in the final config file and nesting it under this entry. For example, to change the name of the Key Vault secret containing the MSSQL admin password, you could use something like: 'sre: { databases: { dbmssql: { adminPasswordSecretName: my-password-name } } }'"
}
Tip
We recommend the following for the inboundAccessFrom setting
Tier 0/1 SREs: this can be set to
Internet, allowing access from anywhere.Tier 2 SREs: this should correspond to the IP addresses of organisational networks (including guest networks) for all approved partner organisations (i.e. specific networks managed by the organisation, such as
EduRoam,Turing Guest,Turing Secure)Tier 3 SREs: this should correspond to the IP addresses of restricted networks for all approved partner organisations. These should only permit connections from within medium security access controlled physical spaces and from managed devices (e.g.
Turing Secure).
Important
The ipPrefix must be unique for each SRE attached to the same SHM. Each SRE needs a range of 2048 IP address (a /21 range in CIDR notation) in a private IP range.
The config itself expects the first three digits denoting the range (e.g. "ipPrefix": "10.11.0.0" rather than "ipPrefix": "10.11.0.0/21")
It is important that the range chosen doesn’t overlap with the SHM (by default 10.0.0.0 - 10.0.7.255), the package repositories (by default 10.10.2.0-10.10.3.255) or any other SRE.
You may find this tool helpful to convert between IP address ranges and CIDRs.
Alan Turing Institute default
We assign consecutive /21 ranges starting from 10.11.0.0/21 (ie. the first three SREs will use 10.11.0.0/21, 10.11.8.0/21 and 10.11.16.0/21).
(Optional) Verify code version#
If you have cloned/forked the code from our GitHub repository, you can confirm which version of the Data Safe Haven you are currently using by running the following commands:
PS> git tag --list | Select-String $(git describe --tags)
This will check the tag you are using against the list of known tags and print it out. You can include this confirmation in any record you keep of your deployment.
(Optional) 🌕 View full SRE configuration#
A full configuration, which will be used in subsequent steps, will be automatically generated from your core configuration. Should you wish to, you can print the full SRE config by running the following Powershell command:

./deployment
PS> ./ShowConfigFile.ps1 -shmId <SHM ID> -sreId <SRE ID>
where
<SHM ID>is the management environment ID for this SHMwhere
<SRE ID>is the secure research environment ID for this SRE
3. 👮 Prepare SHM environment#
(Optional) ⏩ Remove data from previous deployments#
Caution
If you are redeploying an SRE in the same subscription and did not use the ./SRE_Teardown.ps1 script to clean up the previous deployment, then there may be residual SRE data in the SHM.
This script will remove any such data.
Note
If the subscription is not empty, confirm that it is not being used before deleting any resources in it.

./deployment/secure_research_environment/setup
PS> ./Remove_SRE_Data_From_SHM.ps1 -shmId <SHM ID> -sreId <SRE ID>
where
<SHM ID>is the management environment ID for this SHMwhere
<SRE ID>is the secure research environment ID for this SRE
®️ Register SRE with the SHM#
./deployment/secure_research_environment/setup
PS> ./Setup_SRE_Key_Vault_And_Users.ps1 -shmId <SHM ID> -sreId <SRE ID>
where
<SHM ID>is the management environment ID for this SHMwhere
<SRE ID>is the secure research environment ID for this SRE
This step will register service accounts with the SHM and also create a Key Vault in the SRE subscription (at Resource Groups > RG_SHM_<SHM ID>_SRE_<SRE ID>_SECRETS > kv-<SHM ID>-sre-<SRE ID>).
4. 🚉 Deploy networking components#
♣️ Create SRE DNS Zone#

./deployment/secure_research_environment/setup
PS> ./Setup_SRE_DNS_Zone.ps1 -shmId <SHM ID> -sreId <SRE ID>
where
<SHM ID>is the management environment ID for this SHMwhere
<SRE ID>is the secure research environment ID for this SRE
Error
If you see a message You need to add the following NS records to the parent DNS system for... you will need to manually add the specified NS records to the parent’s DNS system, as follows:
Manual DNS configuration instructions

To find the required values for the NS records on the portal, click
All resourcesin the far left panel, search for “DNS Zone” and locate the DNS Zone with SRE’s domain. The NS record will list 4 Azure name servers.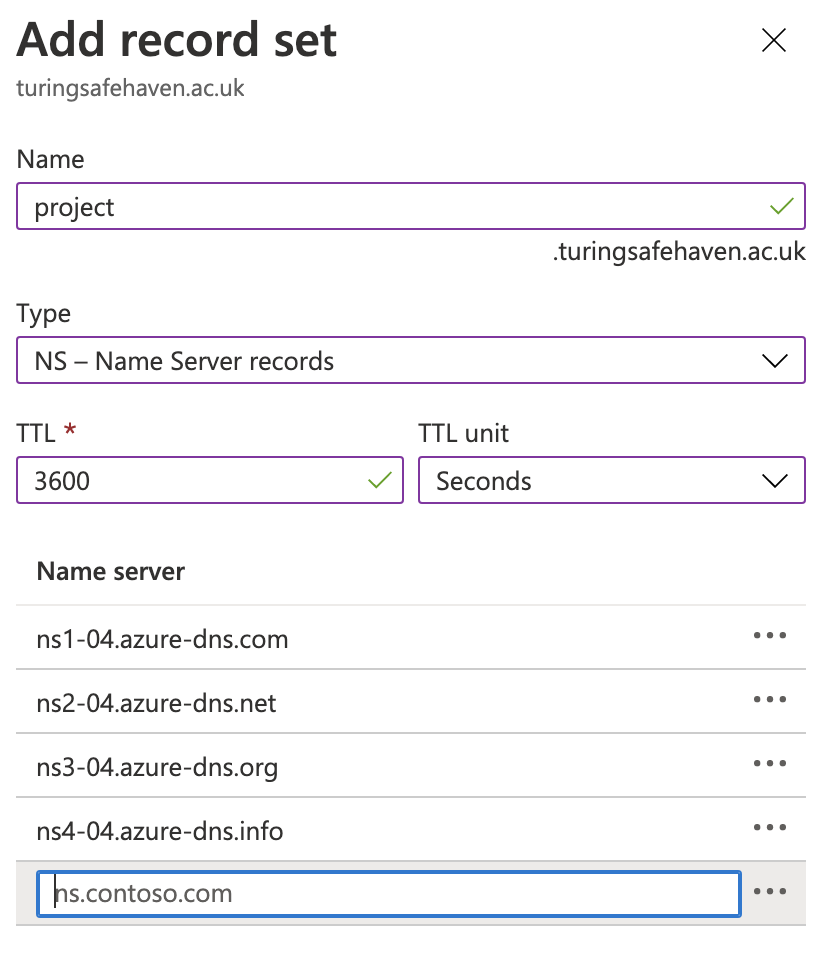
Duplicate these records to the parent DNS system as follows:
If the parent domain has an Azure DNS Zone, create an NS record set in this zone.
The name should be set to the subdomain (e.g.
sandbox) or@if using a custom domain, and the values duplicated from above.For example, for a new subdomain
sandbox.testa.dsgroupdev.co.uk, duplicate the NS records from the Azure DNS Zonesandbox.testa.dsgroupdev.co.ukto the Azure DNS Zone fortesta.dsgroupdev.co.uk, by creating a record set with namesandbox.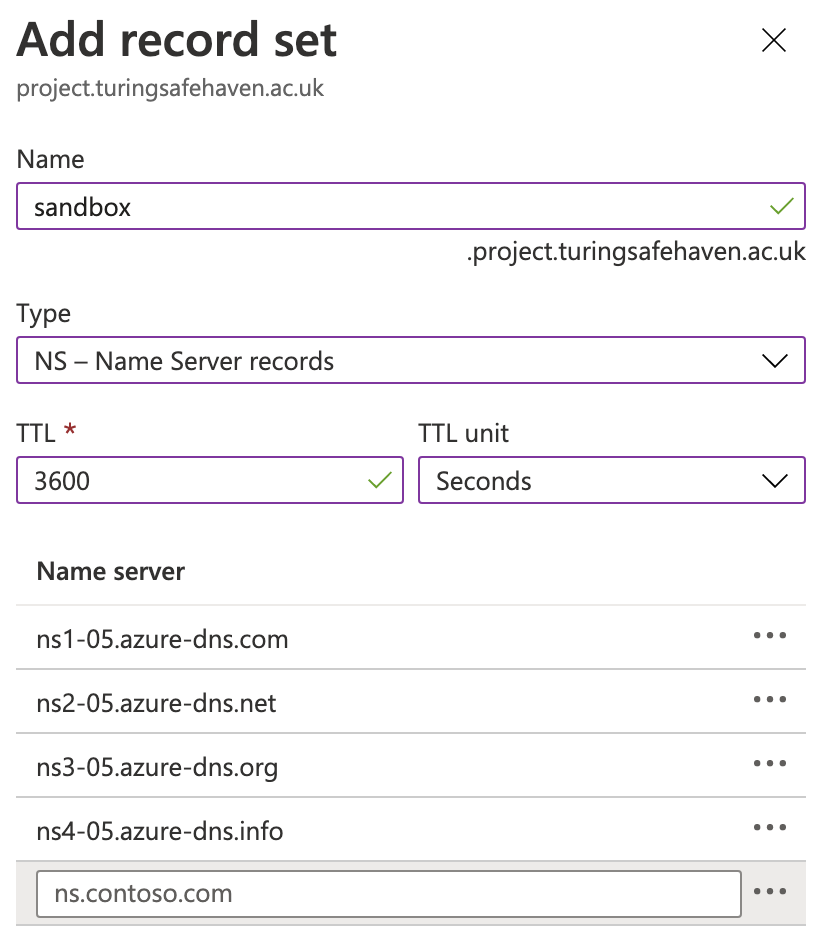
If the parent domain is outside of Azure, create NS records in the registrar for the new domain with the same value as the NS records in the new Azure DNS Zone for the domain.
👻 Deploy the virtual network#

./deployment/secure_research_environment/setup
PS> ./Setup_SRE_Networking.ps1 -shmId <SHM ID> -sreId <SRE ID>
where
<SHM ID>is the management environment ID for this SHMwhere
<SRE ID>is the secure research environment ID for this SRE
Note
The VNet peerings may take a few minutes to provision after the script completes.
5. 💾 Deploy storage accounts#

./deployment/secure_research_environment/setup
PS> ./Setup_SRE_Storage_Accounts.ps1 -shmId <SHM ID> -sreId <SRE ID>
where
<SHM ID>is the management environment ID for this SHMwhere
<SRE ID>is the secure research environment ID for this SRE
This script will create a storage account in the RG_SHM_<shmId>_DATA_PERSISTENT resource group, a corresponding private end point in RG_SRE_NETWORKING and will configure the DNS zone of the storage account to the right IP address.
6. 📡 Deploy remote desktop#
🐠 Deploy the remote desktop servers#

./deployment/secure_research_environment/setup
PS> ./Setup_SRE_Remote_Desktop.ps1 -shmId <SHM ID> -sreId <SRE ID>
where
<SHM ID>is the management environment ID for this SHMwhere
<SRE ID>is the secure research environment ID for this SRE
Error
If you encounter errors with the deployment of the remote desktop servers, re-running Setup_SRE_Remote_Desktop.ps1 should fix them.
If this does not work, please try deleting everything that has been deployed into the RG_SHM_<SHM ID>_SRE_<SRE ID>_REMOTE_DESKTOP resource group for this SRE and attempt to run this step again.
📡 Configure RDS webclient#

Navigate to the RDS Gateway VM in the portal at
Resource Groups > RG_SHM_<SHM ID>_SRE_<SRE ID>_REMOTE_DESKTOP > RDG-SRE-<SRE ID>and note thePrivate IP addressfor this VMLog into the RDS Gateway (
RDG-SRE-<SRE ID>) VM using thisprivate IP addresstogether with the same<admin login>and<admin password>that you used to log into the SHM domain controller.Run the following command on the RDS VM to configure the remote desktop environment
PS> C:\Installation\Deploy_RDS_Environment.ps1
Caution
This script cannot be run remotely since remote Powershell runs as a local admin but this script has to be run as a domain admin.
Error
when deploying on Windows, the SHM VPN needs to be redownloaded/reconfigured each time an SRE is deployed.
Otherwise, there may be difficulties connecting to the RDS Gateway.
🔐 Secure RDS webclient#

./deployment/secure_research_environment/setup
PS> ./Secure_SRE_Remote_Desktop_Gateway.ps1 -shmId <SHM ID> -sreId <SRE ID>
where
<SHM ID>is the management environment ID for this SHMwhere
<SRE ID>is the secure research environment ID for this SRE
This will perform the following actions, which can be run individually if desired:
Disable insecure TLS connections#
Details
./deployment/secure_research_environment/setup
PS> ./Disable_Legacy_TLS.ps1 -shmId <SHM ID> -sreId <SRE ID>
where
<SHM ID>is the management environment ID for this SHMwhere
<SRE ID>is the secure research environment ID for this SRE
Tip
If additional TLS protocols become available (or existing ones are found to be insecure) during the lifetime of the SRE, then you can re-run ./Disable_Legacy_TLS.ps1 to update the list of accepted protocols
Configure RDS CAP and RAP settings#
Details
./deployment/secure_research_environment/setup
PS> ./Configure_SRE_RDS_CAP_And_RAP.ps1 -shmId <SHM ID> -sreId <SRE ID>
where
<SHM ID>is the management environment ID for this SHMwhere
<SRE ID>is the secure research environment ID for this SRE
Update SSL certificate#
Details
./deployment/secure_research_environment/setup
PS> ./Update_SRE_RDS_SSL_Certificate.ps1 -shmId <SHM ID> -sreId <SRE ID> -emailAddress <email>
where
<SHM ID>is the management environment ID for this SHMwhere
<SRE ID>is the secure research environment ID for this SREwhere
<email>is an email address that you want to be notified when certificates are close to expiry
Tip
./Update_SRE_RDS_SSL_Certificate.ps1 should be run again whenever you want to update the certificate for this SRE.
Caution
Let's Encrypt will only issue 5 certificates per week for a particular host (e.g. rdg-sre-sandbox.project.turingsafehaven.ac.uk).
To reduce the number of calls to Let's Encrypt, the signed certificates are stored in the Key Vault for easy redeployment.
For production environments this should usually not be an issue.
Important
If you find yourself frequently redeploying a test environment and hit the Let's Encrypt certificate limit, you can can use:
> ./Update_SRE_RDS_SSL_Certificate.ps1 -dryRun $true
to use the Let's Encrypt staging server, which will issue certificates more frequently.
These certificates will not be trusted by your browser, and so should not be used in production.
🚴 Verify non-privileged user account is set up#
These steps ensure that you have created a non-privileged user account that you can use for testing. You must ensure that you have assigned a licence to this user in the Azure Active Directory so that MFA will work correctly.
You should have already set up a non-privileged user account upon setting up the SHM, when validating the active directory synchronisation, but you may wish to set up another or verify that you have set one up already:
Set up a non-privileged user account

Log into the SHM primary domain controller (
DC1-SHM-<SHM ID>) VM using the connection details that you previously used to log into this VM.Follow the user creation instructions from the SHM deployment guide (everything under the
Validate Active Directory synchronisationheader). In brief these involve:adding your details (ie. your first name, last name, phone number etc.) to a user details CSV file.
running
C:\Installation\CreateUsers.ps1 <path_to_user_details_file>in a Powershell command window with elevated privileges.
This will create a user in the local Active Directory on the SHM domain controller and start the process of synchronisation to the Azure Active Directory, which will take around 5 minutes.
Ensure that your non-privileged user account is in the correct Security Group
Log into the SHM primary domain controller (
DC1-SHM-<SHM ID>) VM using the connection details that you previously used to log into this VM.In Server Manager click
Tools > Active Directory Users and ComputersIn
Active Directory Users and Computers, expand the domain in the left hand panel clickSafe Haven Security GroupsRight click the
SG <SRE ID> Research Userssecurity group and selectPropertiesClick on the
Memberstab.If your user is not already listed here you must add them to the group
Click the
AddbuttonEnter the start of your username and click
Check namesSelect your username and click
OkClick
Okagain to exit theAdd usersdialogue
Synchronise with Azure Active Directory by running following the
Powershellcommand on the SHM primary domain controller
PS> C:\Installation\Run_ADSync.ps1
🔐 Ensure that your non-privileged user account has MFA enabled#
Switch to your custom Azure Active Directory in the Azure portal and make the following checks:

From the Azure portal, navigate to the AAD you have created.
The
Usage Locationmust be set in Azure Active Directory (should be automatically synchronised from the local Active Directory if it was correctly set there)Navigate to
Azure Active Directory > Manage / Users > (user account), and ensure thatSettings > Usage Locationis set.
A licence must be assigned to the user.
Navigate to
Azure Active Directory > Manage / Users > (user account) > Licensesand verify that a license is assigned and the appropriate MFA service enabled.
To complete the account setup, follow the instructions for password and MFA setup present in the user guide.
🔩 Test the Microsoft RDS remote desktop#
Launch a local web browser on your deployment machine and go to
https://<SRE ID>.<safe haven domain>and log in with the user name and password you set up for the non-privileged user account.For example for
<safe haven domain> = project.turingsafehaven.ac.ukand<SRE ID> = sandboxthis would behttps://sandbox.project.turingsafehaven.ac.uk/
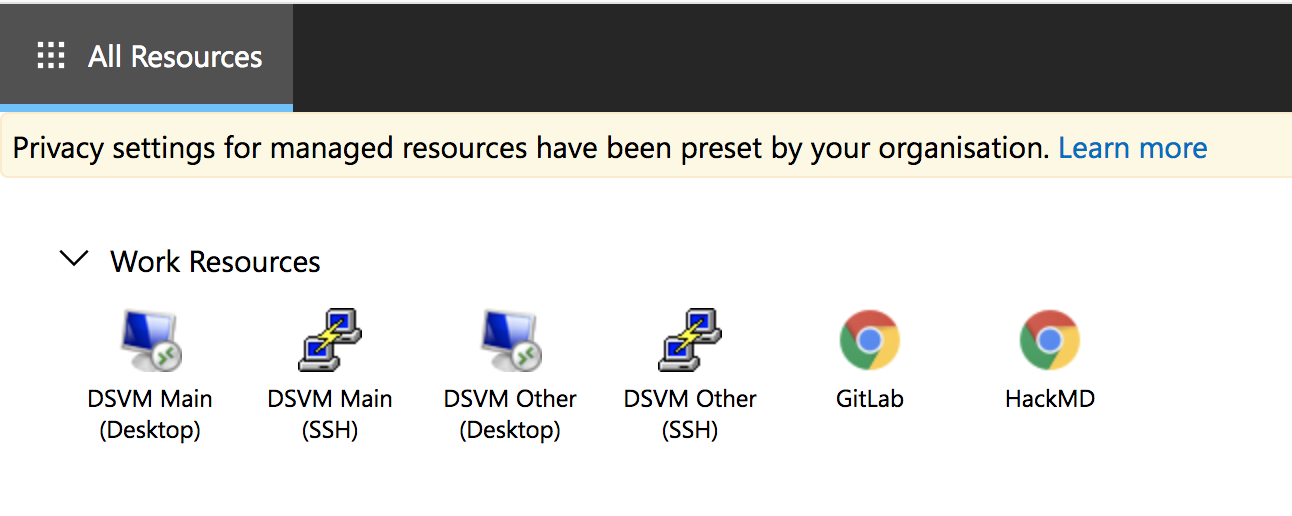
You should see a screen like the following. If you do not, follow the troubleshooting instructions below.
Important
Ensure that you are connecting from one of the permitted IP ranges specified in the inboundAccessFrom section of the SRE config file.
For example, if you have authorised a corporate VPN, check that you have correctly configured you client to connect to it.
Note
Clicking on the apps will not work until the other servers have been deployed.
Error
If you get a 404 resource not found error when accessing the webclient URL, it is likely that the RDS webclient failed to install correctly.
Go back to the previous section and rerun the
C:\Installation\Deploy_RDS_Environment.ps1script on the RDS gateway.After doing this, follow the instructions to configure RDS CAP and RAP settings and to update the SSL certificate.
Error
If you get an unexpected server authentication certificate error , your browser has probably cached a previous certificate for this domain.
Do a hard reload of the page (permanent fix)
OR open a new private / incognito browser window and visit the page.
Error
If you can see an empty screen with Work resources but no app icons, your user has not been correctly added to the security group.
Ensure that the user you have logged in with is a member of the
SG <SRE ID> Research Usersgroup on the domain controller
7. ❄️ Deploy web applications (CoCalc, CodiMD and GitLab)#
./deployment/secure_research_environment/setup
PS> ./Setup_SRE_WebApp_Servers.ps1 -shmId <SHM ID> -sreId <SRE ID>
where
<SHM ID>is the management environment ID for this SHMwhere
<SRE ID>is the secure research environment ID for this SRE
🔬 Test CoCalc, CodiMD and GitLab servers#
Launch a local web browser on your deployment machine and go to
https://<SRE ID>.<safe haven domain>and log in with the user name and password you set up for the non-privileged user account.for example for
<safe haven domain> = project.turingsafehaven.ac.ukand<SRE ID> = sandboxthis would behttps://sandbox.project.turingsafehaven.ac.uk/
Test
CoCalcby clicking on theCoCalcapp icon.You should receive an MFA request to your phone or authentication app.
Once you have approved the sign in, you should see a Chrome window with the CoCalc login page.
You will get a warning about a
Potential Security Riskrelated to a self-signed certificate. It is safe to trust this by selectingAdvanced > Accept the risk and continue.Create a new username and password and use this to log in.
Test
CodiMDby clicking on theCodiMDapp icon.You should receive an MFA request to your phone or authentication app.
Once you have approved the sign in, you should see a Chrome window with the GitLab login page.
Log in with the short-form
usernameof a user in theSG <SRE ID> Research Userssecurity group.
Test
GitLabby clicking on theGitLabapp icon.You should receive an MFA request to your phone or authentication app.
Once you have approved the sign in, you should see a Chrome window with the GitLab login page.
Log in with the short-form
usernameof a user in theSG <SRE ID> Research Userssecurity group.
If you do not get an MFA prompt or you cannot connect to one of the servers, follow the troubleshooting instructions below.
Error
If you can log in to the initial webclient authentication but do not get the MFA request, then the issue is likely that the configuration of the connection between the SHM NPS server and the RDS Gateway server is not correct.
In order to diagnose whether this is an issue with the NPS settings or the MFA connection, run the diagnostic script on the NPS server at C:\Installation\MFA_NPS_Troubleshooter.ps1 and follow the instructions there.
If the “Checking if Azure MFA SPN exists” test fails, then run C:\Installation\Ensure_MFA_SP_AAD.ps1 to restore it.
Error
If running the previous script did not help to diagnose the issue then try the following:
Ensure that both the SHM NPS server and the RDS Gateway are running
Follow the instructions to configure RDS CAP and RAP settings to reset the configuration of the RDS gateway and NPS VMs.
Ensure that the default UDP ports
1812,1813,1645and1646are all open on the SHM NPS network security group (NSG_SHM_SUBNET_IDENTITY). This documentation gives further details.
Error
If this does not resolve the issue, trying checking the Windows event logs
Use
Event Vieweron the SRE RDS Gateway (Custom views > Server roles > Network Policy and Access Services) to check whether the NPS server is contactable and whether it is discarding requestsUse
Event Vieweron the SHM NPS server (Custom views > Server roles > Network Policy and Access Services) to check whether NPS requests are being received and whether the NPS server has an LDAP connection to the SHM DC.Ensure that the requests are being received from the private IP address of the RDS Gateway and not its public one.
One common error on the NPS server is
A RADIUS message was received from the invalid RADIUS client IP address x.x.x.x. This help page might be useful.This may indicate that the NPS server could not join the SHM domain. Try
ping DC1-SHM-<SHM ID>from the NPS server and if this does not resolve, try rebooting it.
Ensure that the
Windows Firewallis set toDomain Networkon both the SHM NPS server and the SRE RDS Gateway
Error
If you get a We couldn't connect to the gateway because of an error message, it’s likely that the Remote RADIUS Server authentication timeouts have not been set correctly.
Follow the instructions to configure RDS CAP and RAP settings to reset the authentication timeouts on the RDS gateway.
Error
If you get multiple MFA requests with no change in the Opening ports message, it may be that the shared RADIUS secret does not match on the SHM server and SRE RDS Gateway.
Follow the instructions to configure RDS CAP and RAP settings to reset the secret on both the RDS gateway and NPS VMs.
Alternatively, this can happen if the NPS secret stored in the Key Vault is too long. We found that a 20 character secret caused problems but the (default) 12 character secret works.
Error
Should there be any issues using the web apps (e.g. unable to log in, or log in page not appearing) you can inspect the build log and access the console for the relevant VMs following the guide for System Managers
8. ⚾ Deploy databases#

./deployment/secure_research_environment/setup
PS> ./Setup_SRE_Databases.ps1 -shmId <SHM ID> -sreId <SRE ID>
where
<SHM ID>is the management environment ID for this SHMwhere
<SRE ID>is the secure research environment ID for this SRE
This will deploy any databases that you specified in the core config file. The time taken will depend on which (if any) databases you chose.
Important
The deployment of an
MS-SQLdatabase will take around 60 minutes to complete.The deployment of a
PostgreSQLdatabase will take around 10 minutes to complete.
9. 💻 Deploy secure research desktops (SRDs)#
./deployment/secure_research_environment/setup
PS> ./Add_Single_SRD.ps1 -shmId <SHM ID> -sreId <SRE ID> -ipLastOctet <IP last octet> [-vmSize <VM size>]
where
<SHM ID>is the management environment ID for this SHMwhere
<SRE ID>is the secure research environment ID for this SREwhere
<IP last octet>is last octet of the IP address[optional] where
<VM size>is the Azure VM size for this SRD
This will deploy a new SRD into the SRE environment.
Tip
If this SRE needs additional software or settings that are not in your default VM image, you can create a custom cloud init file on your deployment machine.
By default, SRD deployments will use the
cloud-init-srd.mustache.yamlconfiguration file in thedeployment/secure_research_environment/cloud_init/folder. This does all the necessary steps to configure the VM to work with LDAP.If you require additional steps to be taken at deploy time while the VM still has access to the internet (e.g. to install some additional project-specific software), copy the default cloud init file to a file named
cloud-init-srd-shm-<SHM ID>-sre-<SRE ID>.mustache.yamlin the same folder and add any additional required steps in theSRE-SPECIFIC COMMANDSblock marked with comments.
Alan Turing Institute default
CPU-based VMs are deployed with the next unused last octet in the range
160to179GPU-based VMs are deployed with the next unused last octet in the range
180and199
Hint
If desired, you can also provide a VM size by passing the optional -vmSize parameter.
If you want to deploy several SRDs, simply repeat the above steps with a different IP address last octet.
Important
The initial shared SRD Main shared VM should be deployed with the last octet 160 as the dashboard is hard-coded to expect this.
10. 🔒 Apply network configuration#
./deployment/secure_research_environment/setup
PS> ./Apply_SRE_Network_Configuration.ps1 -shmId <SHM ID> -sreId <SRE ID>
where
<SHM ID>is the management environment ID for this SHMwhere
<SRE ID>is the secure research environment ID for this SRE
This will apply the locked-down network settings which will restrict access into/out of this SRE.
11. 🚒 Configure firewall#
./deployment/secure_research_environment/setup
PS> ./Setup_SRE_Firewall.ps1 -shmId <SHM ID> -sreId <SRE ID>
where
<SHM ID>is the management environment ID for this SHMwhere
<SRE ID>is the secure research environment ID for this SRE
12. 📈 Configure logging#

./deployment/secure_research_environment/setup
PS> ./Setup_SRE_Monitoring.ps1 -shmId <SHM ID> -sreId <SRE ID>
where
<SHM ID>is the management environment ID for this SHMwhere
<SRE ID>is the secure research environment ID for this SRE
Error
As installing the logging agent can take several minutes, it is possible that some of the commands run in this script might time out. The script should automatically retry any that fail, if you see any failure messages, please re-run:
PS> ./Setup_SRE_Monitoring.ps1 -shmId $shmId -sreId $sreId
this will attempt to install the extensions again, skipping any VMs that already have the extensions installed.
13. ↔️ Enable backup#
./deployment/secure_research_environment/setup
PS> ./Setup_SRE_Backup.ps1 -shmId <SHM ID> -sreId <SRE ID>
where
<SHM ID>is the management environment ID for this SHMwhere
<SRE ID>is the secure research environment ID for this SRE
This will enable regular backups for the persistent data storage accounts, both ingress and egress data.
14. 🔥 Run smoke tests on SRD#
These tests should be run after the network lock down and peering the SRE and package mirror VNets. They are automatically uploaded to the SRD during the deployment step.
Use the remote desktop interface at
https://<SRE ID>.<safe haven domain>to log in to the SRD (SRE-<SRE ID>-<IP last octet>-<version number>) that you have deployed using the scripts aboveOpen a terminal session
Enter the test directory using
cd /opt/testsRun
bats run_all_tests.bats:if any of the tests fail, check the
README.mdin this folder for help in diagnosing the issues
Copy
tests/test_jupyter.ipynbto your home directoryactivate each of the available Python versions in turn
run
jupyter notebookin each case and check that you can run the notebook and that all versions and paths match throughout. See Available Python Versions.